Use of the I2C 2X16 LCD display by the Arduino UNO board
Tutorial plan
1- What is the I2C 2X16 LCD display ?
2- How Arduino board displays text in I2C 2X16 LCD display?
3- The necessary components use the I2C 2X16 LCD display by the Arduino card
4- Arduino board wiring diagram with I2C LCD display
5- Programming the Arduino board to display text in the I2C 2X16 LCD display
What is the I2C 2X16 LCD display ?
The I2C 2x16 LCD display is a type of liquid crystal display (LCD) with the capability to display 2 lines of 16 characters each. It uses the I2C (Inter-Integrated Circuit) communication protocol for data transfer, which simplifies the wiring and reduces the number of pins needed to connect it to a microcontroller or development board.
This display module typically includes an I2C backpack or module that acts as an interface between the LCD screen and the microcontroller, allowing for easy communication via the I2C protocol.
The "2x16" specification means it has 2 lines, each capable of displaying up to 16 characters. These displays are commonly used in various electronic projects, allowing users to showcase information such as sensor readings, messages, system statuses, or any data that fits within the character limits.
The I2C capability enables these displays to be easily integrated into projects using microcontrollers like Arduino, Raspberry Pi, or other development boards supporting I2C communication. It simplifies the wiring and makes it convenient to display information without consuming too many digital pins on the controlling device.
How Arduino board displays text in I2C 2X16 LCD display ?
Arduino boards can display text on displays, such as LCDs (Liquid Crystal Displays), using specific libraries and commands that interact with the display's hardware. The process involves initializing the display, positioning the cursor, and sending text or commands to the display. Here's a general overview of the steps involved:
1- Library Inclusion:
To communicate with a specific display, you typically need a dedicated library. For instance, for an LCD display, the LiquidCrystal library is commonly used.
Include the necessary library at the beginning of your Arduino sketch to enable communication with the display.
2- Initializing the Display:
Set up the pin connections between the Arduino board and the display. Different displays require specific connections.
Initialize the display in the setup() function of your Arduino sketch. This involves specifying the dimensions of the display (number of columns and rows) and initializing it for communication.
3- Displaying Text:
Use commands provided by the library to control the display. For instance, you can position the cursor, clear the display, write text, etc.
Common functions/methods include:
1- lcd.begin(columns, rows): Initializes the LCD with the specified columns and rows.
2- lcd.setCursor(column, row): Positions the cursor at the specified column and row.
3- lcd.print("Your text here"): Writes text to the display at the current cursor position.
4- lcd.clear(): Clears the display.
Other commands specific to the library or the display you're using.
4- Sending Data to the Display:
Write the necessary code in the loop() function or elsewhere in your sketch to control what text or information gets displayed.
Use the provided functions/methods to position the cursor and print text as required by your application logic.
The necessary components use the I2C 2X16 LCD display by the Arduino card
To use an I2C 2x16 LCD display with an Arduino, you'll need the following components:
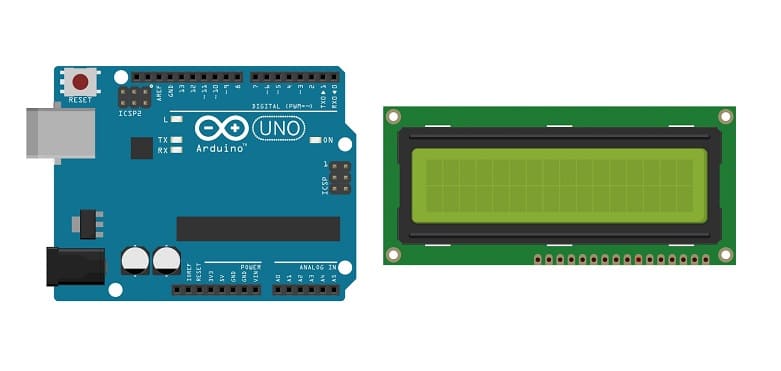
Arduino UNO Board:

The Arduino Uno is a popular and versatile microcontroller board that's widely used in various electronics projects.
I2C 2x16 LCD Display:

The specific display module that includes the LCD screen and the I2C interface. This module usually has an I2C backpack or module built-in to communicate via I2C.
Jumper Wires:

To make the physical connections between the components.
Arduino board wiring diagram with I2C LCD display
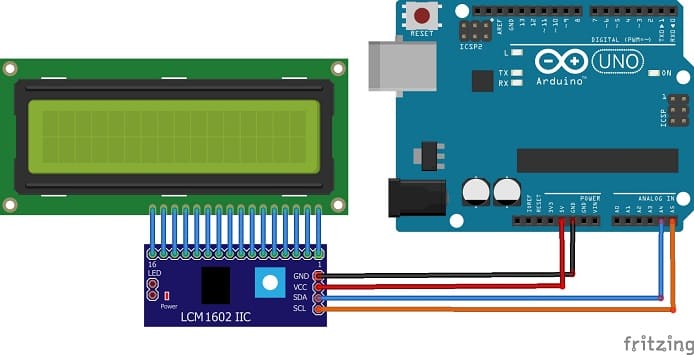
Connect the I2C 2x16 LCD Display to your Arduino as follows:
1- Display SDA to Arduino SDA: Connect the SDA (data line) of the display to the corresponding SDA pin on the Arduino (A4 on Arduino Uno).
2- Display SCL to Arduino SCL: Connect the SCL (clock line) of the display to the corresponding SCL pin on the Arduino (A5 on Arduino Uno).
3- Display VCC to Arduino 5V: Connect the VCC pin of the display to the 5V pin on the Arduino.
4- Display GND to Arduino GND: Connect the GND pin of the display to any GND pin on the Arduino for the ground connection.
Programming the Arduino board to display text in the I2C 2X16 LCD display
Here's a basic example to display text on the I2C 2x16 LCD using the "LiquidCrystal_I2C" library:
|
1 2 3 4 5 6 7 8 9 10 11 12 13 14 15 16 17 18 19 20 21 22 23 24 25 |
#include <LiquidCrystal_I2C.h> // Create an object for the LCD LiquidCrystal_I2C lcd(0x27, 20, 4); void setup() { lcd.init(); // Initialize the LCD } void loop() { lcd.backlight(); // Turn on the backlight lcd.clear(); lcd.setCursor(0, 0); // Set cursor to the start of line 1 lcd.print("Hello"); // Print "Hello" on the LCD lcd.setCursor(0,1); // Set cursor to the start of line 2 lcd.print("LCD Display"); // Print "LCD Display" on the LCD delay(2000); lcd.clear(); lcd.setCursor(0, 0); // Set cursor to the start of line 1 lcd.print("connected to"); // Print "connected to" on the LCD lcd.setCursor(0,1); // Set cursor to the start of line 2 lcd.print("Arduino UNO"); // Print "Arduino UNO" on the LCD delay(2000); } |
Upload the code to your Arduino Uno.
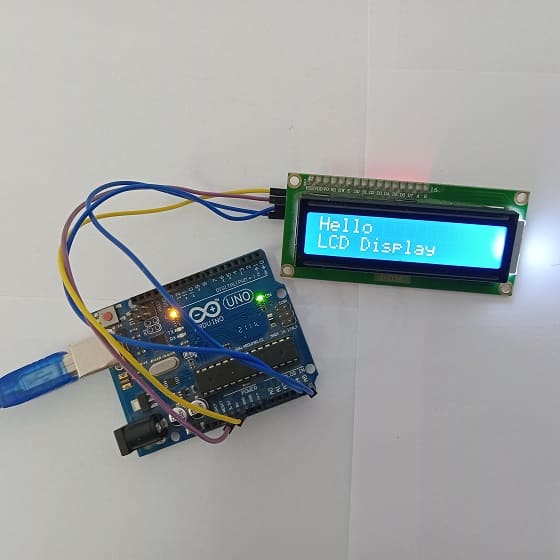
1- This code initializes the LCD and turns on the backlight
2- It positions the cursor at the beginning of the first row, and prints "Hello" on the LCD.
3- It positions the cursor at the beginning of the second row, and prints "LCD Display" on the LCD.
4- It deletes the text int the display
5- It positions the cursor at the beginning of the first row, and prints "connected to" on the LCD.
6- It positions the cursor at the beginning of the second row, and prints "Arduino UNO" on the LCD.
7- It deletes the text int the display
8-The program returns to step 1

Passion for robotics

Recent tutorials


Robotics workshop

Polpular tutorials


Making robots

Most commented tutorials


Robotic arm

Categories
Smart Home