Turn on RGB LED module connected to ESP32 board via WIFI
1- The ESP32 board and WIFI
2- The webserver with the ESP32 card
3- Role of boot.py and main.py files in ESP32 board
4- The components needed to use RGB LED module with the ESP32 board
5- Mounting the ESP32 board with RGB LED module
6- Micropython programming of the ESP32 card to turn on the RGB LED module via WIFI
The ESP32 board and WIFI
The ESP32 board is a popular microcontroller board that features built-in Wi-Fi connectivity, among other capabilities. Here's how the ESP32 board is related to Wi-Fi:
Built-in Wi-Fi Module: The ESP32 microcontroller has a built-in Wi-Fi module, which means it can connect to Wi-Fi networks without the need for additional hardware. This makes it an ideal choice for Internet of Things (IoT) applications where you want to connect your devices to the internet or a local network wirelessly.
802.11 Standards: The ESP32 supports various Wi-Fi standards, including 802.11 b/g/n, which are commonly used for wireless communications. This ensures compatibility with a wide range of Wi-Fi networks, both in homes and commercial settings.
Software Wi-Fi Stack: The ESP32 comes with a comprehensive software Wi-Fi stack that simplifies the configuration and management of Wi-Fi connections. This stack provides libraries and functions for setting up and managing Wi-Fi connections, as well as sending and receiving data over Wi-Fi.
Access Point Mode: The ESP32 can operate in access point (AP) mode, allowing it to create its own Wi-Fi network to which other devices can connect. This can be useful for creating configurations or settings interfaces for other devices.
Security: The ESP32 supports various Wi-Fi security methods, including WPA2-PSK and WPA2-Enterprise, to ensure secure wireless communication.
IoT Connectivity: With its built-in Wi-Fi, the ESP32 is a popular choice for building IoT devices that can send and receive data over the internet or local network. It can interact with cloud services, IoT platforms, and other devices on the same network.
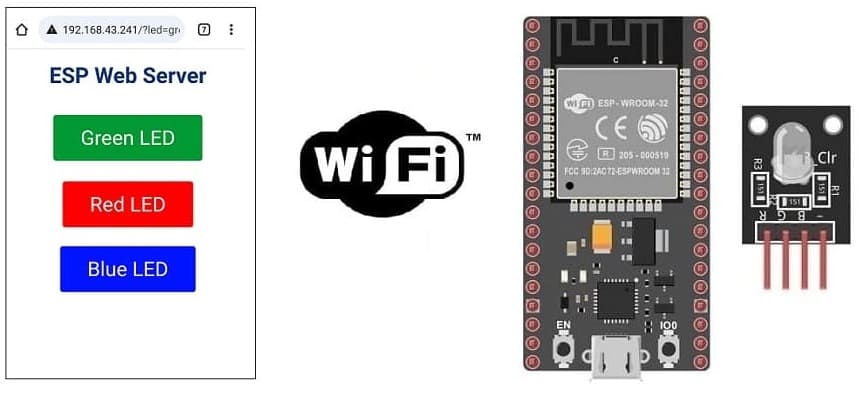
The webserver with the ESP32 card
Creating a web server with an ESP32 board involves setting up an HTTP server on the ESP32, which can respond to HTTP requests and serve web pages or provide control interfaces. Here's a basic example using Arduino and the ESPAsyncWebServer library, which makes it relatively easy to set up a web server on the ESP32:
1- Install MicroPython on Your ESP32: ensure you have MicroPython installed on your ESP32 board. You can use tools like esptool to flash MicroPython onto your ESP32. Make sure your ESP32 is connected to your computer via a USB-to-serial adapter.
2- Access the MicroPython REPL: connect to your ESP32's MicroPython REPL (Read-Eval-Print Loop) using a terminal emulator (e.g., PuTTY, screen, or minicom) to interact with your board.
3- Upload the Web Server Code: write or copy your MicroPython web server code into a text file (e.g., main.py) and upload it to your ESP32 using ampy, a tool for interacting with MicroPython boards over a serial connection. The code provided below is a basic example of a web server in MicroPython:
|
1 2 3 4 5 6 7 8 9 10 11 12 13 14 15 16 17 18 19 20 21 22 23 24 25 26 27 28 29 30 31 32 |
import network import socket ssid = "YourWiFiSSID" password = "YourWiFiPassword" html = """HTTP/1.0 200 OK\r\n\r\nHello, ESP32!""" ap = network.WLAN(network.AP_IF) ap.active(False) sta = network.WLAN(network.STA_IF) sta.active(True) sta.connect(ssid, password) while not sta.isconnected(): pass print("Connected to WiFi") s = socket.socket(socket.AF_INET, socket.SOCK_STREAM) s.bind(('', 80)) s.listen(5) print("Listening on port 80...") while True: conn, addr = s.accept() request = conn.recv(1024) print(request) conn.send(html) conn.close() |
4- Access the Web Interface: once you've uploaded the code, your ESP32 will start a web server. You can access the web interface by entering the ESP32's IP address in a web browser. The IP address will be assigned by your router.
Example: http://ESP32_IP_ADDRESS/
Role of boot.py and main.py files in ESP32 board
In an ESP32 board running MicroPython, the boot.py> and main.py files serve specific roles in the boot process and the execution of user code. Here's a brief explanation of each file:
1-boot.py:
- Role: The boot.py file is executed at boot time, specifically during the MicroPython boot sequence. It contains code that is executed immediately after the ESP32 board is powered on or reset.
- Typical Usage:
Setting up configuration options like Wi-Fi credentials.
Initializing hardware or peripherals that should be available as soon as the board starts.
Customizing the boot process, such as setting up specific logging or system-wide settings.
When the ESP32 boots, it first executes the boot.py file. After the boot.py execution, the ESP32 then proceeds to execute the main.py file, if it exists.
2- main.py:
- Role: The main.py file contains the main user code or application logic that you want the ESP32 to run. It is executed after the boot.py during the boot process. If the main.py file is present, it will be executed automatically on boot. If the main.py file does not exist, the board will still boot normally.
- Typical Usage:
Implementing your project's functionality, which could include tasks such as reading sensors, controlling actuators, communicating with other devices, or running a web server.
Structuring your MicroPython code and organizing it into functions, classes, and modules.
Implementing your custom application logic.
It's important to note that the main.py file contains the entry point for your application code, and it will continue running until it completes or the board is reset.
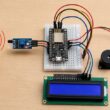
The components needed to use RGB LED module with the ESP32 board
To control the RGB LED module using the ESP32 board, you will need the following components:
ESP32 board :
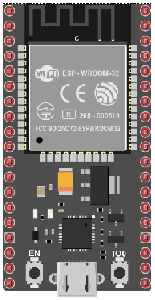
The ESP32 is a popular and versatile microcontroller board that is widely used in the field of embedded systems and Internet of Things (IoT) development. It is developed by Espressif Systems and is part of the ESP (Espressif) series of microcontrollers.
RGB LED Module:
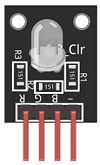
This module contains a red, green, and blue LED, allowing you to produce various colors by controlling the intensity of each color component.
Breadboard:

A breadboard is a prototyping board that allows you to build circuits without soldering. It provides a convenient way to connect the components together.
Jumper Wires:

You'll need jumper wires to make connections between the ESP32 board, RGB LED module and breadboard.
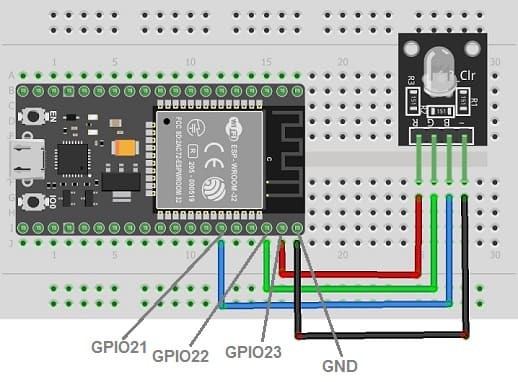
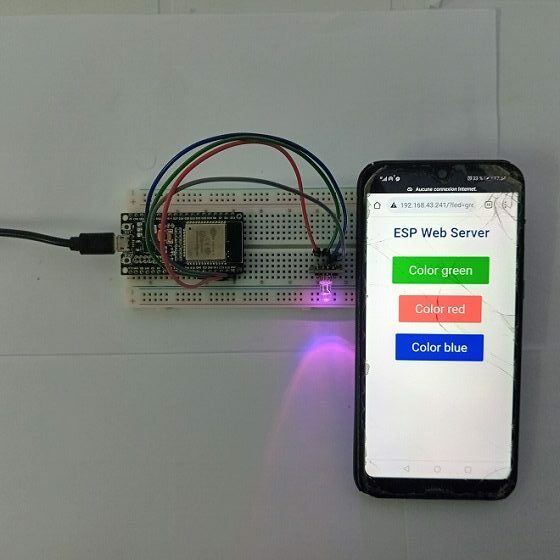
Mounting the ESP32 board with RGB LED module
Once you have the necessary components, you can proceed with the following steps to control the RGB LED module:
1- Connect pin R (red) of RGB LED module to GPIO23 of the ESP32 board
2- Connect pin G (green) of RGB LED module to GPIO22 of the ESP32 board
3- Connect pin B (blue) of RGB LED module to GPIO21 of the ESP32 board
4- Connect pin GND of RGB LED module to pin GND of the ESP32 board
Micropython programming of the ESP32 card to turn on the RGB LED module via WIFI
To control an RGB LED module via Wi-Fi on an ESP32 board running MicroPython, you can use a web server approach similar to what was discussed earlier. You'll create a web server that allows you to send HTTP requests to control the RGB LED. Here's a step-by-step guide:
1- Set Up Your ESP32 with MicroPython: ensure you have MicroPython installed on your ESP32 board. You may need to use tools like esptool to flash MicroPython onto your ESP32. Make sure your ESP32 is connected to your computer via a USB-to-serial adapter.
2- Create boot.py: in your MicroPython project directory, create a boot.py file to handle your Wi-Fi connection and any other necessary configurations. Here's an example of a boot.py that connects your ESP32 to Wi-Fi:
|
1 2 3 4 5 6 7 8 9 10 11 12 13 14 15 16 17 18 19 20 21 22 23 24 25 26 27 28 29 30 31 32 33 |
# Complete project details at https://RandomNerdTutorials.com try: import usocket as socket except: import socket from machine import Pin import network import esp esp.osdebug(None) import gc gc.collect() ssid = 'HUAWEI Y5 2019' password = 'b582058c4d86' station = network.WLAN(network.STA_IF) station.active(True) station.connect(ssid, password) while station.isconnected() == False: pass print('Connection successful') print(station.ifconfig()) red_led = Pin(23, Pin.OUT) green_led = Pin(22, Pin.OUT) blue_led=Pin(21,Pin.OUT) |
3- Create main.py:
Create a main.py file to control the RGB LED by sending commands over Wi-Fi. For this example, we'll create a simple HTTP server that listens for commands to change the LED color.
|
1 2 3 4 5 6 7 8 9 10 11 12 13 14 15 16 17 18 19 20 21 22 23 24 25 26 27 28 29 30 31 32 33 34 35 36 37 38 39 40 41 42 43 44 45 46 47 48 49 50 51 52 53 54 55 56 57 58 59 60 61 62 63 |
def web_page(): html = """<html><head> <title>ESP Web Server</title> <meta name="viewport" content="width=device-width, initial-scale=1"> <link rel="icon" href="data:,"> <style>html{font-family: Helvetica; display:inline-block; margin: 0px auto; text-align: center;} h1{color: #0F3376; padding: 2vh;}p{font-size: 1.5rem;}.button{display: inline-block; background-color: #009933; border: none; border-radius: 4px; color: white; padding: 16px 40px; text-decoration: none; font-size: 30px; margin: 2px; cursor: pointer;} .button2{background-color: #e7bd3b;} .button3{background-color: #ff0000;} .button4{background-color: #0014ff;}</style></head> <body> <h1>ESP Web Server</h1> <p><a href="/?led=green"><button class="button">Color green</button></a></p><p><a href="/?led=red"><button class="button button3">Color red</button></a></p><p><a href="/?led=blue"><button class="button button4">Color blue</button></a></p></body></html>""" return html s = socket.socket(socket.AF_INET, socket.SOCK_STREAM) s.bind(('', 80)) s.listen(5) red_on=0 green_on=0 blue_on=0 while True: conn, addr = s.accept() print('Got a connection from %s' % str(addr)) request = conn.recv(1024) request = str(request) print('Content = %s' % request) red = request.find('/?led=red') green = request.find('/?led=green') yellow = request.find('/?led=yellow') blue=request.find('/?led=blue') if red == 6: # if we press the red button if red_on==0: print('RED') red_led.value(1)#Turn on the red color of RGB LED module red_on=1 else: red_on=0 red_led.value(0)#Turn off the red color of RGB LED module if green == 6: # if we press the green button if green_on==0: print('green') green_led.value(1)#Turn on the green color of RGB LED module green_on=1 else: green_led.value(0)#Turn off the green color of RGB LED module green_on=0 if blue == 6: # if we press the blue button if blue_on==0: print('blue') blue_led.value(1)#Turn on the blue color of RGB LED module blue_on=1 else: blue_led.value(0)#Turn off the blue color of RGB LED module blue_on=0 response = web_page() conn.send('HTTP/1.1 200 OK\n') conn.send('Content-Type: text/html\n') conn.send('Connection: close\n\n') conn.sendall(response) conn.close() |
4- Send HTTP POST requests to control the LED to control the RGB LED, you can send HTTP POST requests to your ESP32's IP address.
0 comment
Leave a comment
Passion for robotics

Recent tutorials

Robotics workshop

Polpular tutorials


Making robots

Most commented tutorials


Robotic arm

Categories
Smart Home