The Sensor Shield V5.0
Definition of the Sensor Shield V5.0
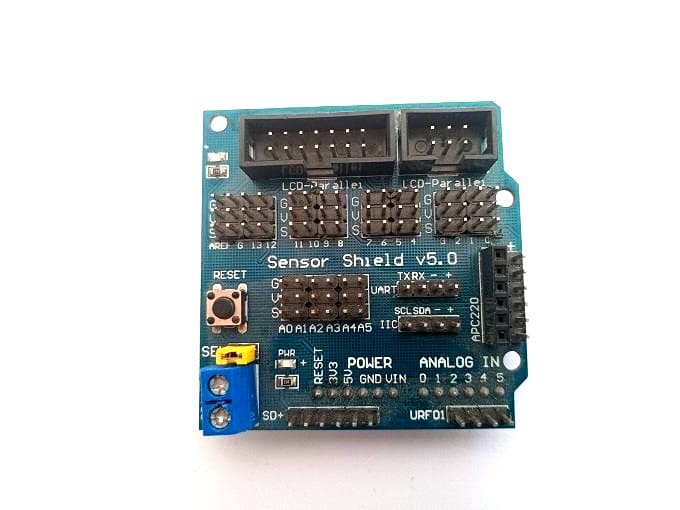
The Sensor Shield V5.0 is an extension board for Arduino microcontrollers that makes it easier to connect various sensors and actuators to the board. The shield has multiple pins and headers that allow easy connection to sensors such as temperature sensors, light sensors, sound sensors, and distance sensors, as well as actuators such as motors, servos, LEDs, and relays.
The Sensor Shield V5.0 is designed to work with Arduino Uno and compatible boards, and it has a compact and modular design that makes it easy to use in a variety of projects. It also comes with a convenient screw terminal for easy wiring and a reset button for quick resets.
One of the key benefits of using the Sensor Shield V5.0 is that it allows you to quickly prototype and test your ideas for projects involving sensors and actuators. You can easily connect multiple sensors and actuators to your Arduino board without worrying about the wiring or the complexity of the connections.
Another advantage of the Sensor Shield V5.0 is that it can help you save time and money. Instead of building your own custom circuit board, you can use the Sensor Shield V5.0 to quickly and easily connect your sensors and actuators to your Arduino board.
The components of the Sensor Shield V5.0
The Sensor Shield V5.0 has various components that allow it to interface with different types of sensors and actuators. Here are some of the key components of the Sensor Shield V5.0:
Input/output (I/O) pins: The shield has a series of I/O pins that allow you to connect sensors and actuators to your Arduino board.
Power pins: The shield has a series of power pins that allow you to provide power to your sensors and actuators. These include a 5V pin, a 3.3V pin, and ground pins.
Screw terminal: The shield has a convenient screw terminal that allows you to easily connect wires to the board without soldering.
Reset button: The shield has a reset button that allows you to quickly reset your Arduino board.
LED indicators: The shield has LED indicators that show the status of your Arduino board.
ICSP header: The shield has an ICSP (In-Circuit Serial Programming) header that allows you to program your Arduino board using a special programming tool.
Expansion headers: The shield has expansion headers that allow you to connect other shields or modules to your Arduino board.
Built-in voltage regulator: The shield has a built-in voltage regulator that ensures that the sensors and actuators receive a stable voltage.
Analog pins: The shield has analog pins that allow you to read analog signals from sensors such as temperature sensors, light sensors, and distance sensors.
Sensor Shield V5.0 pins
The Sensor Shield V5.0 has a variety of pins that allow you to connect sensors and actuators to your Arduino board. Here are the different types of pins available on the Sensor Shield V5.0:
Digital pins: The shield has a series of digital pins (D0-D13) that allow you to connect digital sensors and actuators such as LEDs, switches, and relays.
Analog pins: The shield has six analog pins (A0-A5) that allow you to read analog signals from sensors such as temperature sensors, light sensors, and distance sensors.
Power pins: The shield has a series of power pins including 5V, 3.3V, and ground pins. The 5V pin is used to power sensors and actuators that require a 5V power supply, while the 3.3V pin is used to power sensors and actuators that require a 3.3V power supply.
Reset button: The shield has a reset button that allows you to reset your Arduino board.
ICSP header: The shield has an ICSP (In-Circuit Serial Programming) header that allows you to program your Arduino board using a special programming tool.
Serial pins: The shield has two serial pins (TX and RX) that allow you to communicate with other devices using a serial protocol.
I2C pins: The shield has two I2C pins (SDA and SCL) that allow you to communicate with other devices using the I2C protocol.
SPI pins: The shield has four SPI pins (MISO, MOSI, SCK, and SS) that allow you to communicate with other devices using the SPI protocol.
PWM pins: The shield has six PWM (Pulse Width Modulation) pins that allow you to control the speed of motors or the brightness of LEDs.
The Sensor Shield V5.0 and servo motors
The Sensor Shield V5.0 is compatible with servo motors, which are commonly used in robotics projects to control the movement of arms, legs, and other mechanical components. The shield has six PWM (Pulse Width Modulation) pins (D3, D5, D6, D9, D10, and D11) that can be used to control up to six servo motors.
To use a servo motor with the Sensor Shield V5.0, you can connect the power and ground pins of the servo motor to the appropriate power and ground pins on the shield. Then, you can connect the signal pin of the servo motor to one of the PWM pins on the shield.
In your Arduino code, you can use the Servo library to control the position of the servo motor. You will first need to include the Servo library at the top of your code, like this:
|
1 |
#include <Servo.h> |
Then, you can create a Servo object and attach it to the PWM pin that you connected the signal pin of the servo motor to, like this:
|
1 2 3 4 5 6 |
Servo myservo; // create servo object to control a servo int servoPin = 9; // PWM pin that the servo is attached to void setup() { myservo.attach(servoPin); // attaches the servo on pin 9 to the servo object } |
You can then use the write() method of the Servo library to set the position of the servo motor. The write() method takes an angle between 0 and 180 degrees as its argument, and will move the servo motor to the corresponding position. For example, to move the servo motor to an angle of 90 degrees, you would use the following code:
|
1 |
myservo.write(90); // move servo to 90 degrees |
By controlling the position of the servo motor with your Arduino code, you can use the Sensor Shield V5.0 to control the movement of various mechanical components in your robotics project.
The Sensor Shield V5.0 and the Arduino UNO board
The Sensor Shield V5.0 is designed to be compatible with the Arduino UNO board. To use the Sensor Shield V5.0 with an Arduino UNO, you can simply stack the shield on top of the Arduino board. The pins on the shield will align with the pins on the Arduino board, allowing the two boards to communicate with each other.
Once the Sensor Shield V5.0 is connected to the Arduino UNO, you can use the shield's sensors and other components in your Arduino projects. The shield has a number of pins that are compatible with various sensors, including analog and digital inputs, I2C and SPI communication pins, and PWM pins for controlling servos and other devices.
To use the sensors and other components on the Sensor Shield V5.0, you will typically need to connect them to the appropriate pins on the shield. For example, if you wanted to use a temperature sensor with the shield, you would connect the power, ground, and signal pins of the sensor to the appropriate pins on the shield.
Once the sensor is connected, you can use the Arduino IDE to write code that reads data from the sensor and performs various actions based on that data. The Sensor Shield V5.0 also includes an integrated microSD card slot, which can be used to store data or log information from sensors in your project.
The role of the Sensor Shield V5.0 in building robots
The Sensor Shield V5.0 is a valuable tool for building robots, as it provides a convenient way to add a variety of sensors and other components to an Arduino-based robot project. Some of the ways that the Sensor Shield V5.0 can be used in robotics projects include:
Sensor input: The Sensor Shield V5.0 includes a variety of pins that can be used to connect sensors to your robot project. This makes it easy to add sensors such as ultrasonic sensors, temperature sensors, and light sensors to your robot, which can be used to detect and respond to its environment.
Servo control: The Sensor Shield V5.0 includes several PWM pins that can be used to control servos and other motors. This allows you to add moving parts to your robot, such as arms or wheels, and control their motion with precision.
Data logging: The Sensor Shield V5.0 includes an integrated microSD card slot, which can be used to log data from sensors in your robot project. This can be useful for tracking changes in the environment, or for recording the performance of your robot over time.
Communication: The Sensor Shield V5.0 includes several communication pins, such as I2C and SPI, which can be used to communicate with other devices or modules in your robot project. This can be useful for integrating different components, such as a GPS module or a wireless communication module, into your robot.
0 comment
Leave a comment
Passion for robotics

Recent tutorials


Robotics workshop

Polpular tutorials


Making robots

Most commented tutorials


Robotic arm

Categories
Smart Home