The Arduino UNO board

Arduino
01-05-23
1281
0
What is the Arduino UNO board ?
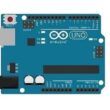
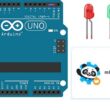
The Arduino UNO is a popular microcontroller board designed for DIY electronics projects. It is based on the Atmel ATmega328P microcontroller and has a variety of input and output pins that can be used to interface with sensors, actuators, and other electronic components.
The board includes a USB interface for programming and power supply, as well as a voltage regulator that allows it to be powered from a range of sources, including batteries.
The Arduino UNO board is popular among hobbyists and students because of its low cost, ease of use, and vast community support. It can be programmed using the Arduino IDE (Integrated Development Environment), which is available for free download on the Arduino website. The IDE uses a simplified version of the C++ programming language, making it accessible to beginners without prior programming experience.
The Arduino UNO board is widely used in various projects, including robotics, home automation, data logging, and more. Its versatility and simplicity make it a great tool for experimenting and learning about electronics and programming.
The components of the Arduino UNO board
The Arduino UNO board consists of several components that work together to provide a platform for building electronics projects. Here are the main components:
Microcontroller: The microcontroller on the Arduino UNO is an Atmel ATmega328P. It is the brain of the board and is responsible for executing the code that you upload to the board.
Input/output (I/O) pins: The Arduino UNO has 14 digital I/O pins and 6 analog input pins. These pins can be used to read inputs from sensors, control outputs such as LEDs and motors, and communicate with other devices using protocols such as SPI, I2C, and UART.
Power input: The Arduino UNO can be powered through the USB port or an external power supply connected to the DC jack. The board also has a voltage regulator that can regulate the input voltage to 5V, which is used to power the microcontroller and other components on the board.
Reset button: The reset button on the Arduino UNO can be used to restart the program running on the microcontroller.
Crystal oscillator: The crystal oscillator on the Arduino UNO provides a clock signal to the microcontroller, allowing it to accurately execute instructions and communicate with other devices.
USB interface: The USB interface on the Arduino UNO is used for programming the board and for serial communication with the computer.
LED indicators: The Arduino UNO has several LED indicators that provide feedback on the status of the board, including power, communication, and I/O activity.
The ports of the Arduino UNO board
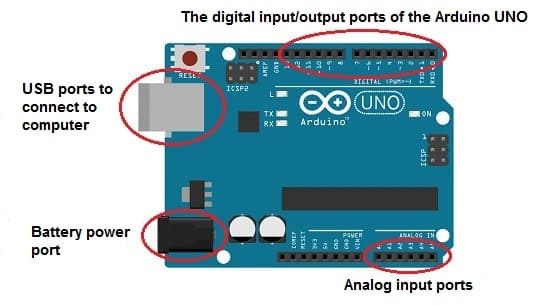
The Arduino UNO board has several ports that provide different types of input/output capabilities. Here are the main ports of the Arduino UNO:
Digital I/O ports: The Arduino UNO has 14 digital I/O ports, labeled from 0 to 13. These ports can be configured as either inputs or outputs using software. They can be used to read signals from sensors or switches, or to control outputs such as LEDs, motors, or relays.
Analog input ports: The Arduino UNO has 6 analog input ports, labeled A0 through A5. These ports can read analog signals from sensors such as light sensors, temperature sensors, or potentiometers. The analog signals are converted to a digital value by the built-in analog-to-digital converter (ADC) on the microcontroller.
Power port: The power port on the Arduino UNO is used to provide power to the board. It has a voltage range of 7-12V DC and is connected to a voltage regulator on the board that provides a stable 5V DC output.
USB port: The USB port on the Arduino UNO is used to communicate with a computer and to program the board. It provides a virtual serial port that can be used to send and receive data between the board and the computer.
ICSP port: The In-Circuit Serial Programming (ICSP) port on the Arduino UNO is used to program the microcontroller using a programmer or another Arduino board. It can also be used to burn a bootloader to the microcontroller.
Reset button: The reset button on the Arduino UNO is used to reset the microcontroller and restart the program running on the board.
 [/vc_column_text]
Programming the Arduino UNO board
Programming the Arduino UNO board is done using the Arduino Integrated Development Environment (IDE), which is a software tool used to write, compile, and upload code to the board. Here are the basic steps to program the Arduino UNO:
1- Download and install the Arduino IDE from the official website: https://www.arduino.cc/en/software. The IDE is available for Windows, macOS, and Linux. 
2- Connect the Arduino UNO board to your computer using a USB cable. The board should be recognized by the computer and the LED labeled "ON" should light up. 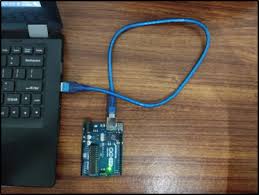
3- Open the Arduino IDE and select the correct board and serial port from the Tools menu. For the Arduino UNO board, select "Arduino UNO" as the board type and the appropriate serial port (usually the one labeled "Arduino UNO") under the Port menu. 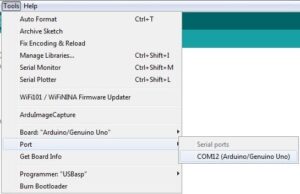
4- Write your code in the Arduino IDE using the C++ programming language. You can use the examples provided with the IDE or write your own code. 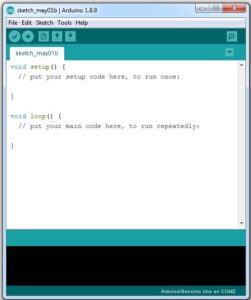
5- Verify and compile your code by clicking on the Verify button (checkmark icon). The IDE will check your code for errors and compile it into a binary file that can be uploaded to the board.
6- Upload your code to the Arduino UNO by clicking on the Upload button (right arrow icon). The IDE will compile your code (if necessary) and upload it to the board.
7- Monitor the serial output using the Serial Monitor tool in the IDE to debug your code and view output messages from the board.
With these steps, you should be able to write and upload code to your Arduino UNO board. There are also many resources available online, including tutorials, code examples, and forums, to help you learn more about programming the Arduino UNO.
The relationship between the Arduino UNO board and the sensors
The Arduino UNO board can be used with a wide range of sensors to detect various types of input, such as temperature, light, sound, motion, and more. The board provides input/output (I/O) ports that can be connected to the sensors, allowing the board to read data from the sensors and perform actions based on that data.
Here are the basic steps to use a sensor with the Arduino UNO board:
1- Identify the type of sensor you want to use and determine its electrical specifications, such as voltage and current requirements.
2- Connect the sensor to the appropriate input port on the Arduino UNO board. Depending on the type of sensor, you may need to use an analog or digital input port, and you may need to use additional components such as resistors or capacitors to ensure proper operation.
3- Write the code to read data from the sensor using the appropriate library or functions in the Arduino IDE. The code will typically involve configuring the input port, reading the data from the sensor, and processing the data as needed.
4- Use the data from the sensor to perform an action, such as controlling an output device like an LED or a motor, or sending data to a display or a remote device.
By following these steps, you can use the Arduino UNO board to interface with a wide range of sensors and create projects that sense and respond to the environment. There are many libraries and examples available in the Arduino community that can help you get started with using sensors with the Arduino UNO board.
The role of the Arduino UNO board in robotics
The Arduino UNO board plays a significant role in robotics as it can be used to control various components of a robot, such as motors, sensors, and other actuators. The board provides a versatile platform for programming and controlling the behavior of the robot, making it an ideal choice for hobbyist and educational robotics projects.
Here are some examples of how the Arduino UNO board can be used in robotics:
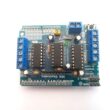
Motor control: The Arduino UNO can be used to control the speed and direction of DC motors and servo motors, which are commonly used in robotics. The board can be used to provide signals to motor driver modules, which in turn control the power to the motors.
Sensor integration: The Arduino UNO can be used to interface with a variety of sensors, including ultrasonic sensors, infrared sensors, and proximity sensors. These sensors can provide feedback to the robot about its environment, allowing it to navigate and avoid obstacles.
Data processing and decision-making: The Arduino UNO can be used to process sensor data and make decisions about how the robot should behave. For example, it can be programmed to follow a line or track, or to detect and respond to changes in light or sound.
Communication with other devices: The Arduino UNO can be used to communicate with other devices, such as wireless modules or microcontrollers, allowing the robot to be controlled remotely or to exchange data with other systems.
Role of the Arduino UNO board in education
The Arduino UNO board has become increasingly popular in education due to its accessibility, ease of use, and versatility. The board provides a low-cost and user-friendly platform for teaching electronics and programming concepts to students of all ages and skill levels.
Here are some examples of how the Arduino UNO board can be used in education:
Introduction to electronics: The Arduino UNO board can be used to teach basic electronics concepts, such as circuits, resistors, capacitors, and sensors. Students can learn how to connect components to the board and how to read and write signals.
Introduction to programming: The Arduino IDE provides an easy-to-use programming environment that can be used to introduce students to the basics of programming concepts, such as loops, conditionals, and functions. Students can also learn how to use C++ programming language to program the board.
Robotics: The Arduino UNO board can be used to teach robotics concepts, including motor control, sensor integration, and decision-making. Students can build robots and learn how to program them to perform specific tasks or behaviors.
Internet of Things (IoT): The Arduino UNO board can be used to teach IoT concepts, such as connecting devices to the internet and collecting and processing data from sensors. Students can build IoT projects and learn how to use Wi-Fi and other wireless communication protocols to connect their devices to the internet.
0 comment
Leave a comment
Passion for robotics

Recent tutorials


Robotics workshop

Polpular tutorials


Making robots

Most commented tutorials


Robotic arm

Categories
Smart Home