Send data to smartphone measured by DHT11 connected to Arduino
Tutorial plan
1- How to send temperature and humidity measured by DHT11 sensor to smartphone via Bluetooth ?
2- The components required to use DHT11 sensor and HC-06 Bluetooth module by Arduino
3- Mounting the Arduino board with the DHT11 sensor and HC-06 Bluetooth module
4- Programming the Arduino UNO to display the data measured by the DHT11 sensor on the smartphone
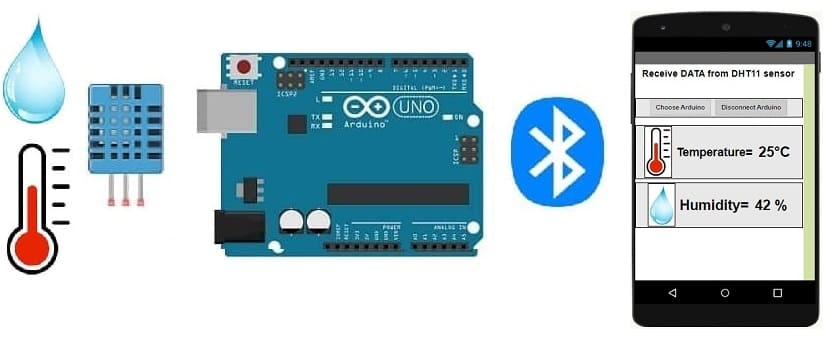
How to send temperature and humidity measured by DHT11 sensor to smartphone via Bluetooth ?
The DHT11 is a basic, low-cost digital temperature and humidity sensor.
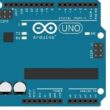
Arduino UNO is a popular microcontroller board known for its versatility and ease of use in various electronics projects, including interfacing with DHT11 sensor.
To send temperature and humidity measured by DHT11 from an Arduino board to a smartphone via Bluetooth, you can use Bluetooth modules like HC-06 and establish a serial communication link between the Arduino and the smartphone.
Components Needed:
Arduino board (e.g., Arduino Uno)
DHT11 sensor
HC-05 or HC-06 Bluetooth module
Jumper wires
Smartphone with a Bluetooth terminal app (e.g., Arduino Bluetooth Terminal)
Hardware Setup: Connect the Bluetooth module and DHT11 sensor to the Arduino.
Arduino Setup: Upload the necessary program to the Aerduino board for sending data
Smartphone Setup:
1- Create a mobile app with App Inventor to receive data from the Arduino board via Bluetooth
2- Install this application on your smartphone
Testing:
1- Upload the Arduino code to your board.
2- Open the serial monitor to see the sensor values (optional).
3- Open the Bluetooth terminal app on your smartphone and connect to the Bluetooth module.
4- You should start receiving temperature and humidity data on your smartphone from the Arduino.
The components required to use DHT11 sensor and HC-06 Bluetooth module by Arduino
To display the temperature and humidity readings from the DHT11 sensor on smartphone using an Arduino, you'll need the following components:
Arduino UNO Board

The Arduino Uno board is a microcontroller board based on the ATmega328P microcontroller. It's one of the most popular and widely used boards in the Arduino family due to its simplicity and versatility.
It is the central control unit for your project.
HC-06 module bluetooth

The HC-06 Bluetooth module is a commonly used serial communication module that enables Bluetooth connectivity for various projects, including Arduino-based systems. It acts as a serial port Bluetooth module, allowing wireless communication between devices.
This module is used for sending the temperature and humidity from the DHT11 sensor to smartphone.
DHT11 Temperature and Humidity Sensor

The DHT11 is a basic, low-cost digital temperature and humidity sensor.
Jumper Wires:

For making temporary connections and wiring between components.
Breadboard:
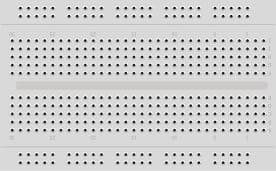
A breadboard is a useful tool for creating temporary electronic circuits. It allows you to connect components without soldering .
Mounting the Arduino board with the DHT11 sensor and HC-06 Bluetooth module
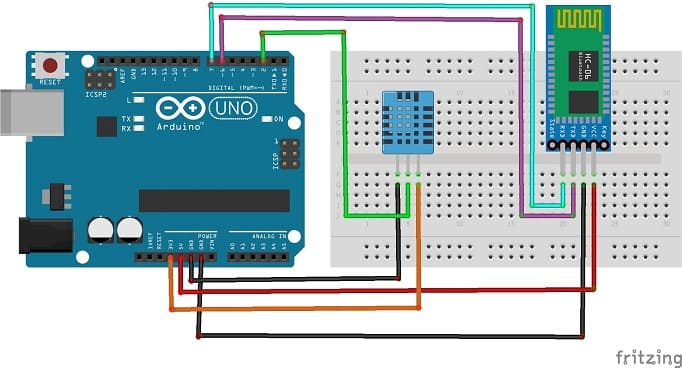
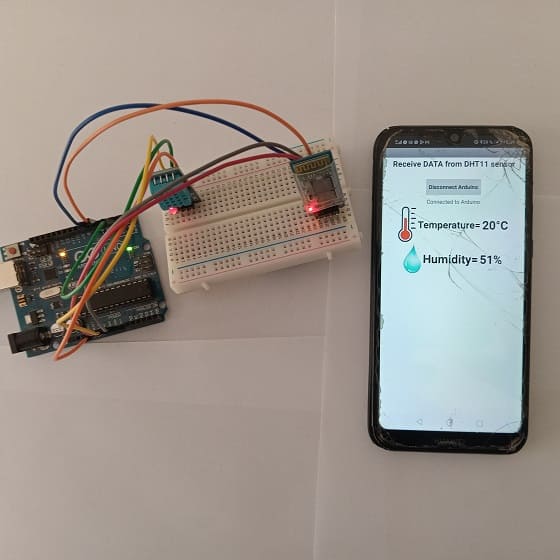
To assemble the Arduino board with the DHT11 sensor and HC-06 Bluetooth module, follow these steps:
1- Connect the DHT11 Sensor to Arduino:
- VCC of DHT11 sensor to 3V3 pin of Arduino
- GND of DHT11 sensor to GND pin of Arduino
- Data pin of DHT11 sensor to digital pin 2 of Arduino (e.g., D2)
2- Connect the HC-06 Bluetooth Module to Arduino:
- VCC of HC-06 module to 5V pin of Arduino
- GND of HC-06 module to GND pin of Arduino
- TXD of HC-06 module to pin 6 of Arduino
- RXD of HC-06 to pin 7 of Arduino
Programming the Arduino UNO to display the data measured by the DHT11 sensor on the smartphone
To display temperature and humidity measured by a DHT11 sensor on a smartphone via Arduino IDE and App Inventor, follow these steps:
Arduino Code (Using Arduino IDE):
|
1 2 3 4 5 6 7 8 9 10 11 12 13 14 15 |
#include <SoftwareSerial.h> #include <dht11.h> #define DHT11PIN 2 //Digital pin connected to the DHT sensor dht11 DHT11; SoftwareSerial hc06(6,7); //Connect the HC-06 module to the Arduino void setup(){ hc06.begin(9600); } void loop(){ DHT11.read(DHT11PIN); //Read the data measured by the DHT11 sensor delay(1000); //Sends a message containing the temperature and humidity to the smartphone hc06.print((int)DHT11.temperature*100+(int)DHT11.humidity); } |
Use this code to program the Arduino. This code reads data from the DHT11 sensor and sends it via Bluetooth using the HC-06 module.
App Inventor (MIT App Inventor):
MIT App Inventor is a web-based visual development environment that allows users to create mobile applications for Android devices. It uses a drag-and-drop interface, making it accessible for people without extensive programming experience.
Design the mobile application with App Inventor:
1- Open MIT App Inventor and create a new project.
2- Design your app interface. You might have labels to display temperature and humidity :
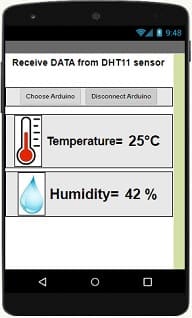
3- Connect to Bluetooth by adding a BluetoothClient1 component.
The "BluetoothClient1" component in MIT App Inventor allows you to create mobile applications that can connect to Bluetooth devices, such as serial Bluetooth modules (eg HC-06) connected to microcontrollers, Bluetooth audio devices, etc. . This extension facilitates communication with these devices using serial Bluetooth connections.
4- Add buttons or a timer to initiate the Bluetooth connection and data retrieval.
Programming part of the application with App Inventor
Receive and Display Data:
1- Starting with Android 12, Bluetooth permissions have been enhanced to improve security and user data protection. This is why we must declare the authorizations that your application needs in the AndroidManifest.xml file. For Bluetooth, you'll need to include ACCESS_FINE_LOCATION, BLUETOOTH_SCAN, and possibly BLUETOOTH_CONNECT permissions, depending on the features you're using.
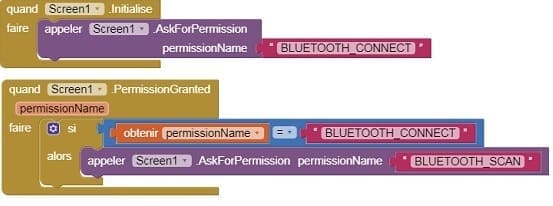
2- Add the the necessary blocks to connect the smartphone to the HC-06 Bluetooth module
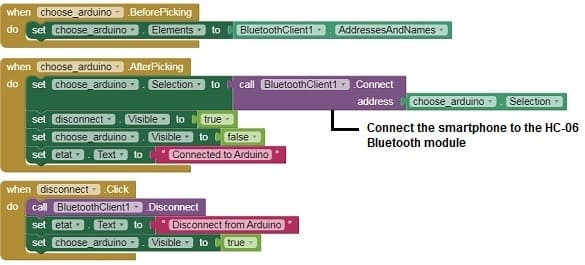
3- Implement logic to receive data from the Arduino through Bluetooth.

Testing:
1- Power on the Arduino and ensure it's transmitting data via Bluetooth.
2- Install the app on your smartphone.
3- Open the app, establish a Bluetooth connection, and start receiving and displaying temperature and humidity data from the Arduino.
This integration between Arduino IDE for programming the board and App Inventor for developing the smartphone app allows for a straightforward means of displaying sensor data wirelessly on your phone. Adjustments might be needed based on your specific app design and Bluetooth communication requirements.


