Object tracking robot based on Arduino UNO and HC-SR04 sensor
Tutorial plan
1- What is an object tracking robot ?
2- Operation of the Object Tracking Robot controlled by Arduino
3- Components of the robot
4- Mounting of the robot
5- Programming the Arduino board
What is an object tracking robot ?
An object tracking robot is a type of robotic system designed to autonomously detect, follow, and sometimes interact with objects in its environment. These robots typically utilize various sensors, such as cameras, LiDAR (Light Detection and Ranging), ultrasonic sensors, or infrared sensors, to perceive the surroundings and identify target objects.
Once an object is detected, the robot employs algorithms for object tracking to estimate the object's position and trajectory over time. These algorithms can include techniques from computer vision, such as feature detection, motion estimation, and machine learning-based object recognition.
The primary function of an object tracking robot is to autonomously detect, track, and sometimes interact with objects in its environment. Here are some of the key functions and capabilities of an object tracking robot:
1- Object Detection: The robot can identify and locate objects within its field of view using sensors such as cameras, LiDAR, or other proximity sensors.
2- Object Tracking: Once an object is detected, the robot can track its position and movement over time, continuously adjusting its own position and orientation to keep the object within its field of view.
3- Navigation: Object tracking robots often have navigation capabilities, allowing them to move autonomously in the environment while tracking objects. This may involve obstacle avoidance to navigate safely.
4- Interaction: Some object tracking robots are designed to interact with the objects they track. This could involve picking up, manipulating, or otherwise interacting with the object based on programmed instructions or user input.
5- Monitoring and Surveillance: Object tracking robots can be deployed for monitoring and surveillance purposes, automatically tracking and recording the movement of objects or individuals within a specified area.
6- Assistance and Service: In environments such as warehouses, hospitals, or homes, object tracking robots can provide assistance by fetching objects, guiding individuals, or performing other helpful tasks.
7- Security: Object tracking robots can enhance security by monitoring and tracking suspicious or unauthorized objects or individuals in restricted areas.
8- Data Collection and Analysis: By tracking objects and their movements, these robots can collect valuable data for analysis, such as traffic patterns in a retail store or the movement of goods in a warehouse.
Overall, the function of an object tracking robot is to provide autonomous perception and interaction capabilities in various applications, enhancing efficiency, safety, and functionality in diverse environments.
Operation of the Object Tracking Robot controlled by Arduino
1- Initialization:
- Upon power-up, the Arduino Uno initializes all necessary components, including the L298N motor driver module and the HC-SR04 sensors.
- It sets up communication protocols and pins for sensor input and motor output.
2- Sensor Configuration:
- The robot is equipped with three HC-SR04 ultrasonic sensors placed strategically to cover its front and sides for comprehensive object detection.
- Each sensor sends out ultrasonic pulses and measures the time it takes for the pulses to bounce back, providing distance data to the Arduino.
3- Object Detection:
- The Arduino continuously reads data from the HC-SR04 sensors to detect nearby objects.
- By analyzing the distance readings from all three sensors, the Arduino identifies the direction and proximity of the target object relative to the robot.
4- Movement Control:
- Based on the detected direction of the object, the Arduino calculates the necessary movement adjustments required to steer the robot towards the object.
- It determines the appropriate motor speeds and directions using the L298N motor driver module to control the movement of the robot's wheels directly.
5- Tracking and Navigation:
- As the object moves within the robot's detection range, the Arduino continuously updates the motor control commands to track its movements.
- The robot adjusts its trajectory in real-time to maintain the object within its sensor's detection range while moving towards it.
Overall, the Arduino-controlled object tracking robot with HC-SR04 sensors and an L298N motor driver module operates by continuously sensing its surroundings, detecting the target object, adjusting its movement, and dynamically updating its actions to track the object effectively while ensuring safe operation without the use of a servo motor.
Components of the robot
1- Arduino UNO:

The Arduino UNO serves as the central processing unit, responsible for controlling the sensor readings, processing data, and triggering alarm signals.
2- L298N Motor Driver Module:
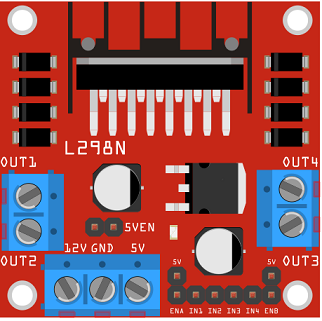
The L298N module is a dual H-bridge motor driver that allows you to control the speed and direction of two DC motors independently. It provides bidirectional control for each motor, making it suitable for driving the wheels of the robot.
3- DC Motors:
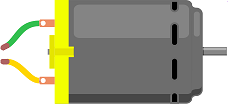
You'll need two DC motors to drive the wheels of the robot. The L298N module will control the speed and direction of these motors based on the commands received from the Arduin UNO.
4- Wheels and Chassis:
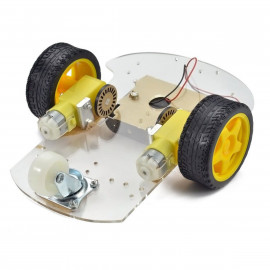
Choose wheels and a chassis suitable for your robot's size and weight requirements. The wheels will be attached to the DC motors to allow the robot to move.
5- HC-SR04 Ultrasonic Sensors:
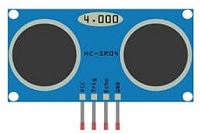
HC-SR04 sensors are commonly used for distance measurement. You'll need at least two of these sensors to detect objects in front of the robot and determine their distance.
6- Power Supply:
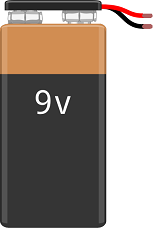
Provide a suitable power supply for the Arduino, L298N module, DC motors, and sensors. Depending on the power requirements of your components, you may need a battery pack or an external power adapter.
7- Jumper Wires

Jumper wires will be used to make connections between the components.
8- Breadboard:
A breadboard can be used to create a temporary circuit for testing and prototyping.
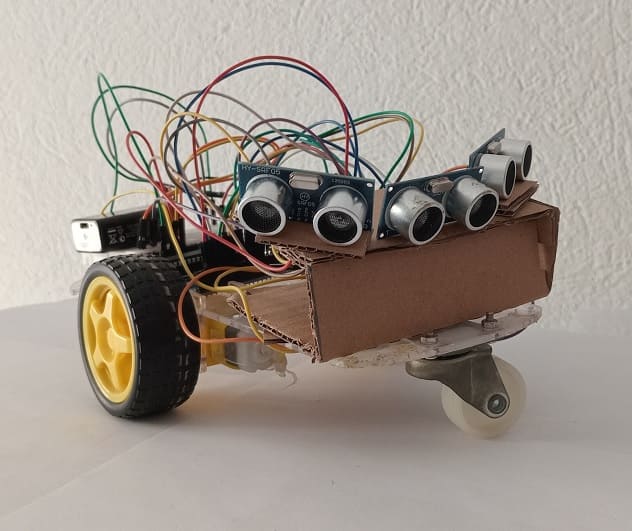
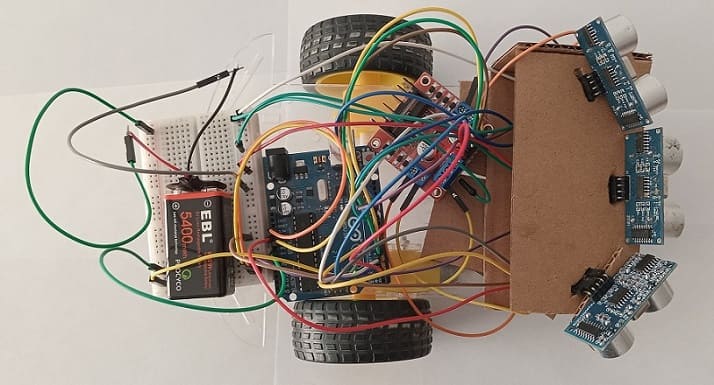
Assembly of the robot
Here's a step-by-step guide to assemble an object tracking robot using Arduino, an L298N motor driver module, and HC-SR04 ultrasonic sensors:
1- Gather Components:
Collect all the necessary components mentioned earlier: Arduino, L298N motor driver module, DC motors, wheels, HC-SR04 ultrasonic sensors, power supply, jumper wires, breadboard (optional), mounting hardware, and any miscellaneous components.
2- Prepare the Chassis:
Assemble the chassis according to your design. Attach the motors to the chassis using mounting brackets and screws. Mount the wheels securely onto the motor shafts.
3- Connect Motors to L298N Module:
Wire the DC motors to the L298N motor driver module. Connect the two terminals of each motor to the OUT1/OUT2 and OUT3/OUT4 terminals of the L298N module. Ensure that the polarity is correct to control the motor's direction.
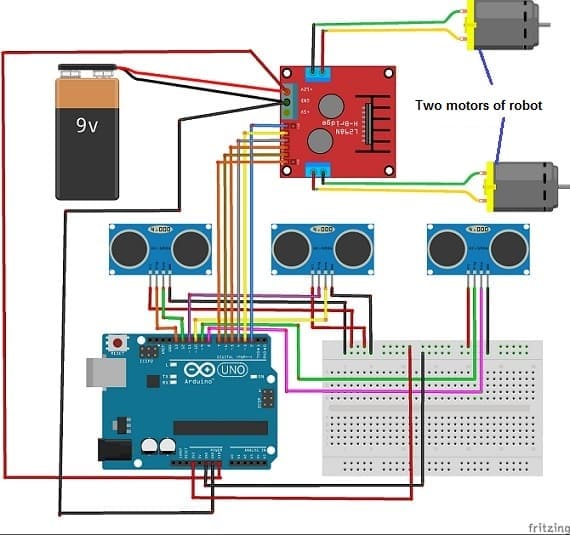
4- Connect L298N Module to Arduino:
Connect the control pins of the L298N module to the GPIO pins of Arduino. You'll typically need connections for controlling the motor direction (e.g., IN1, IN2, IN3, IN4) and PWM pins for speed control (e.g., ENA, ENB).
- Connect pin N°2 of the Arduino board to the ENA pin of the L298N module.
- Connect pin N°3 of the Arduino board to pin IN1 of the L298N module.
- Connect pin N°4 of the Arduino board to pin IN2 of the L298N module.
- Connect pin N°5 of the Arduino board to pin IN3 of the L298N module.
- Connect pin N°6 of the Arduino board to pin IN4 of the L298N module.
- Connect pin N°7 of the Arduino board to the ENB pin of the L298N module.
- Connect the GND pin of the Arduino board to the GND pin of the L298N module.
5- Wire HC-SR04 Sensors to Arduino:
Connect the VCC and GND pins of each HC-SR04 sensor to the appropriate power and ground pins on the Arduino. Connect the Trig (trigger) and Echo pins of each sensor to GPIO pins on the Arduino.
For the first HC-SR04 sensor
- Connect the VCC(+) pin of the HC-SR04 ultrasonic sensor to the 3.3V pin on the Arduino board.
- Connect the Trig pin of the HC-SR04 ultrasonic sensor to pin 9 on the Arduino board.
- Connect the Echo pin of the HC-SR04 ultrasonic sensor to pin 8 on the Arduino board.
- Connect the GND(-) pin of the DHT22 sensor to any ground (GND) pin on the Arduino board.
For the second HC-SR04 sensor
- Connect the VCC(+) pin of the HC-SR04 ultrasonic sensor to the 3.3V pin on the Arduino board.
- Connect the Trig pin of the HC-SR04 ultrasonic sensor to pin 11 on the Arduino board.
- Connect the Echo pin of the HC-SR04 ultrasonic sensor to pin 10 on the Arduino board.
- Connect the GND(-) pin of the DHT22 sensor to any ground (GND) pin on the Arduino board.
For the third HC-SR04 sensor
- Connect the VCC(+) pin of the HC-SR04 ultrasonic sensor to the 3.3V pin on the Arduino board.
- Connect the Trig pin of the HC-SR04 ultrasonic sensor to pin 12 on the Arduino board.
- Connect the Echo pin of the HC-SR04 ultrasonic sensor to pin 13 on the Arduino board.
- Connect the GND(-) pin of the DHT22 sensor to any ground (GND) pin on the Arduino board.
6- Power Supply:
Connect the power supply to Arduino, L298N module, and HC-SR04 sensors. Ensure that the voltage levels are compatible with the requirements of all components.
- Connect the Vin pin of Arduino board to the (+) pin of the 9V battery
- Connect the GND pin of Arduino board to the (-) terminal of the 9V battery
- Connect the 12V pin of the L298N module to the (+) pin of the 9V battery
7- Mount Sensors:
Mount the HC-SR04 sensors on the front of the robot chassis facing forward. Ensure that they have a clear line of sight to detect objects in front of the robot.
Programming the Arduino board
Programming an object tracking robot using Arduino UNO, L298N motor driver module, and HC-SR04 ultrasonic sensors involves setting up GPIO pins for motor control and sensor interfacing, implementing object detection and tracking logic, and controlling the motors based on the detected objects.
You neen to import Ultrasonic library to control the HC-SR04 sensors .
Here's a basic example code to get you started:
|
1 2 3 4 5 6 7 8 9 10 11 12 13 14 15 16 17 18 19 20 21 22 23 24 25 26 27 28 29 30 31 32 33 34 35 36 37 38 39 40 41 42 43 44 45 46 47 48 49 50 51 52 53 54 55 56 57 58 59 60 61 62 63 64 65 66 67 68 69 70 71 72 73 74 75 76 77 78 79 80 81 82 83 84 85 86 87 88 89 90 91 92 93 94 95 |
#include "Ultrasonic.h" // Define HC-SR04 sensor pins Ultrasonic ultrasonic_right(13, 12); // Trig et Echo Ultrasonic ultrasonic(11, 10); // Trig et Echo Ultrasonic ultrasonic_left(9, 8); // Trig et Echo // Define motor pins int enA = 2; int in1 = 3; int in2 = 4; // motor two int enB = 7; int in3 = 5; int in4 = 6; void setup() { // Serial.begin(9600); // set all the motor control pins to outputs pinMode(enA, OUTPUT); pinMode(enB, OUTPUT); pinMode(in1, OUTPUT); pinMode(in2, OUTPUT); pinMode(in3, OUTPUT); pinMode(in4, OUTPUT); analogWrite(enA, 150); analogWrite(enB, 150); } void loop() { // <span class="hljs-comment">Get distances from HC-SR04 sensors</span> int distance_right = ultrasonic_right.Ranging(CM); int distance = ultrasonic.Ranging(CM); int distance_left = ultrasonic_left.Ranging(CM); // <span class="hljs-comment">Adjust motor speeds based on distance</span> if ((distance <50) && (distance >10 )) { // If objects detected by HC-SR04 sensor in the center digitalWrite(in1, HIGH); // the robot moves forward digitalWrite(in2, LOW); digitalWrite(in3, HIGH); digitalWrite(in4, LOW); delay(50); digitalWrite(in1, LOW); digitalWrite(in2, LOW); digitalWrite(in3, LOW); digitalWrite(in4, LOW); delay(30); } if ((distance <10) && (distance >1 )) { // If the object approaches the HC-SR04 sensor digitalWrite(in1, LOW); // The robot is moving backwards digitalWrite(in2, HIGH); digitalWrite(in3, LOW); digitalWrite(in4, HIGH); delay(50); digitalWrite(in1, LOW); digitalWrite(in2, LOW); digitalWrite(in3, LOW); digitalWrite(in4, LOW); delay(30); } if ((distance_right <50) && (distance_right >5 )) { If the HC-SR04 sensor on the right detects an object digitalWrite(in1,HIGH ); // The robot turns right digitalWrite(in2, LOW); digitalWrite(in3, LOW); digitalWrite(in4, LOW); delay(60); digitalWrite(in1, LOW); digitalWrite(in2, LOW); digitalWrite(in3, LOW); digitalWrite(in4, LOW); delay(30); } if ((distance_left <50) && (distance_left >5 )) { If the HC-SR04 sensor on the left detects an object digitalWrite(in1, LOW); // The robot turns left digitalWrite(in2, LOW); digitalWrite(in3, HIGH); digitalWrite(in4, LOW); delay(60); digitalWrite(in1, LOW); digitalWrite(in2, LOW); digitalWrite(in3, LOW); digitalWrite(in4, LOW); delay(30); } if ((distance_right >50) && (distance >50 ) && (distance_left >50 )) { // If no objects detected digitalWrite(in1, LOW); // The robot stops digitalWrite(in2, LOW); digitalWrite(in3, LOW); digitalWrite(in4, LOW); } } |
0 comment
Leave a comment
Passion for robotics

Recent tutorials

Robotics workshop

Polpular tutorials


Making robots

Most commented tutorials


Robotic arm

Categories
Smart Home