Measure water level remotely using Arduino
Tutorial Plan
1- Water measurement objective
2- How does Arduino measure water level ?
3- Materials Needed
4- System wiring diagram
5- Programming Arduino
6- Develop a mobile application to receive a message from Arduino
Water measurement objective
Water measurement refers to the process of quantifying the flow, volume, or level of water in various settings. It is essential for managing water resources, ensuring efficient usage, and maintaining environmental sustainability.
The objective of water measurement is to accurately quantify water usage, availability, or flow to support various activities and decision-making processes.
Specific objectives can vary depending on the context but often include:
1. Resource Management
Monitor water availability in reservoirs, rivers, and aquifers to ensure sustainable usage.
Support water allocation for agricultural, industrial, municipal, and ecological needs.
2. Regulatory Compliance
Ensure adherence to water use permits and legal frameworks.
Monitor effluent discharge to meet environmental standards.
3. Efficiency Optimization
Track water usage to reduce waste and improve efficiency in industries, agriculture, and households.
Enhance irrigation systems and water distribution networks.
4. Flood and Drought Management
Measure water levels and flows to predict and mitigate the impact of floods and droughts.
Develop early warning systems based on real-time water measurements.
5. Scientific Research
Collect data for hydrological studies, climate change research, and ecosystem monitoring.
Understand groundwater recharge rates and surface water interactions.
6. Economic Planning
Support water pricing and economic policies based on accurate usage and availability data.
Plan infrastructure development, such as dams, canals, and treatment plants.
7. Public Health and Safety
Monitor water quality and supply in urban and rural areas.
Manage drinking water systems to ensure public safety.
How does Arduino measure water level ?
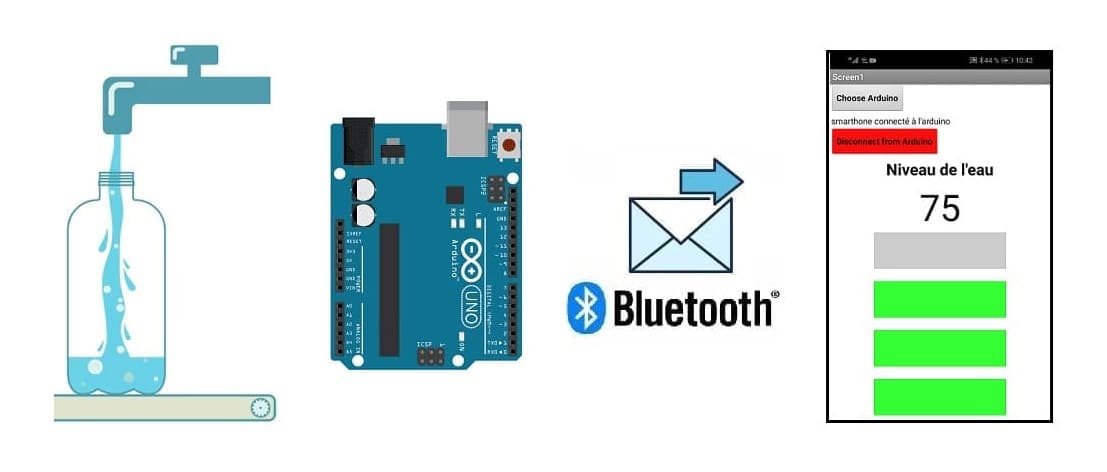
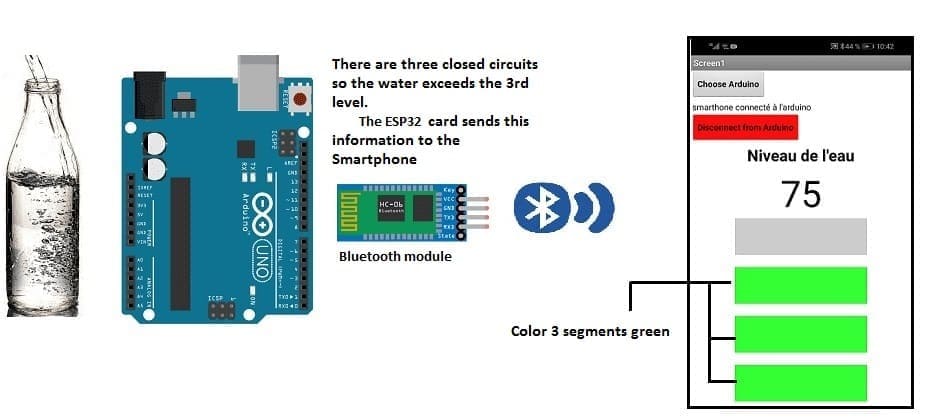
To measure water levels with an Arduino and display or control the system using App Inventor via the HC-06 Bluetooth module, you can follow these steps:
1- Water-Level Sensing
Use wires as probes at different levels in the bottle:
The wires connect to Arduino pins, with one common ground wire at the base.
When water touches a probe, it completes the circuit, allowing the Arduino to detect the water level.
Resistors (pull-down) ensure stable readings when no water is present.
2- Communication via HC-06
The Arduino sends water level data (e.g., LOW, MID, HIGH) to the HC-06.
The HC-06 sends this data to the App Inventor app over Bluetooth.
3- App Inventor Integration
Build a simple interface using MIT App Inventor to Display water levels.
Materials Needed
Arduino

The main controller processes sensor data, operates the relay, and communicates via Bluetooth.
HC-06 Bluetooth module:

It facilitates wireless communication between the Arduino and a smartphone/PC.
A plastic bottle
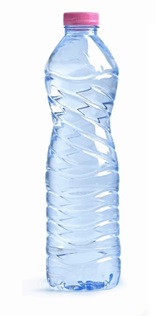
It is used as the water container.
Wires

They connect all components.
Resistors

They help manage signal voltage and current.
Breadboard
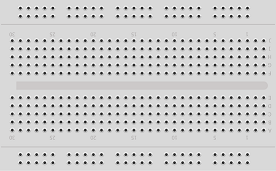
It is used to test electronic circuits without the need for soldering
System wiring diagram
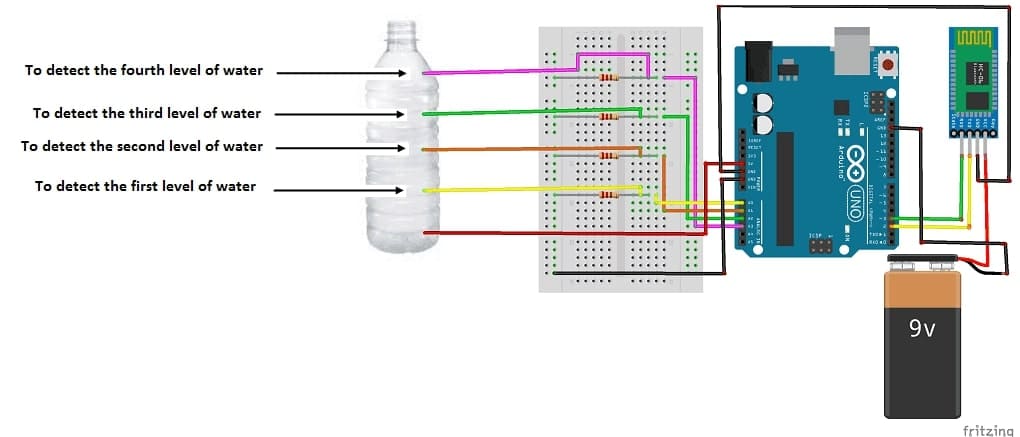
HC-06 Bluetooth Module:
VCC → Arduino 5V
GND → Arduino GND
TXD → Arduino Pin 2
RXD → Arduino Pin 3
Common Ground Wire:
Insert one wire into the bottom of the bottle.
Connect this wire to the GND pin of Arduino.
Level Detection Wires:
Insert additional wires into the bottle at different heights (e.g., low, medium, and high levels).
Connect these wires to Arduino pins (A0, A2, A3 and A4).
Add a resistor (1kΩ–10kΩ) in series between each wire and its respective Arduino pin to protect the circuit.
Connections:
Each detection wire acts as an input to the Arduino.
When water bridges the ground wire and a detection wire, Arduino senses it.
Programming Arduino.
Here is the Arduino program that detects the level of water filled in the bottle and sends this information to the Smartphone via Bluetooth.
|
1 2 3 4 5 6 7 8 9 10 11 12 13 14 15 16 17 18 19 20 21 22 23 24 25 26 27 28 29 30 31 32 33 34 35 36 37 38 39 40 41 42 43 44 45 46 47 48 49 50 51 52 53 54 55 56 57 58 59 60 61 62 63 64 65 66 67 68 69 |
#include <SoftwareSerial.h> int analogA0 = A0; int analogA1 = A1; int analogA2 = A2; int analogA3 = A3; int level_1,level_2,level_3,level_4; //analog readings int niveau=60; SoftwareSerial hc06(2,3); int send_0; int send_1; int send_2; int send_3; int send_4; void setup() { send_0=0; send_1=0; send_2=0; send_3=0; send_4=0; Serial.begin(9600); hc06.begin(9600); pinMode(analogA0,INPUT); pinMode(analogA1,INPUT); pinMode(analogA2,INPUT); pinMode(analogA3,INPUT); } void loop() { // Read the analog interface level_1 = analogRead(analogA0); level_2 = analogRead(analogA1); level_3 = analogRead(analogA2); level_4 = analogRead(analogA3); Serial.print("niveau 1 "); Serial.println(level_1); Serial.print("niveau 2 "); Serial.println(level_2); Serial.print("niveau 3 "); Serial.println(level_3); Serial.print("niveau 4 "); Serial.println(level_4); if ((level_1<niveau)&&(level_2<niveau)&&(level_3<niveau)&&(level_4<niveau)&&(send_0==0))// Niveau 0 de l'eau { hc06.print('0'); // send Level 0 to Smartphone send_0=1;send_1=0;send_2=0;send_3=0;send_4=0; } if ((level_1>niveau)&&(level_2<niveau)&&(level_3<niveau)&&(level_4<niveau)&&(send_1==0)) // Niveau 1 de l'eau{ hc06.print("25");// send Level 1 to Smartphone send_0=0;send_1=1;send_2=0;send_3=0;send_4=0; } if ((level_1>niveau)&&(level_2>niveau)&&(level_3<niveau)&&(level_4<niveau)&&(send_2==0)) // Niveau 2 de l'eau{ hc06.print("50");// send Level 2 to Smartphone send_0=0;send_1=0;send_2=1;send_3=0;send_4=0; } if ((level_1>niveau)&&(level_2>niveau)&&(level_3>niveau)&&(level_4<niveau)&&(send_3==0)) // Niveau 3 de l'eau{ hc06.print("75");// send Level 3 to Smartphone send_0=0;send_1=0;send_2=0;send_3=1;send_4=0; } if ((level_1>niveau)&&(level_2>niveau)&&(level_3>niveau)&&(level_4>niveau)&&(send_4==0)) // Niveau 4 de l'eau { hc06.print("100");// send Level 4 to Smartphone send_0=0;send_1=0;send_2=0;send_3=0;send_4=1; } delay(100); } |
Write this program to:
1- Continuously read the analog input from the pins connected to the sensor wires.
3- Send the data via Bluetooth to a smartphone.
Develop a mobile application to receive a message from Arduino
1- Design the App Interface:
Add a Bluetooth Client component to handle the HC-06 connection.
Add labels to display the water level (e.g., "Water Level: LOW").
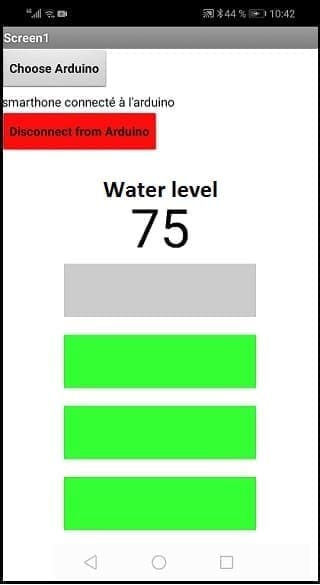
2- Blocks for Functionality:
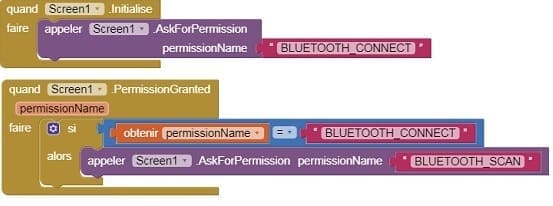
a) Starting with Android 12, Bluetooth permissions have been enhanced to improve security and user data protection. This is why we must declare the authorizations that your application needs in the AndroidManifest.xml file. For Bluetooth, you'll need to include ACCESS_FINE_LOCATION, BLUETOOTH_SCAN, and possibly BLUETOOTH_CONNECT permissions, depending on the features you're using.
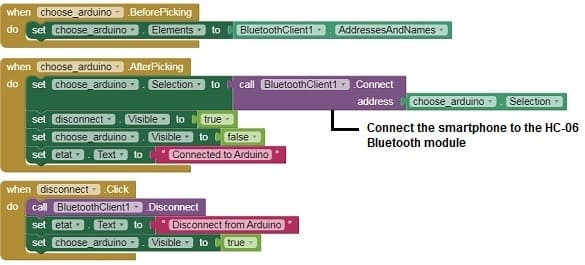
b) Add the the necessary blocks to connect the smartphone to the HC-06 Bluetooth module
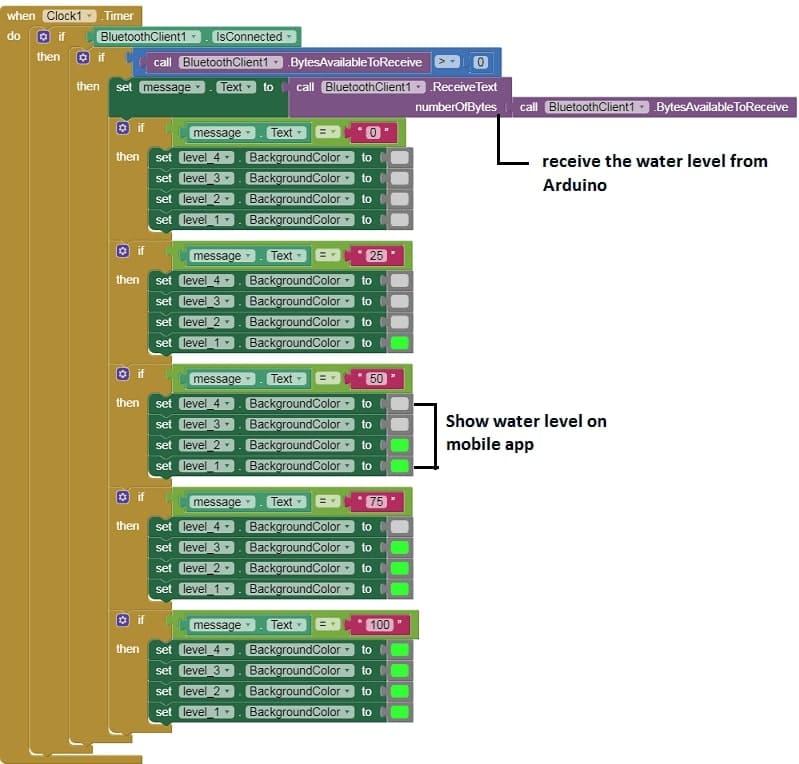
c) Receive Data: Use the BluetoothClient1.ReceiveText block to read the water level sent by the Arduino.
Assembly and Testing
1- Run the Arduino code.
2- Power on the HC-06 and connect it to the app.
3- Monitor water levels in real time on the app.
This setup allows the Arduino to measure water levels and send the data to the App Inventor app, creating an interactive and functional system.

