Getting started with Micro:bit and MakeCode
Programming the Micro:bit board with Makecode
Programming the Micro:bit board with MakeCode is a fun and easy way to get started with coding and physical computing. MakeCode is a free online coding platform that provides a block-based coding interface and a JavaScript editor, both of which can be used to program the Micro:bit.
To get started with programming the Micro:bit with MakeCode, you will need:
- A Micro:bit board
- A USB cable to connect the Micro:bit to your computer
- A web browser
Here are the steps to program the Micro:bit board with MakeCode:
1- Open a web browser and go to the MakeCode website at https://makecode.microbit.org/.
2- Click on the "New Project" button to create a new project.
3- You can choose to use the block-based coding interface or the JavaScript editor. If you are new to coding, you may want to start with the block-based interface. If you have some coding experience, you can choose to use the JavaScript editor.
4- Once you have chosen your coding interface, you can start coding. MakeCode provides a range of blocks and functions that you can use to program the Micro:bit. You can drag and drop these blocks to create your program.
5- Once you have written your code, you can download it to your computer by clicking on the "Download" button. This will create a hex file that you can use to upload your code to the Micro:bit board.
6- Connect the Micro:bit to your computer using a USB cable. The Micro:bit will appear as a removable drive on your computer.
7- Drag and drop the hex file onto the Micro:bit drive to upload your code to the Micro:bit board.
8- Once the upload is complete, disconnect the Micro:bit from your computer and your code will start running on the Micro:bit.
Makecode software
MakeCode is a free, open-source, web-based software platform that allows users to create programs and projects for microcontrollers and other hardware devices. It was created by Microsoft and is now maintained by a community of developers.
MakeCode provides an intuitive and user-friendly interface for programming microcontrollers such as the Micro:bit, Adafruit Circuit Playground Express, and other hardware devices. It features a drag-and-drop coding environment, where users can create code by simply dragging and dropping blocks of pre-written code.
MakeCode supports a variety of programming languages including blocks-based programming, JavaScript, and Python. This allows users with different levels of programming experience to create projects and programs using the platform.
In addition to its programming interface, MakeCode also provides a simulator for testing code before uploading it to a microcontroller or hardware device. This allows users to test their code without needing to physically connect a device, which can save time and prevent errors.
MakeCode also includes a large library of built-in functions and blocks that allow users to quickly create complex projects. These blocks include functions for controlling LEDs, reading and writing data, and communicating with other devices.
The MakeCode interface
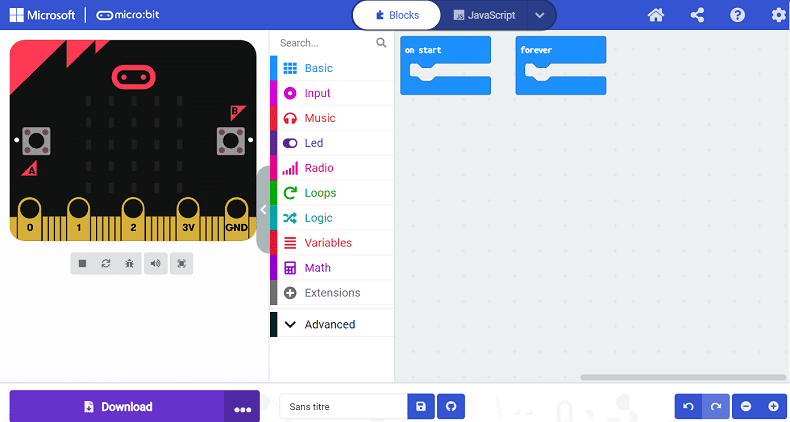
By clicking on New project, you get the screen below. You can also click on your latest projects (My Projects), on Makecode proposals (Tutorial) or import a project from your computer. This screen is divided into three areas:
- on the left: the simulation area in which the result of your programming appears live on the Micro:bit board.
- in the middle: the menu which contains the instructions
- on the right: the work area where you program by dragging and dropping instructions. By clicking on the symbol circled in green in the figure, the simulation area disappears and you gain space for the work area.
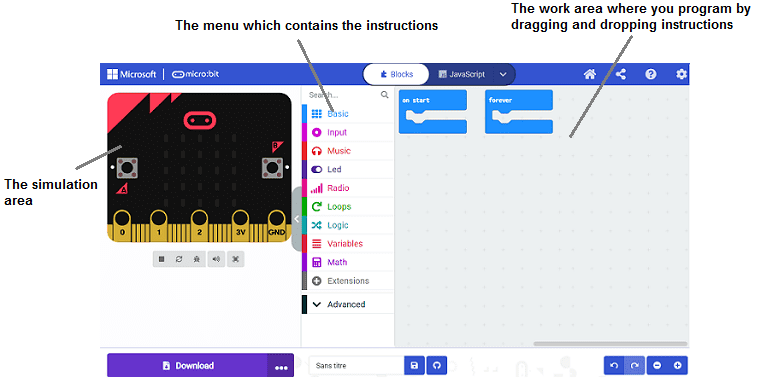
The MakeCode home screen is the starting point for creating a new project or editing an existing one. It provides a user-friendly interface that allows users to easily access and navigate the platform's features.
Here are the main elements you will see on the MakeCode home screen:
![]()
The "Base" menu of the MakeCode platform for the Micro:bit contains blocks of code to control the flow of the program according to specific conditions. Blocks include show data on map, infinite loop, wait and others.
![]()
The input menu of MakeCode allows users to add input functionality to their projects.
![]()
The music menu of MakeCode allows users to add music and sound effects to their projects.
![]()
The LED menu of MakeCode allows users to control the LEDs on their microcontrollers and other hardware devices.
![]()
The radio menu of MakeCode allows users to send and receive messages between microcontrollers and other hardware devices using radio communication.
![]()
The loops menu of MakeCode allows users to create repeating and conditional behaviors in their programs.
![]()
The logic menu of MakeCode allows users to create conditional behaviors in their programs.
![]()
The variables menu of MakeCode allows users to create and manipulate variables in their programs.
![]()
The maths menu of MakeCode allows users to perform mathematical operations in their programs.
![]()
The Extensions menu of MakeCode allows users to add additional functionality to their programs by importing third-party libraries and extensions.
![]()
The advanced menu of MakeCode provides more advanced programming options and features for experienced users.
![]()
The functions menu of MakeCode allows users to create custom functions in their programs.
![]()
The arrays menu of MakeCode provides more advanced variable options, specifically for creating and manipulating arrays.
![]()
The text menu of MakeCode provides options for working with text and string data in your programs.
![]()
The game menu of MakeCode provides options for creating games and game-like experiences using the Micro:bit board.
![]()
The images menu of MakeCode provides options for working with images and graphics on the Micro:bit board.
![]()
The Pins menu in MakeCode allows you to work with the pins on the Micro:bit board.
![]()
The Serial menu in MakeCode allows you to communicate with other devices via serial communication.
![]()
The Control menu in MakeCode provides options for controlling the flow of your program.

