Gas alarm system based on Arduino UNO, MQ-4 sensor and LCD screen
Tutorial plan
Introduction
1- How the gas alarm system ordered by Arduino UNO works ?
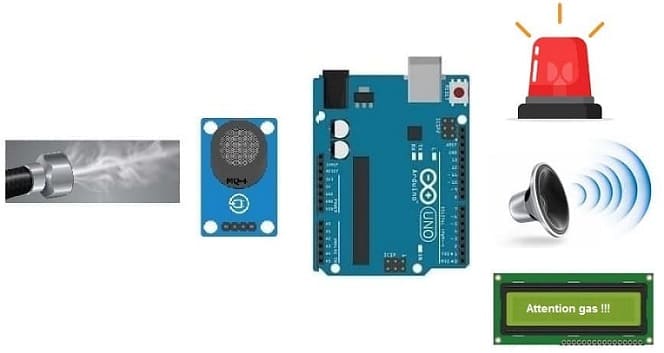
2- Mounting Arduino UNO board with MQ-4 sensor, LED, Buzzer and LCD screen
3- Program Arduino UNO to control the system
Introduction
A gas alarm system is a safety device designed to detect the presence of potentially harmful gases in an environment, such as carbon monoxide (CO), natural gas, propane, methane, or other combustible gases. These systems are commonly used in homes, commercial buildings, industrial facilities, and other locations where gas leaks could pose a threat to health and safety.
Here's how a typical gas alarm system works:
1- Gas Sensors: Gas alarm systems contain sensors that are capable of detecting specific types of gases. These sensors continuously monitor the air for the presence of gases, and when they detect a gas at a certain concentration level, they trigger an alarm.
2- Alarm Devices: When a gas is detected, the system activates alarm devices such as sirens, strobe lights, or audible alerts to warn occupants of the building about the potential danger. These alarms are usually loud and conspicuous to ensure they can be easily heard or seen.
3- Monitoring and Notification: In some cases, gas alarm systems are connected to monitoring services that can provide remote monitoring and notifications. This allows for immediate response in case of a gas leak, even if no one is present at the location where the alarm is installed.
4- Integration with Building Systems: Advanced gas alarm systems may be integrated with other building systems, such as ventilation systems or shut-off valves for gas lines. This integration allows for automated responses to gas leaks, such as activating ventilation to remove the gas from the building or shutting off the gas supply to prevent further leaks.
5- Maintenance and Testing: Regular maintenance and testing of gas alarm systems are essential to ensure their proper functioning. This includes periodic calibration of sensors, testing of alarm devices, and replacing batteries or other components as needed.
Overall, gas alarm systems play a crucial role in preventing accidents and protecting occupants from the dangers associated with gas leaks. They provide early warning of potential hazards, allowing people to take appropriate actions to mitigate the risks and ensure their safety.
How the gas alarm system ordered by Arduino UNO works ?
Gas alarm systems play a crucial role in detecting and alerting users to the presence of hazardous gases in an environment. This gas alarm system utilizes an Arduino UNO microcontroller, an MQ-4 gas sensor, an LCD screen, an LED indicator, and a buzzer to provide real-time gas monitoring and alarm notifications.
Components:
1- Arduino UNO:

The Arduino UNO serves as the central processing unit, responsible for controlling the sensor readings, processing data, and triggering alarm signals.
2- MQ-4 Gas Sensor:
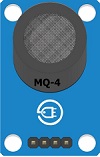
The MQ-4 sensor is designed to detect various combustible gases such as methane, natural gas, and propane. It provides analog output proportional to the gas concentration in the surrounding atmosphere.
3- LCD Screen:

A 16x2 character LCD screen is used to display real-time gas concentration readings and alarm messages, providing a user-friendly interface for monitoring gas levels.
4- LED Indicator:
![]()
An LED indicator serves as a visual alert, signaling the presence of hazardous gas when the concentration exceeds a predefined threshold.
5- Buzzer:
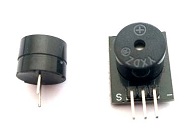
A piezoelectric buzzer generates audible alarm signals to alert users to potential gas leaks or unsafe conditions.
Working Principle:
1- Initialization: Upon power-up, the Arduino UNO initializes the components, including the MQ-4 sensor, LCD screen, LED, and buzzer.
2- Gas Detection: The MQ-4 sensor continuously samples the surrounding air for the presence of combustible gases. It converts the gas concentration into an analog voltage signal.
3- Data Processing: The Arduino reads the analog voltage from the sensor and converts it into a gas concentration value using calibration factors or conversion formulas.
4- Display Output: The gas concentration value is displayed on the LCD screen in real-time, allowing users to monitor gas levels visually.
5- Alarm Triggering: If the gas concentration exceeds a predefined threshold considered unsafe, the Arduino triggers alarm signals. The LED indicator lights up, and the buzzer emits audible alarm sounds to alert users to potential hazards.
6- Continuous Monitoring: The system continuously loops through these steps, providing continuous gas monitoring and alarm notifications.
Features:
1- Real-time Monitoring: The gas alarm system offers real-time monitoring of gas concentration levels, enabling users to respond promptly to hazardous conditions.
2- Threshold Alarm: The system triggers visual and audible alarms when the gas concentration exceeds a predefined threshold, ensuring timely warnings to prevent accidents.
3- User Interface: The LCD screen provides a user-friendly interface for displaying gas concentration readings and alarm messages, enhancing user interaction and understanding.
4- Multimodal Alerts: The system employs both visual (LED) and audible (buzzer) alarm signals, increasing the likelihood of alerting users in noisy or visually challenging environments.
5- Customization: The system can be customized by adjusting threshold levels, calibration parameters, and alarm settings to suit specific gas detection requirements.
6- Low-Cost Solution: Utilizing readily available components and open-source Arduino software, the gas alarm system offers a cost-effective solution for gas detection and safety monitoring applications.
Mounting Arduino UNO board with MQ-4 sensor, LED, Buzzer and LCD screen
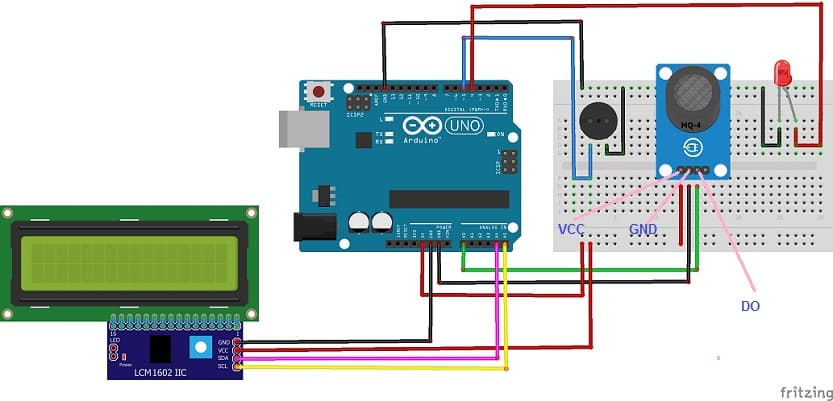
Attaching the MQ-4 sensor :
- Connect the VCC pin of the MQ-4 sensor to the 5V pin of the Arduino UNO board
- Connect the GND pin of the MQ-4 sensor to the GND pin of the Arduino UNO board
- Connect the DO pin of the MQ-4 sensor to the A0 pin of the Arduino UNO board
Attaching the buzzer :
- Connect the (+) terminal of buzzer to pin 5 of the Arduino UNO board.
- Connect the (-) terminal of buzzer to GND pin of the Arduino UNO board.
Attaching the red LED :
- Connect the negative terminal (cathode) of LED to the ground (GND) of the Arduino UNO board.
- Connect the positive terminal (cathode) of LED to pin 4 of the Arduino UNO board.
Attaching the LCD I2C 1602 Display :
- Connect the SDA (data line) of the LCD I2C 1602 display to A4 pin of Arduino UNO board.
- Connect the SCL (clock line) of the LCD I2C 1602 display to A5 pin of Arduino UNO board.
- Connect the VCC pin of the LCD I2C 1602 display to the 5V pin of Arduino UNO board.
- Connect the GND pin of the LCD I2C 1602 display to GND pin of Arduino UNO board.
Program Arduino UNO to control the system
Below is an example code to program the gas alarm system based on Arduino UNO, MQ-4 sensor, LCD screen, LED, and Buzzer:
import this library : LiquidCrystal_I2C for I2C LCD screen
|
1 2 3 4 5 6 7 8 9 10 11 12 13 14 15 16 17 18 19 20 21 22 23 24 25 26 27 28 29 30 31 32 33 34 35 36 37 38 39 40 41 |
#include <LiquidCrystal_I2C.h> LiquidCrystal_I2C lcd(0x27, 20, 4); int buzzer_pin = 5; // Digital pin for Buzzer int redled_pin = 4; // Digital pin for LED int analogPin = A0; // Analog pin for MQ-4 sensor int analogVal; //analog readings <span class="hljs-type">const</span> <span class="hljs-type">int</span> threshold = <span class="hljs-number">300</span>; <span class="hljs-comment">// Threshold value for triggering alarm</span> void setup() { Serial.begin(9600); pinMode(buzzer_pin, OUTPUT); pinMode(redled_pin, OUTPUT); lcd.init(); // Initialization of the display lcd.backlight(); // activates the backlight } void loop () { analogVal = analogRead(analogPin); // Read analog value from MQ-4 sensor Serial.print("gaz= "); Serial.print(analogVal); // Read the analog interface if (analogVal< threshold) // // If the sensor detects a gas leak { // print alert message on LCD screen lcd.setCursor(0, 0); lcd.print("Attention !!!"); lcd.setCursor(0, 1); lcd.print("gaz detected"); <span class="hljs-comment">// Turn on LED and Buzzer</span> digitalWrite(buzzer_pin, HIGH); digitalWrite(redled_pin, HIGH); } else { lcd.clear(); // clear LCD screen <span class="hljs-comment">// Turn off LED and Buzzer</span> digitalWrite(buzzer_pin, LOW); digitalWrite(redled_pin, LOW); } delay(100); // Delay between readings } |
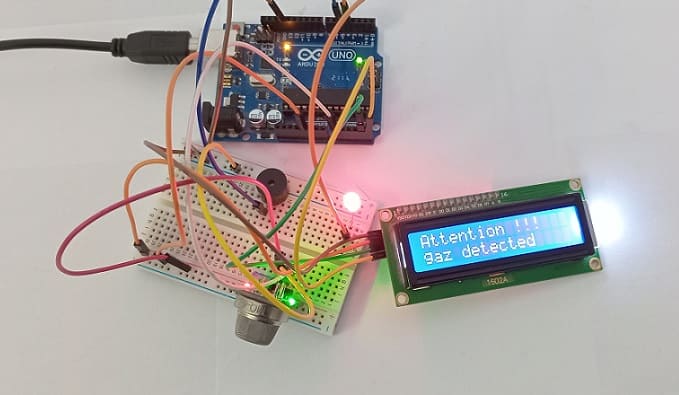
This program continuously reads the analog value from the gas sensor, converts it into a gas concentration value, and displays it on the LCD screen. If the gas concentration exceeds the predefined threshold, an alarm is triggered, which includes turning on an LED and sounding a buzzer for a specified duration.
Make sure to adjust the threshold value and the conversion function according to the specifications of your MQ-4 gas sensor and the gases you want to detect. Additionally, consider calibrating the sensor in a controlled environment for accurate readings.
0 comment
Leave a comment
Passion for robotics

Recent tutorials


Robotics workshop

Polpular tutorials


Making robots

Most commented tutorials


Robotic arm

Categories
Smart Home