ESP32-CAM Video Streaming Web Server
Tutorial plan
1- Web server streaming video presentation
2- What is ESP32-Cam ?
3- Necessary components to control ESP32-Cam
4- Circuit setup
5- Programming ESP32-CAM
Web server streaming video presentation
A Video Streaming Web Server is a system that transmits live or recorded video content over the internet to various client devices, like computers, smartphones, and smart TVs. This server is crucial for services like YouTube, Netflix, and live-streaming platforms. Here's a breakdown of how a video streaming server works, its components, and its benefits.
Key Components of a Video Streaming Web Server
Video Source:
The video source can be either live video (like from a camera for live streaming) or pre-recorded video files. In live streaming, video capture devices and encoding hardware/software convert video into a streamable format.
Video Encoder:
Video encoding software (or hardware) compresses the video to reduce its file size without losing too much quality. Popular encoding formats include H.264, H.265, VP9, and AV1. Encoding is essential for efficient streaming, as it makes the content accessible even on low-bandwidth connections.
Streaming Protocols:
Protocols like HLS (HTTP Live Streaming), DASH (Dynamic Adaptive Streaming over HTTP), and RTMP (Real-Time Messaging Protocol) manage how video data is transmitted over the network. These protocols allow the video to be divided into chunks and adapt the quality of the stream based on the user’s bandwidth.
Content Delivery Network (CDN):
CDNs distribute video content from multiple servers worldwide. When a user accesses a video, the CDN delivers the stream from the server closest to them, reducing buffering and ensuring smoother playback. This is crucial for global video delivery.
Video Player:
A client-side application or component (like HTML5 video players or mobile app players) receives and decodes the video for playback on users’ devices. The player communicates with the streaming server to adapt video quality based on network speed and device capabilities.
Types of Video Streaming
On-Demand Streaming:
Content is pre-recorded and stored on the server, allowing users to watch it anytime. Examples include Netflix, YouTube, and other video-on-demand services.
Live Streaming:
Content is broadcast in real-time, suitable for events, webinars, or live gaming streams. It requires real-time encoding and streaming, with minimal delay, to ensure the live aspect for viewers.
Benefits of a Video Streaming Web Server
Scalability: Using CDNs and cloud-based servers allows the streaming server to scale and handle thousands or even millions of viewers simultaneously.
Adaptive Streaming: Protocols like HLS and DASH adjust video quality based on bandwidth, offering smooth playback even with varying internet speeds.
Global Reach: Viewers worldwide can access the content with minimal latency due to the geographic distribution of CDN servers.
Improved User Experience: With features like adaptive bitrate streaming and low latency, streaming servers provide high-quality video and reduce buffering issues.
What is ESP32-Cam ?
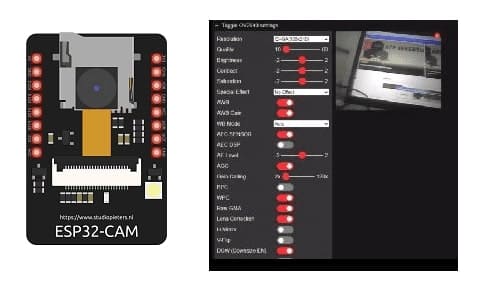
The ESP32-CAM is a small, powerful, and affordable Wi-Fi-enabled camera module based on the ESP32 microcontroller. It is widely used for IoT projects that involve image capture, video streaming, and remote monitoring. The ESP32-CAM module includes a built-in camera (OV2640), making it ideal for applications like home security, face recognition, and AI image processing on the edge.
Key Features of ESP32-CAM
Microcontroller:
The ESP32 is a dual-core microcontroller with Wi-Fi and Bluetooth capabilities, capable of handling various IoT tasks. It can connect to the internet, which enables it to stream video to remote devices.
Camera Module:
The OV2640 camera, typically used in ESP32-CAM, is a 2MP camera capable of capturing images up to 1600x1200 pixels and video streaming up to VGA resolution (640x480). The quality is good enough for many low-power applications.
Storage:
The ESP32-CAM has a slot for a microSD card (up to 4 GB) for local storage. This is useful for storing captured images and video files.
Connectivity:
Wi-Fi: Enables the ESP32-CAM to act as a web server, allowing users to stream video or send captured images over the internet.
Bluetooth: Limited applications for video but can be used for basic connectivity tasks.
GPIO Pins:
The ESP32-CAM has a limited number of GPIO pins compared to standard ESP32 boards, as many pins are dedicated to the camera module. However, it has enough GPIO pins for controlling LEDs, sensors, and even small servos.
Flash Memory:
4 MB PSRAM, which helps with handling image data processing and buffering for video streaming.
Applications of ESP32-CAM
Home Security Cameras:
ESP32-CAM modules are popular in DIY security camera projects. They can stream live video, send notifications, and capture images when movement is detected.
Face Recognition and Detection:
Using machine learning libraries such as ESP-WHO, the ESP32-CAM can perform face detection and basic recognition tasks. It’s useful for secure access control systems.
Remote Monitoring Systems:
Ideal for real-time monitoring applications, such as wildlife tracking, plant growth observation, or surveillance of remote areas.
Smart Doorbells:
ESP32-CAM can be used in smart doorbell applications with motion detection and remote video feed capabilities.
Necessary components to control ESP32-Cam
To control an ESP32-CAM module, you'll need several components and accessories to set it up, program it, and operate it effectively. Here’s a rundown of the essentials:
1. ESP32-CAM Module
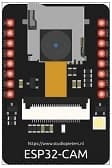
This is the primary module, featuring an ESP32 microcontroller and a built-in OV2640 camera sensor. Ensure your module is the ESP32-CAM model with the correct pin layout.
2. FTDI Programmer (USB-to-Serial Adapter)
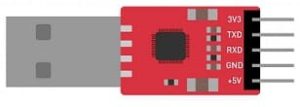
Since the ESP32-CAM module lacks a built-in USB interface for programming, you need an FTDI programmer to connect it to your computer for initial setup and uploading code. An FTDI adapter with a 5V and 3.3V switch is ideal.
The CP2102 USB-to-UART bridge is an alternative to the FTDI programmer, allowing you to program and communicate with devices like the ESP32-CAM over a USB connection.
Circuit setup
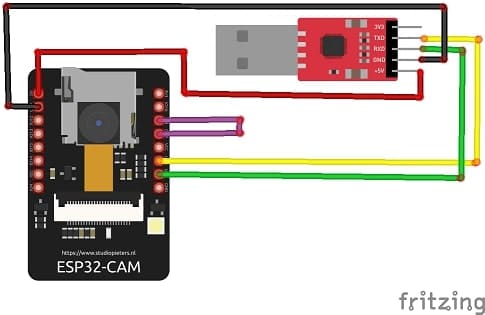
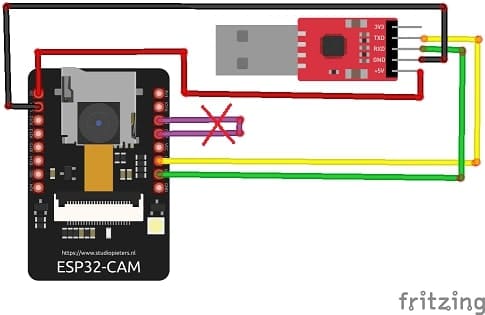
Wiring the CP2102 to ESP32-CAM:
the UOT pin of the ESP32-CAM board to the RXD pin of the CP2102 converter
the UOR pin of the ESP32-CAM board to the TXD pin of the CP2102 converter
the 5V pin of the ESP32-CAM board to the 5V pin of the CP2102 converter
the GND pin of the ESP32-CAM board to the GND pin of the CP2102 converter
the IO0 pin of the ESP32-CAM board to the GND pin of the ESP32-CAM board
Setting Up Flash Mode:
Connect GPIO0 on the ESP32-CAM to GND to enter flashing mode. This connection can be made with a jumper wire.
Programming ESP32-CAM
Installing ESP32 Module in Arduino IDE
To install the ESP32 module in the Arduino IDE, follow these steps:
1- Open the Arduino IDE.
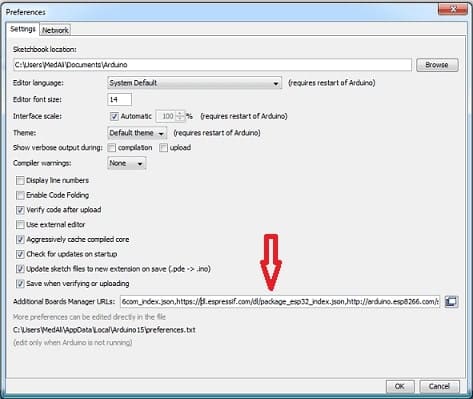
2- Go to File > Preferences.

3- In the Additional Boards Manager URLs field, enter the following URL: https://dl.espressif.com/dl/package_esp32_index.json
4- Go to Tools > Board > Boards Manager.
5- n the Boards Manager window, search for “ESP32” and select “esp32 by Espressif Systems”.
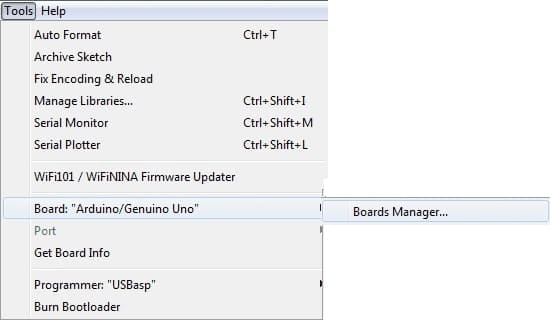
6- Click the Install button to install the ESP32 module.
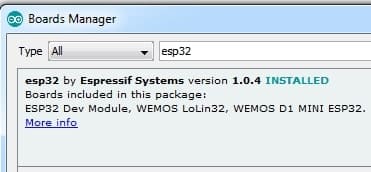
7- Once the installation is complete, close the Boards Manager window.
8- Go to Tools > Board and select “AI THINKER ESP32-CAM” that you want to use.
9- You can now program the ESP32 module using the Arduino IDE
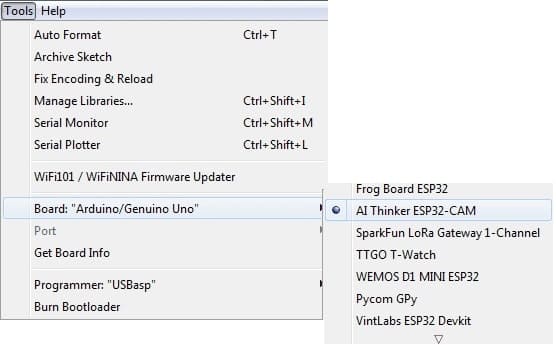
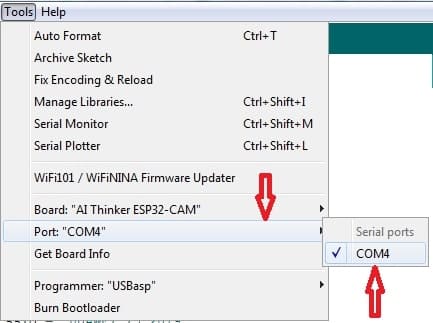
10- Select the COM port corresponding to your ESP32-CAM in the “Tools” > “Port” menu.
Project import “camerawebserver “
The “camerawebserver” project for the ESP32 is sample code that comes with the ESP32 library for the Arduino IDE. This project allows you to create a web server that broadcasts the video captured by the OV2640 camera integrated into the ESP32-CAM.
To use this project, you need to follow these steps:
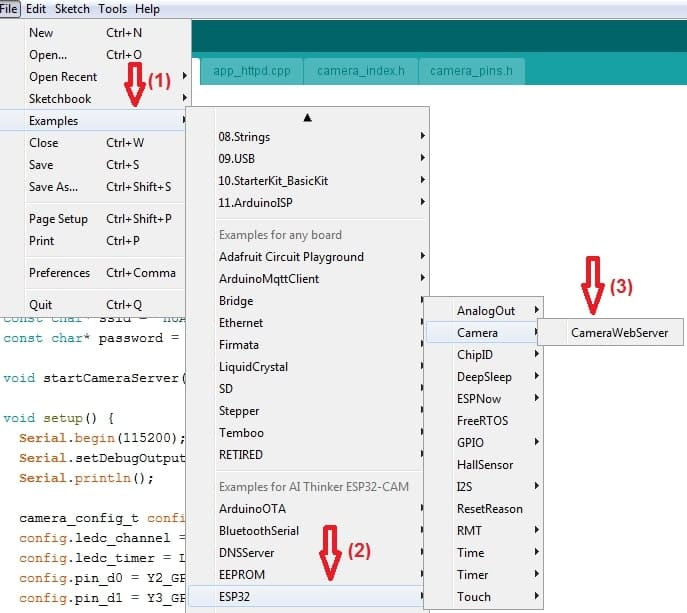
1- Open the “camerawebserver” project from the menu “File” > “Exemples” > “ESP32” > “Camera” > “CameraWebServer”.
2- Edit your Wi-Fi network information by replacing the “ssid” and “password” variables in the code.
|
1 2 |
const char* ssid = "HUAWEI Y5 2019"; const char* password = "b582058c4d86"; |
3- select the camera model corresponding to the AI THINKER ESP32-CAM module.
This selection is done simply by deleting the “//” of comments in front of the line « #define CAMERA MODEL AI THINKER » and commenting out the line chosen by default:
|
1 2 3 4 5 6 |
// Select camera model //#define CAMERA_MODEL_WROVER_KIT //#define CAMERA_MODEL_ESP_EYE //#define CAMERA_MODEL_M5STACK_PSRAM //#define CAMERA_MODEL_M5STACK_WIDE #define CAMERA_MODEL_AI_THINKER |
4- Upload the code to the ESP32-CAM by clicking the “Upload” button.
5- When uploading the program, press the RESET button on the ESP32-CAM board when the IDE tries to connect to the ESP32, during this phase:

6- Wait for the upload to complete
7- Disconnect ESP32-CAM board IO0 pin to ESP32-CAM board GND pin
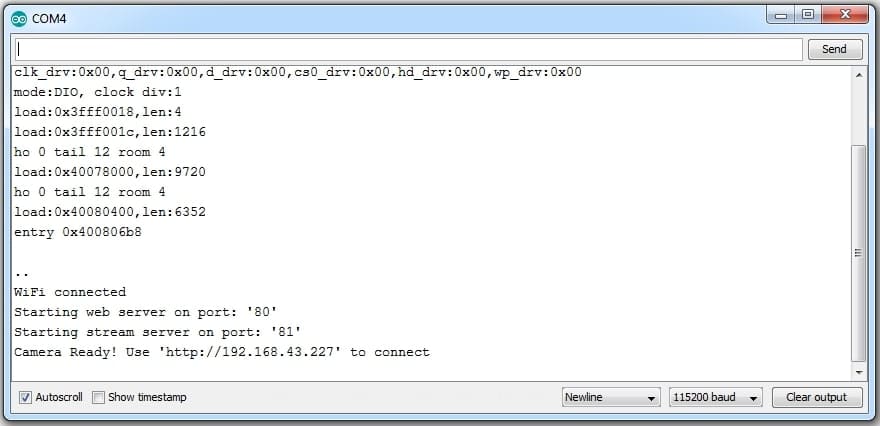
8- Open Serial Monitor
9- Press the RESET button on the ESP32-CAM board
10- We observe the serial monitor to see the IP address of the ESP32-CAM.
11- Open a web browser on your computer and enter the IP address of the ESP32-CAM in the address bar.

12- The web page displayed by the ESP32-CAM should contain a live video feed from the OV2640 camera.
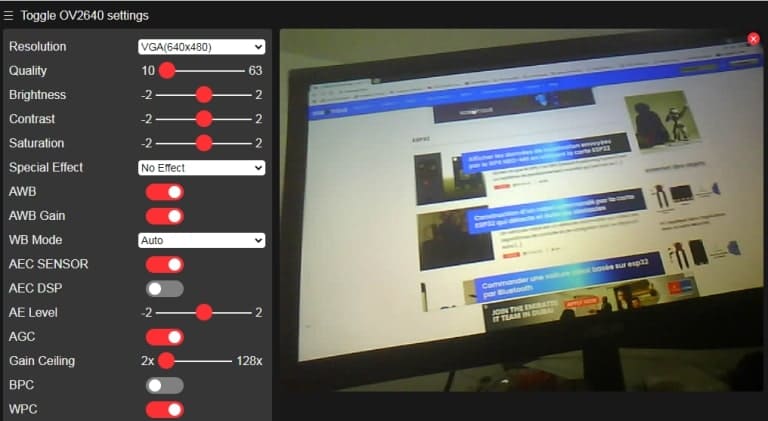
By using this project, you can easily create a web server to stream live video from ESP32-CAM.

