Display RFID ID using Arduino, RFID-RC522 and LCD screen

Tutorial plan
1- Purpose of the tutorial
2- RFID-RC522 module and RFID card
3- Connecting Arduino with RFID-RC522 module and LCD I2C display
4- Arduino program to read RFID ID and Display on LCD screen
Purpose of the tutorial
The main goal of this tutorial is to demonstrate how to read the UID (Unique Identifier) of an RFID card using an RFID-RC522 module and display it on an LCD 16x2 I2C display using an Arduino.
This project is ideal for access control systems, attendance tracking, and security applications.
By the end of this tutorial, you will be able to:
Understand how RFID technology works.
Connect an RFID-RC522 module and LCD I2C display to an Arduino.
Read the UID of an RFID card or tag.
Display the UID on an LCD screen.
Use Arduino libraries for RFID and LCD modules.
RFID-RC522 module and RFID card
What is the RFID-RC522 Module ?
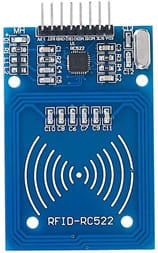
The RFID-RC522 is a low-cost and efficient RFID (Radio-Frequency Identification) module that operates at 13.56 MHz. It is commonly used in access control systems, attendance monitoring, inventory tracking, and other RFID-based projects.
How RFID-RC522 Works?
1- Powering the Module:
The RFID module is powered by 3.3V (⚠ It is NOT 5V tolerant).
2- RFID Communication:
The module emits radio waves (13.56 MHz) that power up nearby RFID tags (Passive Tags).
When an RFID card is placed near the module, it transmits its unique ID (UID).
3- Data Transmission:
The module reads the UID using SPI communication and sends it to the Arduino.
4- Processing and Displaying Data:
The UID is processed and can be displayed on an LCD screen or used for access control systems.
What is an RFID Badge?
![]()
An RFID badge is a type of RFID (Radio-Frequency Identification) tag that is typically used for access control, attendance tracking, and security systems. It contains a unique identification number (UID) that can be read by an RFID reader like the RFID-RC522 module.
How an RFID Badge Works ?
The RFID reader (RC522) emits radio waves (13.56 MHz).
When the RFID badge is near the reader, it absorbs energy and activates.
The badge sends its UID (Unique Identifier) back to the reader.
The reader processes the UID and can use it for authentication (e.g., unlocking a door).
What is an RFID White Card ?

An RFID white card is a blank, contactless RFID card used for identification, authentication, and access control. It contains an embedded RFID chip and an antenna that allows it to communicate with an RFID reader wirelessly.
How an RFID White Card Works?
1- The RFID reader (e.g., RC522) emits a radio signal.
2- The RFID white card absorbs the signal, activating the embedded chip.
3- The card sends its unique ID (UID) or stored data back to the reader.
4- The reader processes the UID, which can be used for authentication or identification.
Connecting Arduino with RFID-RC522 module and LCD I2C display
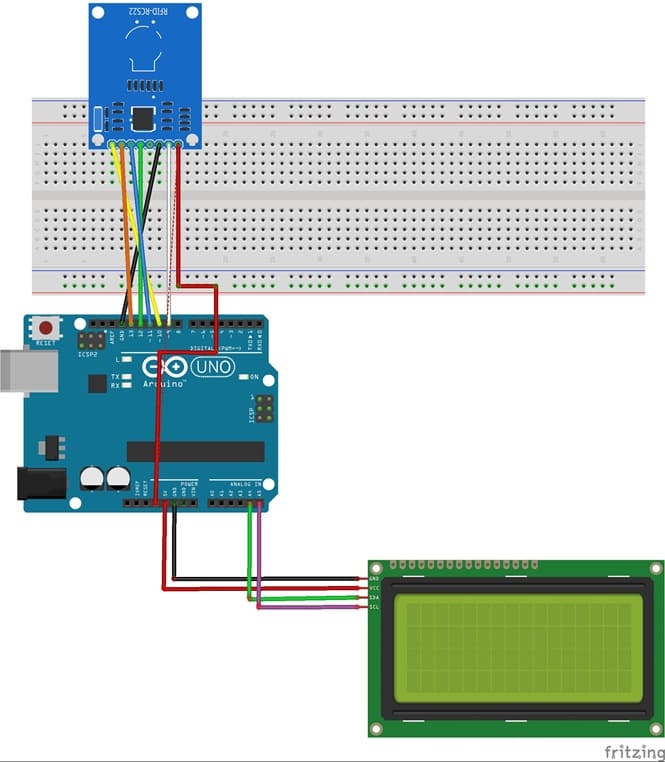
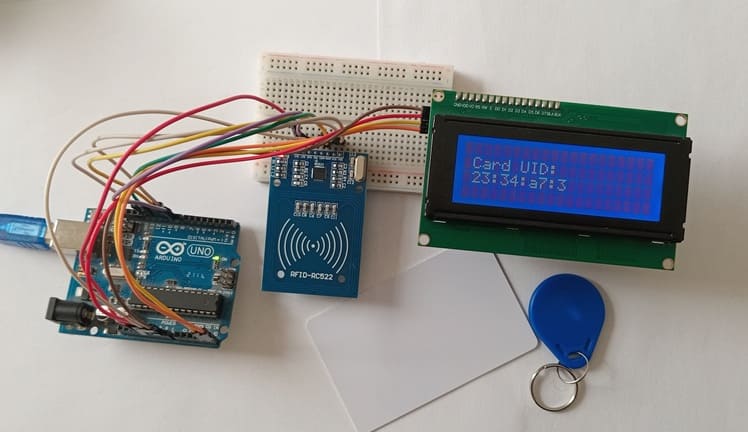
Connection RFID-RC522 to Arduino
RFID-RC522 | Arduino UNO | Description |
VCC | 3.3V | Power supply |
GND | GND | Ground |
SDA (SS) | Pin 10 | Slave Select (SS) |
SCK | Pin 13 | SPI Clock (SCK) |
MOSI | Pin 11 | Master Out Slave In (MOSI) |
MISO | Pin 12 | Master In Slave Out (MISO) |
RST | Pin 9 | Reset |
Connection LCD I2C display to Arduino
LCD I2C Display Pin | Arduino Pin |
GND | GND |
VCC | 5V |
SDA | A4 |
SCL | A5 |
Arduino program to read RFID ID and Display on LCD screen
Here is an Arduino program to read an RFID card's ID using the MFRC522 module and display it on an LCD screen (I2C). This code uses the MFRC522 library for RFID communication and the LiquidCrystal_I2C library for the LCD display.
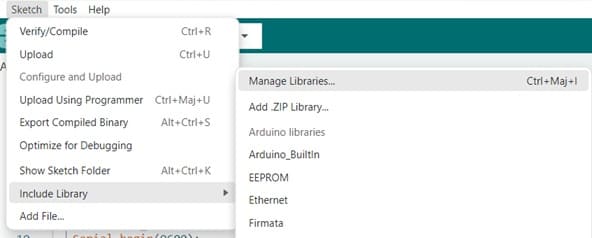
1- Open Arduino IDE.
2- Go to Sketch → Include Library → Manage Libraries.
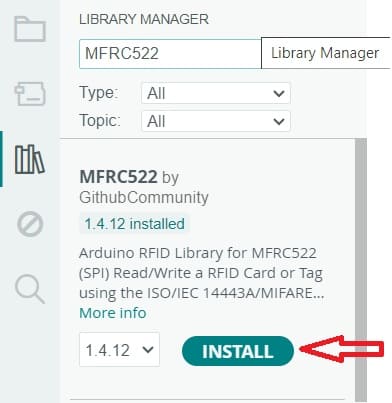
3- Search for MFRC522 and install it.
|
1 2 3 4 5 6 7 8 9 10 11 12 13 14 15 16 17 18 19 20 21 22 23 24 25 26 27 28 29 30 31 32 33 34 35 36 37 38 39 40 41 42 43 44 45 46 47 48 49 50 51 52 53 54 55 56 57 58 59 60 61 |
#include <LiquidCrystal_I2C.h> #include <SPI.h> #include <MFRC522.h> // RFID module pins #define SS_PIN 10 #define RST_PIN 9 // Initialize LCD (40x4) with I2C address 0x27 LiquidCrystal_I2C lcd(0x27, 40, 4); MFRC522 rfid(SS_PIN, RST_PIN); bool cardDetected = false; // Track card status void setup() { Serial.begin(9600); lcd.init(); lcd.backlight(); SPI.begin(); rfid.PCD_Init(); lcd.setCursor(1, 1); lcd.print("Scan your card"); } void loop() { if (!rfid.PICC_IsNewCardPresent() || !rfid.PICC_ReadCardSerial()) { if (cardDetected) { // Only update LCD if the message changes lcd.clear(); lcd.setCursor(1, 1); lcd.print("Scan your card"); cardDetected = false; // Reset status } return; } cardDetected = true; Serial.print("Badge UID: "); lcd.clear(); lcd.setCursor(1, 1); lcd.print("Card UID:"); // Read and display UID String uid = ""; for (byte i = 0; i < rfid.uid.size; i++) { Serial.print(rfid.uid.uidByte[i], HEX); uid += String(rfid.uid.uidByte[i], HEX); if (i < rfid.uid.size - 1) { uid += ":"; } } Serial.println(); lcd.setCursor(1, 2); lcd.print(uid); / Display UID on LCD display delay(5000); // wait 5 sec rfid.PICC_HaltA(); rfid.PCD_StopCrypto1(); } |
How It Works ?
1- The RFID-RC522 module detects an RFID card.
2- The UID (unique identifier) of the card is read and displayed on the LCD.
3- The program waits 5 seconds before allowing another scan.
0 comment
Leave a comment
Passion for robotics

Recent tutorials


Robotics workshop

Polpular tutorials


Making robots

Most commented tutorials


Robotic arm

Categories
Smart Home