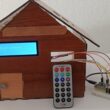
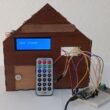
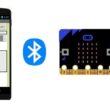
Display on LCD screen a message transmitted to Arduino via Bluetooth
Tutorial plan
1- How to display on LCD I2C screen a message transmitted to Arduino via Bluetooth ?
2- The necessary components to use the LCD I2C 1602 display by Arduino
3- Arduino board wiring diagram with LCD I2C 1602 display
4- Program Arduino UNO to receive and display a message from the Smartphone
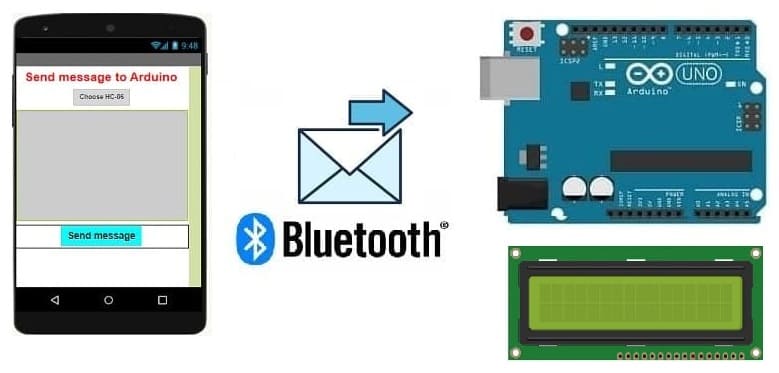
5- Develop a mobile application to send a message to Arduino UNO
How to display on LCD I2C screen a message transmitted to Arduino via Bluetooth ?
To display a message on an I2C LCD screen connected to an Arduino Uno that is receiving messages via Bluetooth, you'll need to follow a few steps. Here's a general guide to help you achieve this:
Hardware Setup:
1- Connect your I2C LCD screen to the Arduino Uno. Typically, this involves connecting the SDA and SCL pins on the LCD to the corresponding pins on the Arduino Uno, as well as providing power and ground.
2- Connect the Bluetooth module (e.g., HC-05) to the Arduino Uno. Connect the RX pin of the Bluetooth module to the TX pin of the Arduino Uno and vice versa. Also, connect the VCC and GND pins appropriately.
Software Setup:
1- Make sure you have the required libraries installed. You may need to install the "LiquidCrystal_I2C" library for the I2C LCD and the "SoftwareSerial" library for Bluetooth communication. You can install these libraries through the Arduino IDE Library Manager.
2- Write the Arduino code.
App Inventor:
1- Open App Inventor (https://appinventor.mit.edu/).
2- Create a new project.
3- Drag and drop the following components onto the designer screen:
4- In the Blocks editor, use the following blocks to connect and send a message to Arduino UNO
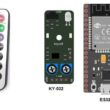
The necessary components to use the LCD I2C 1602 display by Arduino
Arduino UNO Board

The Arduino Uno board is a microcontroller board based on the ATmega328P microcontroller. It's one of the most popular and widely used boards in the Arduino family due to its simplicity and versatility.
It is the central control unit for your project.
HC-06 module bluetooth

The HC-06 Bluetooth module is a commonly used serial communication module that enables Bluetooth connectivity for various projects, including Arduino-based systems. It acts as a serial port Bluetooth module, allowing wireless communication between devices.
This module is used for receiving data from smartphone via Bluetooth.
LCD I2C 1602 Display:

The LCD I2C 1602 display is a type of liquid crystal display (LCD) that utilizes the I2C (Inter-Integrated Circuit) communication protocol to interface with microcontrollers or other devices.
Jumper Wires:

For making temporary connections and wiring between components.
Breadboard:

A breadboard is a useful tool for creating temporary electronic circuits. It allows you to connect components without soldering.
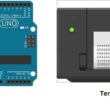
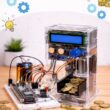
Arduino board wiring diagram with LCD I2C 1602 display
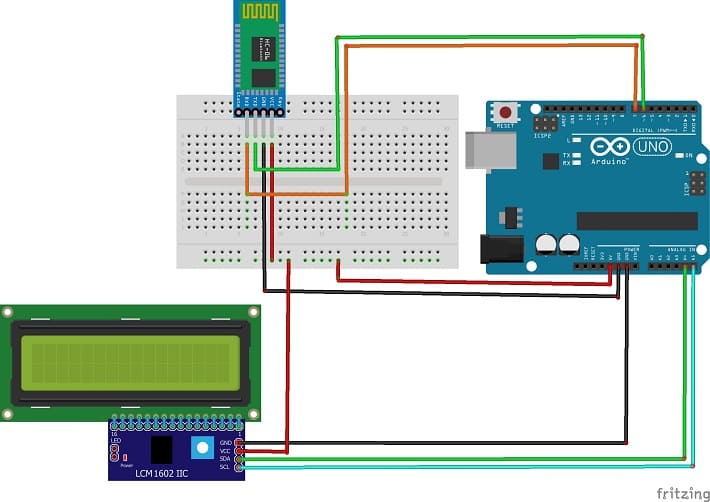
Connect the LCD I2C 1602 Display to Arduino:
1- Connect the SDA (data line) of the LCD I2C 1602 display to A4 pin of Arduino.
2- Connect the SCL (clock line) of the LCD I2C 1602 display to A5 pin of Arduino.
3- Connect the VCC pin of the LCD I2C 1602 display to the 5V pin of Arduino.
4- Connect the GND pin of the LCD I2C 1602 display to GND pin of Arduino.
Connect the HC-06 Bluetooth Module to Arduino:
1- VCC pin of HC-06 module to 5V pin of Arduino
2- GND pin of HC-06 module to GND pin of Arduino
3- TXD pin of HC-06 module to pin 6 of Arduino
4- RXD pin of HC-06 to pin 7 of Arduino
Program Arduino UNO to receive and display a message from the Smartphone
To program the Arduino board, you'll need to follow these steps.
1- import this library : LiquidCrystal_I2C for I2C LCD screen
2- Create a new Arduino script to read data from HC-06 module and display it on LCD screen :
|
1 2 3 4 5 6 7 8 9 10 11 12 13 14 15 16 17 18 19 20 21 22 23 24 25 26 27 28 |
a#include <SoftwareSerial.h> #include <LiquidCrystal_I2C.h> LiquidCrystal_I2C lcd(0x27, 20, 4); SoftwareSerial hc06(6,7); String message=""; void setup(){ //Initialize Bluetooth Serial Port hc06.begin(9600); lcd.init(); } void loop(){ //Read data from HC06 while(hc06.available()>0){ message+=(char)hc06.read(); } //Select function with cmd if(message!=""){ lcd.clear(); lcd.backlight(); lcd.setCursor(0, 0); lcd.print("Message received"); lcd.setCursor(0,1); lcd.print(message); message=""; } delay(100); } |
Develop a mobile application to send a message to Arduino UNO
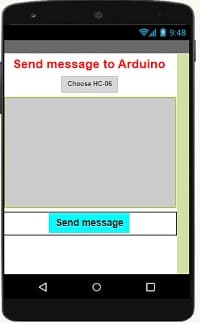
1- Create the designer of mobile app with App Inventor.
- Use the available Bluetooth components to establish a connection with the Arduino.
- Add text fields to write a message.
- Add button to sen the message to Arduino
Here is the Designer part of the application with App Inventor :
2. Programming the application with App Inventor:
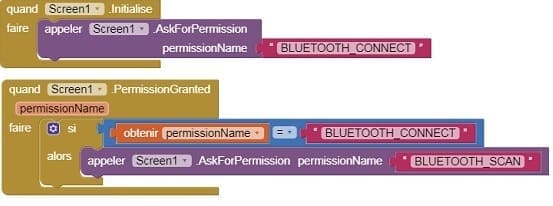
1- Starting with Android 12, Bluetooth permissions have been enhanced to improve security and user data protection. This is why we must declare the authorizations that your application needs in the AndroidManifest.xml file. For Bluetooth, you'll need to include ACCESS_FINE_LOCATION, BLUETOOTH_SCAN, and possibly BLUETOOTH_CONNECT permissions, depending on the features you're using.
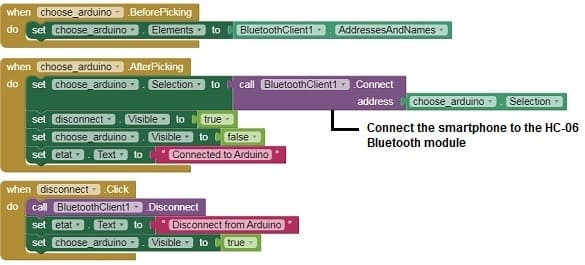
2- Add the the necessary blocks to connect the smartphone to the HC-06 Bluetooth module
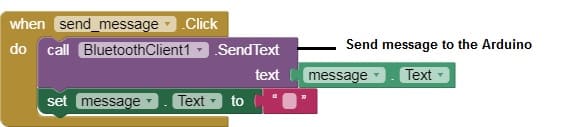
3- Use these programming blocks to send message from Smartphone to Arduino via Bluetooth
Download projectDownload application
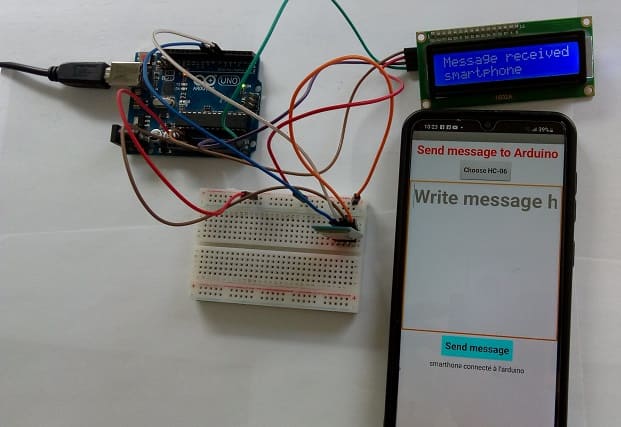
Testing :
1- Upload the MicroPython code to Arduino.
2- Install and launch the app created with App Inventor on your smartphone.
3- Connect to Arduino from the mobile app.
4- Check that the message is sent to the Arduino
0 comment
Leave a comment
Passion for robotics

Recent tutorials


Robotics workshop

Polpular tutorials


Making robots

Most commented tutorials


Robotic arm

Categories
Smart Home