Display data on Micro:bit board display with MakeCode

Micro:bit 19-04-23
200 0

What is a Micro:bit card ?

carte microbit

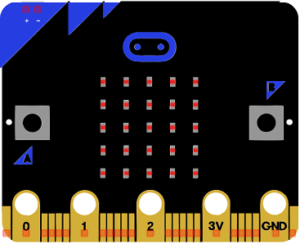
The Micro:bit is a pocket-sized, programmable computer that was designed by the BBC and several partners as a tool to help students learn about coding and electronics. It is a small, low-cost, and easy-to-use device that allows users to create a wide range of projects, from simple games to complex robots.

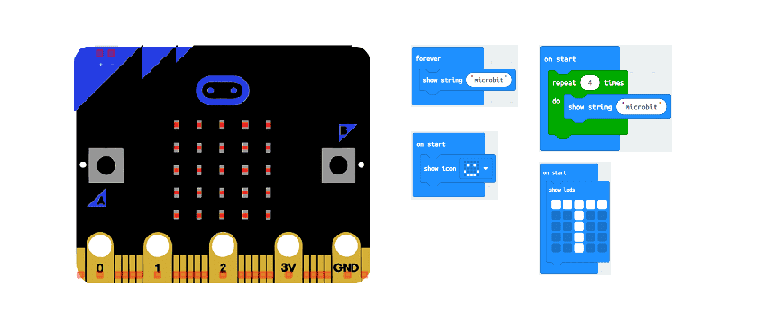
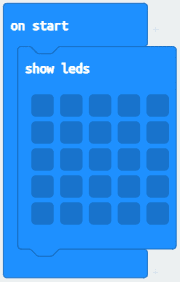
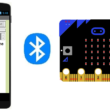
The Micro:bit card includes a number of features that make it a powerful learning tool. It has 25 programmable LED lights that can be used to create simple animations or display messages, as well as two buttons, an accelerometer, and a compass. It also includes wireless communication capabilities, allowing it to communicate with other Micro:bits or with other devices such as smartphones or computers.

To program the Micro:bit, users can use a variety of programming languages and environments, including block-based languages like Scratch and JavaScript-based languages like MicroPython. The Micro:bit can be connected to a computer using a USB cable, or it can be programmed wirelessly using Bluetooth.

Using MakeCode as a programming language for the Micro:bit board

MakeCode interface

MakeCode is a free, open-source platform for creating interactive experiences with technology. It was created by Microsoft as a tool for teaching coding and computational thinking to students of all ages and skill levels.

MakeCode supports a variety of programming languages, including block-based languages like Scratch and JavaScript-based languages like TypeScript. It also includes a variety of tools for working with hardware, such as support for microcontrollers like the Micro:bit and Circuit Playground, as well as sensors and other electronics components.

One of the key features of MakeCode is its visual programming interface, which allows users to drag and drop blocks of code to create programs. This makes it easy for beginners to learn the basics of coding, while also providing more advanced users with the flexibility to write their own code.

In addition to its programming tools, MakeCode also includes a variety of resources and tutorials to help users get started with coding and electronics. It also has a strong community of users who share projects, tips, and resources with each other.

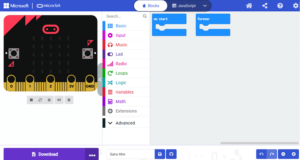
Display text on the Micro:bit board displa

To display text on the Micro:bit board display with MakeCode, follow these steps:

  1. Go to the MakeCode website and create a new project for the Micro:bit.
  2. In the “Basic” category of the code editor, drag the “show string” block and drop it into the workspace.
  3. Click on the text field in the “show string” block and type the text that you want to display.
  4. Drag the “forever” block from the “on starts” category and snap it around the “show string” block. This will make the text display continuously on the board.
  5. Connect your Micro:bit to your computer and click on the “Download” button in the MakeCode editor.
  6. A file with a .hex extension will be downloaded. Drag and drop this file onto the Micro:bit drive that appears on your computer to transfer the code to the board.
  7. Your Micro:bit will now display the text that you entered in the “show string” block.

Here’s an example code block in MakeCode to display the text “micro:bit!” on the Micro:bit board display:

Scroll text for a specified number of times

To scroll text for a specified number of times on the Micro:bit board display with MakeCode, you can use the “scroll string” block and combine it with a loop that repeats a specific number of times. Here are the steps:

  1. Create a new project for the Micro:bit on the MakeCode website.
  2. Drag the “scroll string” block from the “Basic” category and drop it into the workspace.
  3. Type the text that you want to scroll in the “scroll string” block.
  4. Drag the “repeat” block from the “Loops” category and snap it around the “scroll string” block.
  5. Type the number of times you want the text to scroll in the “repeat” block.
  6. Connect your Micro:bit to your computer and click on the “Download” button in the MakeCode editor.
  7. A file with a .hex extension will be downloaded. Drag and drop this file onto the Micro:bit drive that appears on your computer to transfer the code to the board.

Here’s an example code block in MakeCode to scroll the text “microbit” four times on the Micro:bit board display:

Repeat show string

Scrolling text on the Micro:bit card display indefinitely

To display scrolling text indefinitely on the Micro:bit card display using MakeCode, you can use a loop that constantly scrolls the text. Here’s how you can do it:

  1. Open the MakeCode editor and create a new project.
  2. Click on the “Basic” category in the blocks menu and drag the “show string” block into the workspace.
  3. Enter the text you want to display in the “show string” block. You can also customize the font and scroll speed in the block options.
  4. Add a “forever” loop around the “show string” block. This will make the text continuously scroll on the display.
  5. Download the code to the Micro:bit and test it out.

Here’s an example code that displays the text “microbit” scrolling indefinitely:

scrolling_text_makecode

Display icons on the Micro:bit display

To display icons on the Micro:bit display using MakeCode, you can use the “show icon” block. Here’s how you can do it:

  1. Open the MakeCode editor and create a new project.
  2. Click on the “Basic” category in the blocks menu and drag the “show icon” block into the workspace.
  3. Choose the icon you want to display from the drop-down menu in the “show icon” block options. There are several built-in icons to choose from, such as a heart, a smiley face, and an arrow.
  4. You can also customize the brightness of the icon by adjusting the “brightness” slider in the block options.
  5. Download the code to the Micro:bit and test it out.

MakeCode offers you 40 icons to display:

makecode_icônes

Create our own icons with MakeCode

steps:

  1. Open MakeCode editor: Go to https://makecode.microbit.org/ and click on “New Project” to create a new project.
  2. Choose “Basic” from the toolbox: Once you’re in the MakeCode editor, click on the “Basic” category in the toolbox on the left-hand side.
  3. Choose “show leds” block: Drag the “show leds” block from the toolbox onto the coding area.
  4. Create your icon: To create your icon, you can turn on or off the LED lights by clicking on the square representing each LED in the “show leds” block. You can also change the color of each LED by selecting it and using the color palette on the right-hand side.
  5. Save your icon: Once you’re happy with your icon, click on the “Download” button to save it as an image file. You can then use this image file in your MakeCode project by uploading it to the “Images” category in the toolbox.
  6. Use your icon in your project: To use your icon in your project, simply drag the “show leds” block onto the coding area and replace the default icon with your own by clicking on the “Upload” button and selecting your image file.

With MakeCode, you can create your own icons using the LED lights on the micro:bit quickly and easily, allowing you to customize your micro:bit projects in a unique way.

makecode_show_leds

Flash an icon

To flash an icon with MakeCode, you can follow these steps:

  1. Open MakeCode editor: Go to https://makecode.microbit.org/ and click on “New Project” to create a new project.
  2. Choose “Basic” from the toolbox: Once you’re in the MakeCode editor, click on the “Basic” category in the toolbox on the left-hand side.
  3. Choose “show leds” block: Drag the “show leds” block from the toolbox onto the coding area.
  4. Create your icon: To create your icon, you can turn on or off the LED lights by clicking on the square representing each LED in the “show leds” block. You can also change the color of each LED by selecting it and using the color palette on the right-hand side.
  5. Add a loop block: To make the icon flash repeatedly, drag the “loop” block from the toolbox onto the coding area and place the “show leds”, “pause”, and “clear screen” blocks inside the loop.
  6. Save and download: Once you’re happy with your flashing icon, click on the “Download” button to save it as a .hex file.
  7. Flash your micro:bit: Connect your micro:bit to your computer and drag the .hex file onto the micro:bit icon in your file explorer.
makecode-clignoter-icône

0 comment

Leave a comment

Veuillez noter s'il vous plaît*

Votre adresse e-mail ne sera pas publiée. Les champs obligatoires sont indiqués avec *

Purpose of this website

Educational robotics refers to the use of robots and robotics technology to promote learning in educational settings. It involves the integration of technology, engineering, and computer science into the classroom, allowing students to engage in hands-on, project-based learning experiences.
In this context, our website represents an excellent resource for parents, teachers and children who wish to discover robotics.

Contact details

Zaouiet Kontech-Jemmel-Monastir-Tunisia

+216 92 886 231

medaliprof@gmail.com

Pictures of the articles

Robotic site created by MedAli-Teacher info