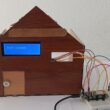
Detect gas leaks using Micro:bit, MQ-4 sensor and SSD1306 display
Tutorial plan
1- How does the Micro:bit detect gas leaks and display an alert message ?
2- Necessary system components controoled by Micro:bit
3- Micro:bit wiring with with the MQ-4 sensor and SSD1306 screen
4- Program Micro:bit to detect the gas leak and display an alert message
How does the Micro:bit detect gas leaks and display an alert message ?
To detect gas leaks and display an alert message on SSD1306 screen using the Micro:bit, you would typically follow these steps:
1- Gas Sensor Integration: Connect a gas sensor capable of detecting the desired gases to the Micro:bit. This could involve using analog or digital pins, I2C, or UART communication protocols, depending on the sensor's interface.
2- SSD1306 Screen Connection: Connect SSD1306 screen to the Micro:bit. The SSD1306 screen usually require digital pins for data transfer and control, so make sure you wire it accordingly.
3- Programming: Write code in the MakeCode environment or another compatible programming language to read data from the gas sensor and display alert messages on the SSD1306 screen when gas levels exceed a certain threshold.
4- Alert Thresholds: Define thresholds for gas concentration levels that constitute a gas leak. When the sensor detects gas levels above these thresholds, trigger an alert.
5- Display Alert Message: When an alert condition is met, use the Micro:bit to send appropriate messages to the SSD1306 screen, indicating the presence of a gas leak and possibly providing instructions for safety measures.
Necessary system components controoled by Micro:bit
Micro:bit board:

The Micro:bit board is a small, programmable microcontroller board designed for education and beginner-friendly coding projects. It was developed by the BBC, in collaboration with various partners, as a tool to introduce young people to programming and electronics.
The GPIO expansion card for the Micro:bit card

The GPIO expansion board for the Micro:bit board expands the capabilities of the Micro:bit board by adding more input/output (GPIO) pins and additional functionality.
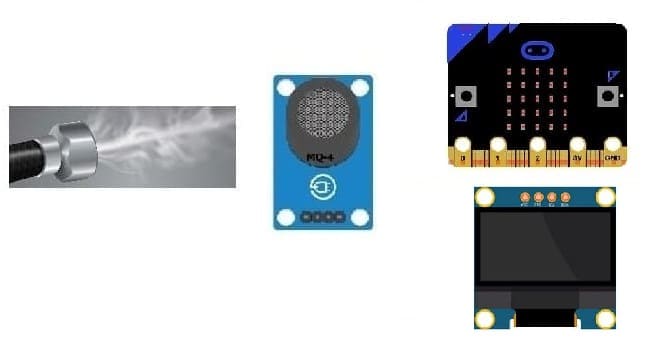
MQ-4 gas sensor:
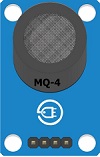
The MQ-4 gas sensor is a type of semiconductor gas sensor commonly used to detect the presence of methane (CH4) gas in the atmosphere. It belongs to a family of gas sensors known as the "MQ series," which are widely used in various applications, including industrial safety, gas leakage detection, and environmental monitoring.
SSD1306 display:
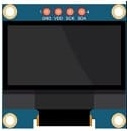
The SSD1306 display is a type of OLED (Organic Light-Emitting Diode) display that uses the SSD1306 driver chip.
The screen is used to display the alert message in case of gas leak detection.
Jumper Wires:

For making temporary connections and wiring between components.
Breadboard:

A breadboard is a useful tool for creating temporary electronic circuits. It allows you to connect components without soldering.
Micro:bit wiring with with the MQ-4 sensor and SSD1306 screen
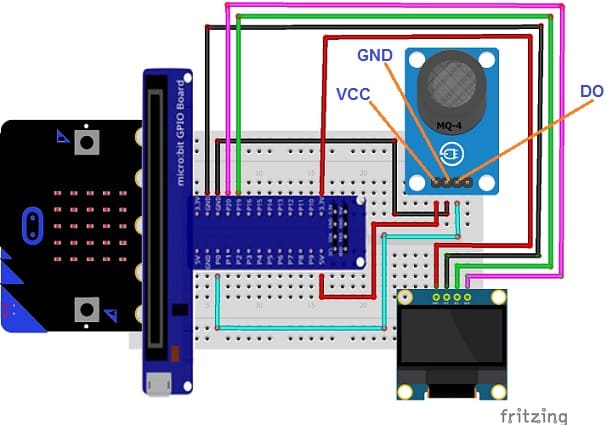

Details of the MQ-4 sensor connections to Micro:bit :
- Connect the VCC pin of the MQ-4 sensor to the 5V pin of GPIO board
- Connect the GND pin of the MQ-4 sensor to the GND pin of the Micro:bit
- Connect the DO pin of the MQ-4 sensor to the P0 pin of the Micro:bit
Details of the SSD1306 screen connections to Micro:bit :
- Connect the SDA (data line) of the SSD1306 display to GPIO21 pin of Micro:bit.
- Connect the SCL (clock line) of the SSD1306 display to GPIO22 pin of Micro:bit.
- Connect the VCC pin of the SSD1306 display to the 3.3V pin of Micro:bit
- Connect the GND pin of the SSD1306 display to GND pin of Micro:bit.
Program Micro:bit to detect the gas leak and display an alert message
To program the Micro:bit to detect a gas leak and display an alert message on SSD1306 screen using MakeCode, you can follow these steps:
1- Open MakeCode Editor: Go to the MakeCode website (https://makecode.microbit.org/) and create a new project.
2- Add SSD1306 Extension:
Look for "Extensions" and click on it.

In the search box, type "muselab-oled-v2" to find the OLED extension.
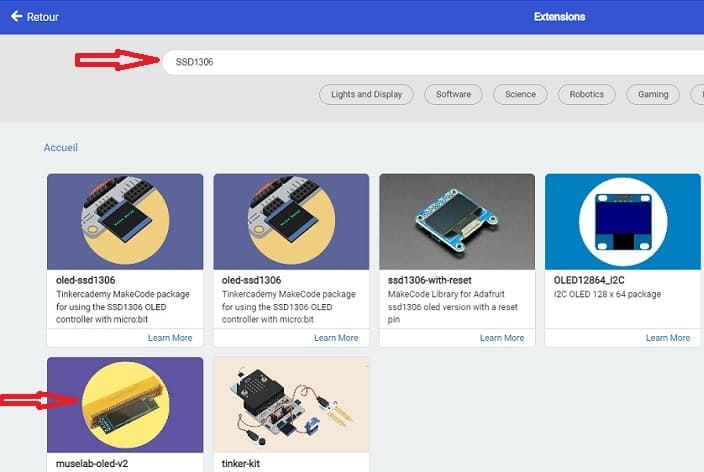
Click on the "SSD1306" extension to add it to your project.
3- Program the Gas Leak Detection: Use blocks to program the Micro:bit to read data from the gas sensor and display an alert message on the SSD1306 screen when a gas leak is detected. Here's a step-by-step guide:
a. Drag an "on start" block from the "Basic" category to the workspace. This block will execute once when the Micro:bit starts.
b. Drag a "forever" block from the "Basic" category inside the "on start" block. This block will continuously run the code inside it.
c. Inside the "forever" block, add code to read the data from the gas sensor. Use appropriate blocks from the "Pins" category to read analog or digital data from the sensor.
d. Set a threshold value for gas concentration. If the gas concentration exceeds this threshold, it indicates a gas leak.
e. Use conditional statements (e.g., "if...else") to check if the gas concentration exceeds the threshold.
f. Inside the conditional statement for detecting a gas leak, add blocks to display an alert message on the SSD1306 screen. Use blocks from the SSD1306 extension to control the display.
4- Test Your Code: Once you've programmed the Micro:bit, click on the "Download" button to download the code onto your Micro:bit. Connect the gas sensor to the Micro:bit and power it up. Test your code to ensure that it detects gas leaks and displays alert messages on the SSD1306 screen as expected.
Here's a basic example of how your MakeCode program might look:
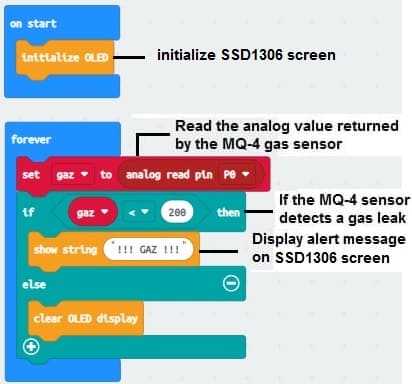
This example continuously reads the value from the gas sensor, checks if it exceeds the predefined threshold, and displays an alert message on the SSD1306 screen if a gas leak is detected. Adjust the threshold value according to your sensor's sensitivity and the desired detection level.
0 comment
Leave a comment
Passion for robotics

Recent tutorials

Robotics workshop

Polpular tutorials


Making robots

Most commented tutorials


Robotic arm

Categories
Smart Home