Detect gas leaks using Arduino, MQ-4 sensor and LCD screen
Tutorial plan
Introduction
1- How does the arduino detect gas leaks and display an alert message on the LCD ?
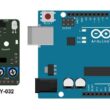
2- Necessary system components
3- Mounting the Arduino board with the MQ-4 sensor and LCD display
4- Program the Arduino board to detect the gas leak and display an alert message
Introduction
Gas leak detection refers to the process of identifying and locating leaks in systems that contain gases, such as natural gas, propane, methane, or other potentially hazardous gases. This process is crucial for ensuring safety, preventing accidents, and minimizing environmental impact.
Various methods and technologies are used for gas leak detection, including:
Gas Sensors: Gas sensors, such as the MQ-4 sensor mentioned earlier, are commonly employed for detecting specific gases. These sensors operate based on principles such as conductivity changes, catalytic reactions, or infrared absorption. They can be integrated into fixed systems or portable devices for continuous monitoring or spot-checking.
Electronic Gas Detectors: Electronic gas detectors are sophisticated instruments designed for detecting a wide range of gases. They typically utilize advanced sensor technologies combined with microcontrollers for accurate and reliable gas detection. These detectors may provide visual and audible alarms when gas concentrations exceed predefined thresholds.
Ultrasonic Leak Detectors: Ultrasonic leak detectors are capable of detecting gas leaks by sensing the ultrasonic sound produced by escaping gas. They are particularly useful for detecting leaks in pressurized systems or pipelines.
Flame Ionization Detectors (FID): FID instruments detect hydrocarbon gases by measuring the ionization of molecules in a flame. They are highly sensitive and are often used in industrial settings for detecting volatile organic compounds (VOCs) and other hydrocarbons.
Visual Inspection: Visual inspection involves physically inspecting gas pipes, fittings, valves, and other components for signs of leakage, such as corrosion, cracks, or damaged seals. This method is commonly used in conjunction with other detection techniques.
Gas Tracer Dyes: Gas tracer dyes are sometimes added to gas lines to aid in leak detection. These dyes are visible under ultraviolet light and can help locate leaks by fluorescing at the point of leakage.
Gas Chromatography: Gas chromatography is a laboratory technique used for analyzing the composition of gas samples. While not typically used for real-time leak detection, it can be employed for precise analysis and identification of gas components.
Effective gas leak detection often involves a combination of these methods to ensure comprehensive coverage and reliable results. Regular inspection, maintenance, and calibration of detection equipment are essential for maintaining the safety and integrity of gas systems.
How does the arduino detect gas leaks and display an alert message on the LCD ?
The MQ-4 gas sensor is a type of semiconductor gas sensor commonly used to detect the presence of methane (CH4) gas in the atmosphere. It belongs to a family of gas sensors known as the "MQ series," which are widely used in various applications, including industrial safety, gas leakage detection, and environmental monitoring.
Using this sensor, we can create a simple but effective gas leak detection system, controlled by an Arduino board and providing visual alerts via an LCD display.
Here is a brief description of this system:
1- The Arduino board periodically reads the analog value from the MQ-4 sensor using one of its analog pins.
2- Based on the read value, the Arduino board determines if the gas concentration exceeds a predefined threshold, indicating the presence of a gas leak.
3- If a gas leak is detected, the Arduino board sends a signal to clear the LCD display and display an alert message indicating the presence of a gas leak.
4- If no gas leak is detected, a message indicating the absence of a leak is displayed on the LCD display.
5- This process repeats in a loop, allowing continuous monitoring of gas presence and real-time alert display.
By combining these components, we can create a simple yet effective gas leak detection system controlled by an Arduino board and providing visual alerts via an LCD display.
Necessary system components
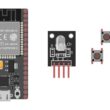
Arduino UNO Board

The Arduino Uno board is a microcontroller board based on the ATmega328P microcontroller. It's one of the most popular and widely used boards in the Arduino family due to its simplicity and versatility.
It is the central control unit for your project.
MQ-4 gas sensor:
The MQ-4 gas sensor is used to detect gas leak
LCD I2C 1602 Display:

The LCD I2C 1602 display is a type of liquid crystal display (LCD) that utilizes the I2C (Inter-Integrated Circuit) communication protocol to interface with microcontrollers or other devices.
The LCD screen is used to display the alert message in case of gas leak detection.
Jumper Wires:

For making temporary connections and wiring between components.
Breadboard:

A breadboard is a useful tool for creating temporary electronic circuits. It allows you to connect components without soldering.
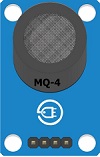
Mounting the Arduino board with the MQ-4 sensor and LCD display
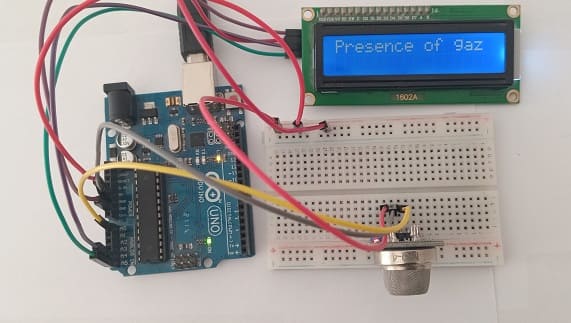
Connect the MQ-4 sensor connections to the Arduino board :
- Connect the VCC pin of the MQ-4 sensor to the 5V pin of the Arduino
- Connect the GND pin of the MQ-4 sensor to the GND pin of the Arduino
- Connect the DO pin of the MQ-4 sensor to the A0 pin of the Arduino
Connect the LCD I2C 1602 Display to Arduino:
- Connect the SDA (data line) of the LCD I2C 1602 display to A4 pin of Arduino.
- Connect the SCL (clock line) of the LCD I2C 1602 display to A5 pin of Arduino.
- Connect the VCC pin of the LCD I2C 1602 display to the 5V pin of Arduino.
- Connect the GND pin of the LCD I2C 1602 display to GND pin of Arduino.
Program the Arduino board to detect the gas leak and display an alert message
Here is a simple code example to accomplish this task:
import this library : LiquidCrystal_I2C for I2C LCD screen
|
1 2 3 4 5 6 7 8 9 10 11 12 13 14 15 16 17 18 19 20 21 22 23 24 25 26 27 |
#include <LiquidCrystal_I2C.h> LiquidCrystal_I2C lcd(0x27, 20, 4); int analogPin = A0; // Capteur de gaz MQ-4 analog interface int analogVal; //analog readings String message=""; void setup(){ lcd.init(); Initialize LCD Screen } void loop(){ // Read analog value from gas sensor analogVal = analogRead(analogPin); lcd.clear(); // effacer le contenu de l’Afficheur LCD lcd.backlight(); // active le rétro-éclairage <span class="hljs-comment">// Check if gas concentration exceeds threshold</span> if (analogVal<=60) { <span class="hljs-comment">// Display alert message on LCD </span> lcd.print("Presence of gaz"); } else { lcd.print("Absence of gaz"); } delay(1000); } |
In this example:
1- We read the analog value from the gas sensor and compare it to a predefined threshold.
2- If the sensor reading exceeds the threshold, we set a flag (analogVal) to true.
3- Based on the flag, we display appropriate messages on the LCD screen. If a gas leak is detected, we display an alert message; otherwise, we display a message indicating no gas leak.
4- The process repeats in a loop, continuously monitoring the gas sensor and updating the LCD display accordingly.
0 comment
Leave a comment
Passion for robotics

Recent tutorials


Robotics workshop

Polpular tutorials


Making robots

Most commented tutorials


Robotic arm

Categories
Smart Home