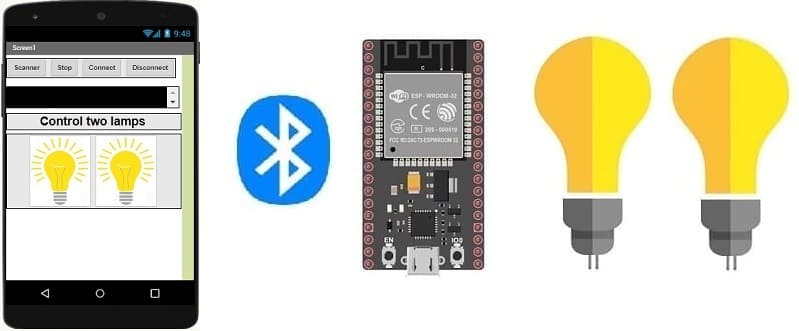
Control two lamps connected to the ESP32 board via Bluetooth
Tutorial plan
Introduction
1- Why do we use App Inventor to create a mobile application capable of communicating the smartphone with the ESP32 board?
2- The components needed to control two lamps with the ESP32 board
3- Mounting the ESP32 board with two lamps and two relays
4- Turn on two lamps connected to the ESP32 board by a smartphone via Bluetooth using the Micropython and MIT Inventor app
Introduction
You can control a lamp connected to an ESP32 board via Bluetooth. The ESP32 is a versatile microcontroller that can communicate over Bluetooth using various protocols such as Bluetooth Low Energy (BLE) or Classic Bluetooth. You'll need to:
Connect Lamp to ESP32: Connect the lamp to the ESP32 board, typically through a relay or some sort of switch that the ESP32 can control.
Bluetooth Communication: Use a mobile app or a device with Bluetooth capabilities to communicate with the ESP32. You can develop a custom app or use pre-existing apps like Bluetooth terminal apps to send commands.
Programming: Write code for the ESP32 to receive commands via Bluetooth and control the connected lamp accordingly. For instance, you might send specific signals via Bluetooth to turn the lamp on or off.
Remember to pair your Bluetooth-enabled device (e.g., smartphone) with the ESP32 before attempting to control the lamp.
Ensure to handle security measures if you plan to control devices remotely to prevent unauthorized access or misuse.
Why do we use App Inventor to create a mobile application capable of communicating the smartphone with the ESP32 board?
App Inventor is a visual programming environment that simplifies the process of creating Android applications. It's particularly useful for beginners or those without extensive programming experience because of its block-based interface, which allows users to drag and drop visual blocks to create functionalities instead of writing code from scratch.
When it comes to communicating with an ESP32 board (or any hardware) from a smartphone, App Inventor provides a user-friendly interface to create apps that can interact with hardware via Bluetooth or Wi-Fi. Here's why it's commonly used for this purpose:
Ease of Use: App Inventor's block-based system makes it easy to create mobile apps without requiring extensive coding knowledge. It simplifies the process of creating UI elements, defining behaviors, and handling interactions.
Visual Interface: Its visual interface allows users to create apps by assembling blocks that represent different functionalities. This makes it more intuitive and accessible compared to traditional text-based coding.
Bluetooth and Wi-Fi Support: App Inventor provides built-in components and blocks that allow easy integration with Bluetooth or Wi-Fi modules, which are commonly used for communication with devices like the ESP32.
Rapid Prototyping: For quick prototyping or proof-of-concept projects, App Inventor enables fast development cycles. Users can quickly iterate and test functionalities before moving on to more complex development stages.
Community Support: It has a supportive community with resources, tutorials, and forums where users can find help, share ideas, and troubleshoot issues related to integrating hardware with mobile apps.
The components needed to control two lamps by ESP32 card
To control two lamps using the ESP32 board, you will need the following components:
ESP32 Board:
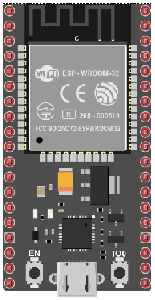
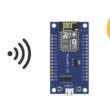
The ESP32 is a microcontroller board that features built-in WiFi and Bluetooth capabilities. It can be programmed and used to control the lamp.
Two Relays Modules:
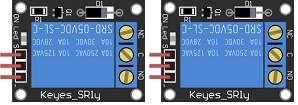
You'll need a relay module that is compatible with the ESP32 card and can switch the high-voltage lamp. Ensure it's rated for the voltage and current required for your lamp.
Two Lamps (220V):
The two lamps is rated for 220V. Ensure it's in working condition and safe to use.
Power Supply for the Lamp:

You'll need a power source for the lamp, typically a 220V AC power supply.
Wiring:
Various wires and cables for connecting the components in your circuit.
Breadboard:

A breadboard is a prototyping board that allows you to build circuits without soldering. It provides a convenient way to connect the components together.
Jumper Wires:

You'll need jumper wires to make connections between the ESP32 card, lamp, relay, and breadboard. Ensure you have male-to-male jumper wires or a mix of male-to-male and male-to-female wires, depending on your specific needs.
Mounting the ESP32 card with two lamps and two relays
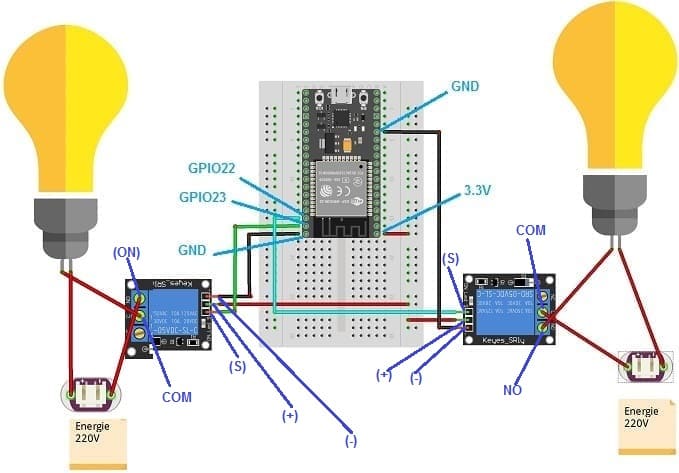
To control two lamps using a ESP32 board, you will need to use two relays modules to safely interface the low-voltage ESP32 card with the high-voltage lamp. Here are the step-by-step instructions to set up the ESP32 with two lamps :
1- Safety First: Ensure the two lamps are disconnected from any power source before proceeding.
2- Connect the first Relay to the ESP32:
- Connect the relay's control pin (S) to pin 23 of ESP32 board.
- Connect the pin (+) of relay to pin 3.3V of ESP32 board.
- Connect the relay's ground pin (-) to the ESP32's GND.
3- Connect the first Lamp and the power supply to the Relay:
- Connect one of the the the power supply wires to the relay's common (COM) terminal.
- Connect the phase wire of the lamp's to the normally open (NO) terminal of the relay.
- Connect the neutral wire of the power supply directly to the neutral wire of the lamp.
4- Connect the second Relay to the ESP32:
- Connect the relay's control pin (S) to pin 22 of ESP32 board.
- Connect the pin (+) of relay to pin 3.3V of ESP32 board.
- Connect the relay's ground pin (-) to the ESP32's GND.
5- Connect the second Lamp and the power supply to the Relay:
- Connect one of the lamp's wires to the relay's common (COM) terminal.
- Connect the phase wire of the power supply to the normally open (NO) terminal of the relay.
- Connect the neutral wire of the power supply directly to the neutral wire of the lamp.

Lighting two lamps connected to the ESP32 board by a smartphone via Bluetooth using the Micropython and MIT Inventor app
To light two lamps connected to an ESP32 board using a smartphone via Bluetooth, you can follow these steps using MicroPython for the ESP32 and the MIT App Inventor:
1. ESP32 MicroPython Code:
Write a simple MicroPython script to control the two lamps using Bluetooth.
You'll need to use ble_uart_peripheral.py and ble_advertising.py.
you must use the following firmware: esp32-20210902-v1.17.bin .
|
1 2 3 4 5 6 7 8 9 10 11 12 13 14 15 16 17 18 19 20 21 22 23 24 25 26 27 28 29 30 31 32 |
########## DIGITAL MANUFACTURING ########## # PIKACHU Project # Authors: Miguel Angel Guzman # Kadriye Nur Bakirci ########################################### ########## IMPORT REQUIRED LIBRARIES ########## import bluetooth from ble_uart_peripheral import BLEUART from machine import Pin relay_lamp1=Pin(23, Pin.OUT) # GPIO pin connected to the first relay who controls the first lamp relay_lamp2=Pin(22, Pin.OUT) # GPIO pin connected to the second relay who controls the second lamp # Create BLE object ble = bluetooth.BLE() # Open UART session for BLE uart = BLEUART(ble) # Define ISR for an UART input on BLE connection def on_rx(): # Read UART string, AppInventor sends raw bytes uart_in = uart.read() # read the message received from the Smartphone via Bluetooth print("UART IN: ", uart_in.decode()) # display the message received from the Smartphone on the Thonny console if (uart_in.decode().find('1')==0): relay_lamp1.value(1) # Turn on the first lamp relay_lamp2.value(0) # Turn off the second lamp if (uart_in.decode().find('0')==0): relay_lamp1.value(0) # Turn off the first lamp relay_lamp2.value(1) # Turn on the second lamp # Map ISR to UART read interrupt uart.irq(handler=on_rx) uart.close() |
2. MIT App Inventor Setup:
1- Create a new project in MIT App Inventor.
2- Add the BluetoothClient component to your project.
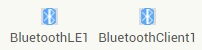
- The "BluetoothLE1" extension indeed refers to a specific extension for MIT App Inventor which allows you to manage Bluetooth Low Energy (BLE) communication in your mobile applications. This extension facilitates the interaction between your App Inventor application and BLE devices, such as sensors, trackers, wearables, etc.
- The "BluetoothClient1" extension in MIT App Inventor allows you to create mobile applications that can connect to Bluetooth devices, such as serial Bluetooth modules (eg HC-06) connected to microcontrollers, Bluetooth audio devices, etc. . This extension facilitates communication with these devices using serial Bluetooth connections.
3- Design a simple interface with two buttons to turn the two lamps on and off.
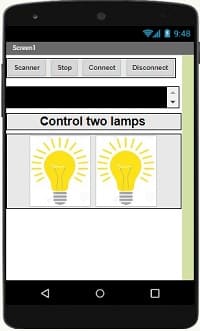
4- Use programming blocks to connect the smartphone to the ESP32 board via Bluetooth and command the two lamps:
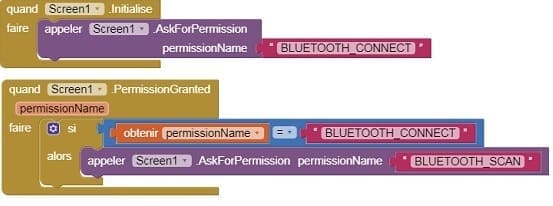
a- Starting with Android 12, Bluetooth permissions have been enhanced to improve security and user data protection. This is why we must declare the authorizations that your application needs in the AndroidManifest.xml file. For Bluetooth, you'll need to include ACCESS_FINE_LOCATION, BLUETOOTH_SCAN, and possibly BLUETOOTH_CONNECT permissions, depending on the features you're using.
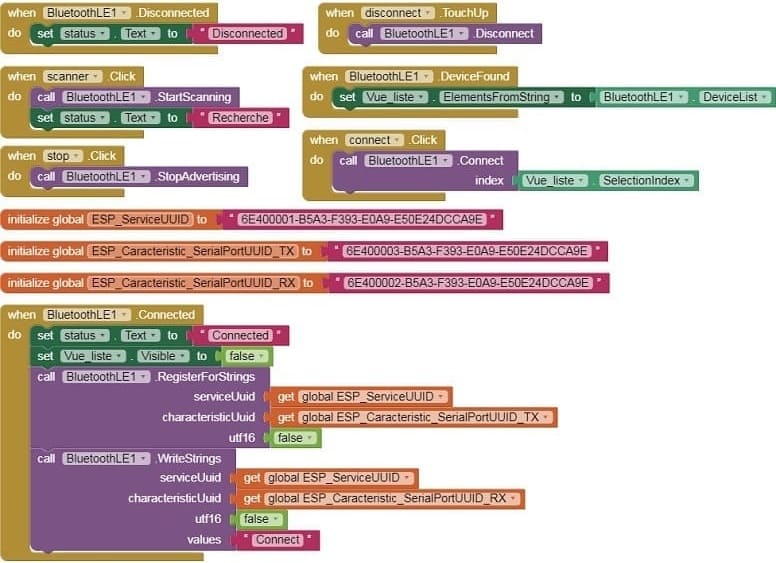
b- Use these programming blocks to connect the smartphone to the ESP32 board via Bluetooth:
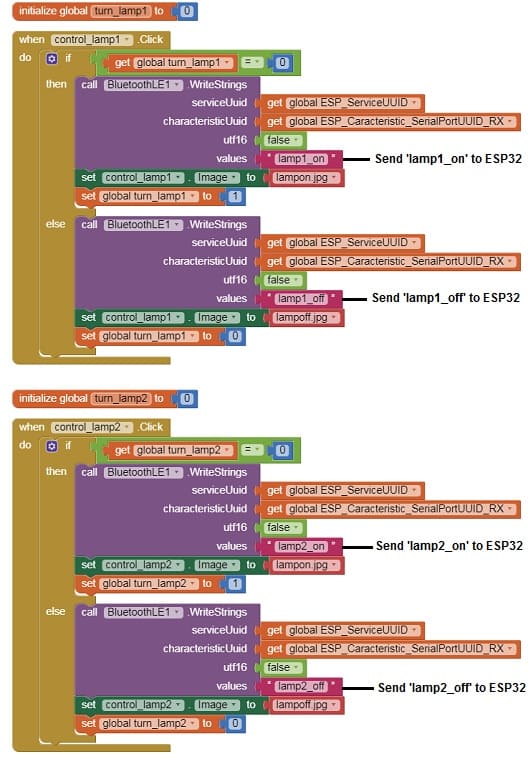
c - Use programming blocks to send Bluetooth commands to the ESP32 when the button is clicked.
Download aia projectDownload apk file
5. Test:
- Load the MicroPython code onto your ESP32.
- Install the MIT App Inventor app on your smartphone and install the app you created.
- Pair and connect your smartphone with the ESP32 through Bluetooth.
- Open the app and use the button to control the two lamps connected to the ESP32 by a relay.
0 comment
Leave a comment
Passion for robotics

Recent tutorials


Robotics workshop

Polpular tutorials


Making robots

Most commented tutorials


Robotic arm

Categories
Smart Home