Control the HC-SR04 ultrasonic sensor using Micro:bit board

Tutorial plan
1- What is the HC-SR04 ultrasonic sensor ?
2- The components required to use HC-SR04 ultrasonic sensor by Micro:bit board
3- Mounting the Micro:bit board with the HC-SR04 ultrasonic sensor
4- Program the Micro:bit with Makecode board to calulate the distance between the HC-SR04 sensor and an object
What is the HC-SR04 ultrasonic sensor ?
The HC-SR04 is an ultrasonic distance measuring sensor module. It is commonly used for measuring distances and detecting obstacles in various applications, such as robotics, home automation, and industrial projects. The sensor works on the principle of ultrasonic sound waves.
Here's a basic overview of how the HC-SR04 sensor works:
Ultrasonic Transmitter: The sensor has an ultrasonic transmitter that emits short pulses of ultrasonic sound waves.
Ultrasonic Receiver: It also has a receiver that listens for the echo of the transmitted ultrasonic waves.
Distance Calculation: The sensor calculates the time taken for the ultrasonic waves to travel to the target object and back. Using the speed of sound in the air, it then calculates the distance to the object.
Output: The sensor provides an output in the form of a pulse width or a voltage signal that corresponds to the measured distance.
The HC-SR04 typically has four pins:
VCC (Power): Connects to the positive power supply (5V or 3.3V).
Trig (Trigger): Sends a short pulse to trigger the sensor to transmit ultrasonic waves.
Echo: Receives the echo signal and outputs a pulse whose width corresponds to the distance.
GND (Ground): Connects to the ground of the circuit.
Micro:bit and other microcontrollers are often used to interface with the HC-SR04 sensor, making it a popular choice for hobbyists and developers working on projects involving distance measurement or obstacle avoidance. The sensor's simplicity, low cost, and ease of use contribute to its widespread popularity in the maker community.
The components required to use HC-SR04 ultrasonic sensor by Micro:bit board
Micro:bit board:

The Micro:bit board is a small, programmable microcontroller board designed for education and beginner-friendly coding projects. It was developed by the BBC, in collaboration with various partners, as a tool to introduce young people to programming and electronics.
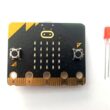
HC-SR04 ultrasonic Sensor
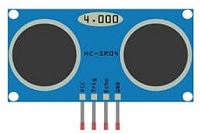
The HC-SR04 is an ultrasonic distance measuring sensor module.
Jumper Wires:

For making temporary connections and wiring between components.
Breadboard:

A breadboard is a useful tool for creating temporary electronic circuits. It allows you to connect components without soldering.
Mounting the Micro:bit board with the HC-SR04 ultrasonic sensor
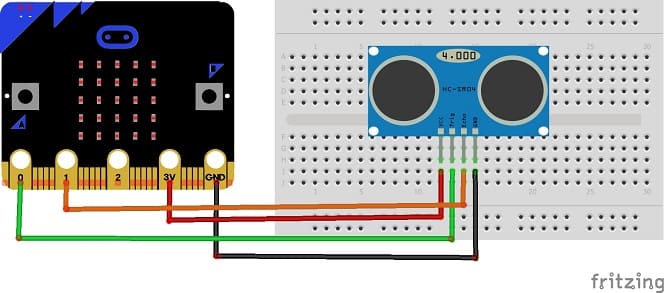
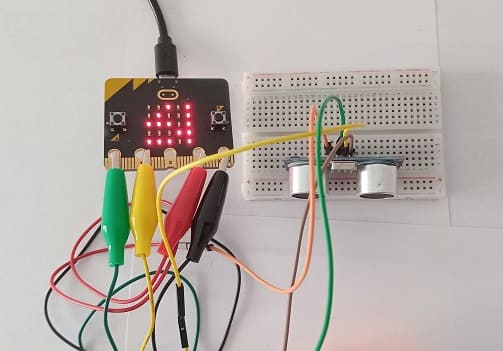
This represents the connections between the HC-SR04 ultrasonic sensor and the Micro:bit board:
- Connect the VCC(+) pin of the HC-SR04 ultrasonic sensor to the 3.3V pin on the Micro:bit board.
- Connect the Trig pin of the HC-SR04 ultrasonic sensor to P0 pin on the Micro:bit board.
- Connect the Echo pin of the HC-SR04 ultrasonic sensor to P1 pin on the Micro:bit board.
- Connect the GND(-) pin of the HC-SR04 sensor to any ground (GND) pin on the Micro:bit board.
Program the Micro:bit board with Makecode to calculate the distance between the HC-SR04 sensor and an object
To calculate the distance between the HC-SR04 sensor and an object using the Micro:bit and MakeCode, you can follow these steps:
1- Open the MakeCode editor at https://makecode.microbit.org/.
2- Create a new project by clicking on "New Project."
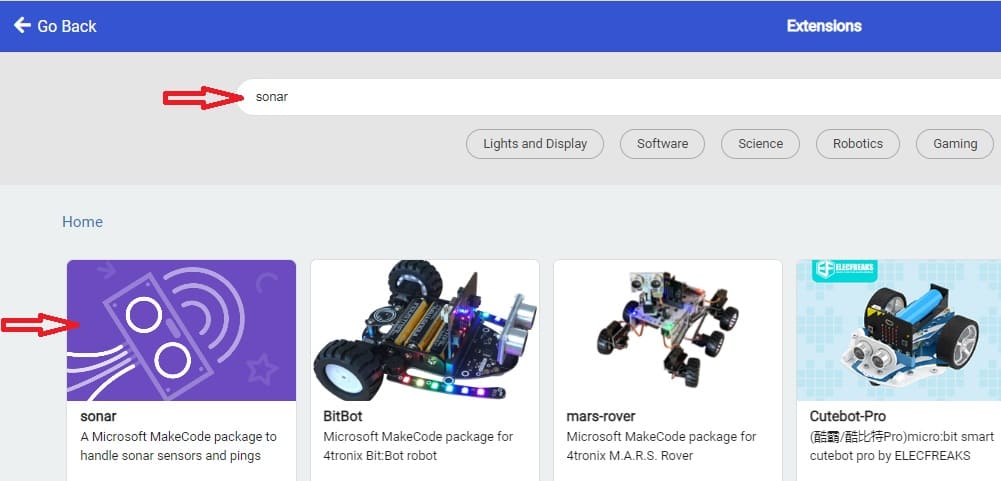
3- Add the HC-SR04 extension:
Look for "Extensions" and click on it.

In the search box, type "sonar" to find the bluetooth extension.
4- Now, you can start programming the Micro:bit to use the HC-SR04 sensor. Here's an example code in MakeCode blocks:
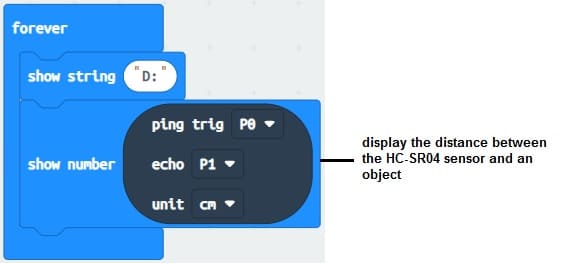
This code uses Micro:bit's P0 and P1 pins. Make sure the HC-SR04 sensor is correctly connected, with the Trig pin connected to the P0 pin and the Echo pin connected to the P1 pin.
Here's a brief explanation of the code:
1- The HC-SR04 sensor is triggered by sending a pulse to the Trig pin.
2- The duration of the echo signal is measured on the Echo pin using pins.pulseIn.
3- The distance is calculated using the formula distance = (duration * speed of sound) / 2.
4- The distance is displayed on the Micro:bit's LED screen.
1 comment

situs online slot777 com 15-11-2525
Nice blog here! Also your website loads up fast! What host are you using? Can I get your affiliate link to your host? I wish my web site loaded up as quickly as yours lol
Leave a comment
Passion for robotics

Recent tutorials


Robotics workshop

Polpular tutorials


Making robots

Most commented tutorials


Robotic arm

Categories
Smart Home