Arduino UNO, fan and Bluetooth
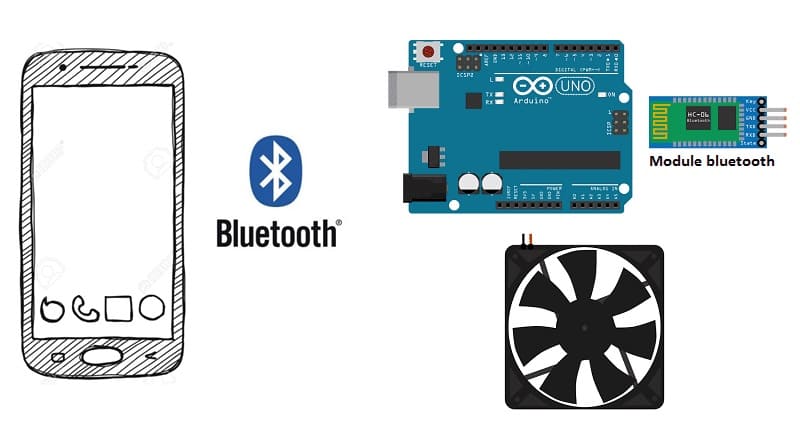
Tutorial plan
1- How to control a fan with Arduino and Smartphone ?
2- Components Needed
3- Circuit Setup of system
4- Arduino program
5- Mobile application with App Inventor
How to control a fan with Arduino and Smartphone ?
Controlling a fan with Arduino and a smartphone using the HC-06 Bluetooth module, a relay module, and App Inventor involves building a system where the fan can be remotely turned ON or OFF through a mobile app. Here’s a detailed description of its functionality:
1. Smartphone Sends a Command via Bluetooth:
The user opens the custom app on their smartphone and connects to the HC-06 Bluetooth module.
The app provides buttons (e.g., "ON" and "OFF") to control the fan.
When a button is pressed, the app sends a specific command (e.g., the text "ON" or "OFF") to the Arduino via the HC-06 Bluetooth module.
2. HC-06 Bluetooth Module Receives the Command:
The HC-06 module, paired with the smartphone via Bluetooth, receives the command and forwards it to the Arduino through a serial connection.
3. Arduino Processes the Command:
The Arduino reads the command from the HC-06 via its serial input.
Based on the command:
- If the command is "ON," the Arduino sends a HIGH signal to the relay module, turning the fan ON.
- If the command is "OFF," the Arduino sends a LOW signal to the relay module, turning the fan OFF.
4. Relay Module Controls the Fan:
The relay module is connected to the AC fan. It acts as a switch:
- When the Arduino sends a HIGH signal, the relay closes its circuit, supplying power to the fan, which turns ON.
- When the Arduino sends a LOW signal, the relay opens its circuit, cutting power to the fan, which turns OFF.
Components Needed
Arduino:

It acts as the central controller, receiving commands from the smartphone via the Bluetooth module and controlling the relay module to operate the fan.
HC-06 Bluetooth Module:

It allows wireless communication between the Arduino and the smartphone.
Relay Module:

It works as an electronic switch to control the AC fan. The Arduino sends signals to the relay to turn the fan ON or OFF.
Fan:
An AC fan or low-voltage DC fan (depending on the relay and power source).
5- Jumper Wires

Jumper wires will be used to make connections between the components.
6- Breadboard:
A breadboard can be used to create a temporary circuit for testing and prototyping.
Smartphone and App (Created using App Inventor):
The smartphone sends ON/OFF commands to the Arduino via a custom-made app created using MIT App Inventor.
Circuit Setup of system
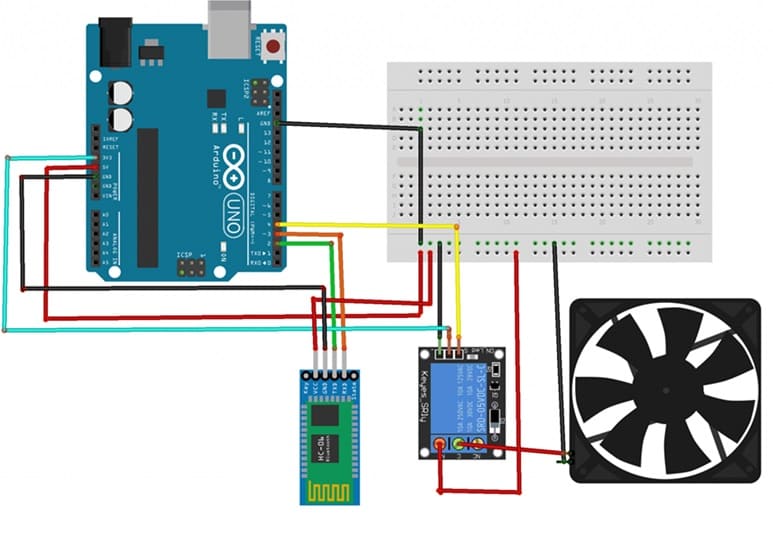
1. HC-06 Bluetooth Module:
VCC → Arduino 5V
GND → Arduino GND
TXD (Transmit) → Arduino RX (Pin 2)
RXD (Receive) → Arduino TX (Pin 3)
2. Relay Module:
VCC → Arduino 5V
GND → Arduino GND
S (Signal Pin) → Arduino Digital Pin (e.g., Pin 4)
COM → One wire of the fan's power supply (AC or DC).
NO (Normally Open) → Fan's live wire.
NC (Normally Closed) → Leave disconnected.
3. Fan:
Connect the fan to the relay module using the live wire (see above) and the neutral wire to the power supply.
Arduino program
Here’s a sample code for controlling the fan:
|
1 2 3 4 5 6 7 8 9 10 11 12 13 14 15 16 17 18 19 20 21 22 23 24 25 26 27 28 29 30 31 32 33 34 35 |
#include <SoftwareSerial.h> SoftwareSerial hc06(2,3); String cmd=""; void setup(){ pinMode(4,OUTPUT); //Initialize Serial Monitor Serial.begin(9600); //Initialize Bluetooth Serial Port hc06.begin(9600); } void loop(){ //Read data from HC06 while(hc06.available()>0){ cmd+=(char)hc06.read(); } //Select function with cmd if(cmd!=""){ Serial.print("Command recieved : "); Serial.println(cmd); // We expect ON or OFF from bluetooth if(cmd=="demarrer"){ digitalWrite(4,HIGH);//Start the fan Serial.println("Function is on"); }else if(cmd=="stop"){ digitalWrite(4,LOW);//Stop the fan Serial.println("Function is off"); }else{ Serial.println("Function is off by default"); } cmd=""; //reset cmd } delay(100); } |
Mobile application with App Inventor
1- Create a New Project:
Open MIT App Inventor and create a new project.
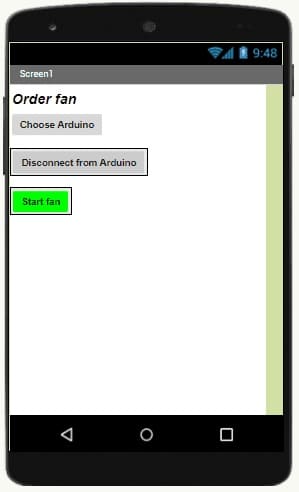
2- Design the App:
Add a ListPicker component for Bluetooth device selection.
Add a Button to control the fan
Add a Label to show connection status or messages.
3- Configure the Blocks:
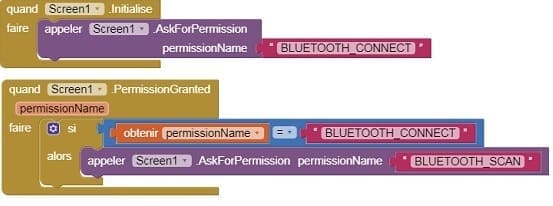
a) Starting with Android 12, Bluetooth permissions have been enhanced to improve security and user data protection. This is why we must declare the authorizations that your application needs in the AndroidManifest.xml file. For Bluetooth, you'll need to include ACCESS_FINE_LOCATION, BLUETOOTH_SCAN, and possibly BLUETOOTH_CONNECT permissions, depending on the features you're using.
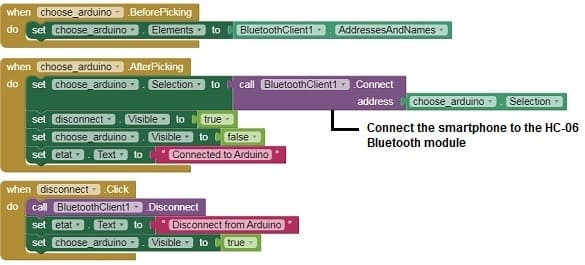
b) Add the the necessary blocks to connect the smartphone to the HC-06 Bluetooth module
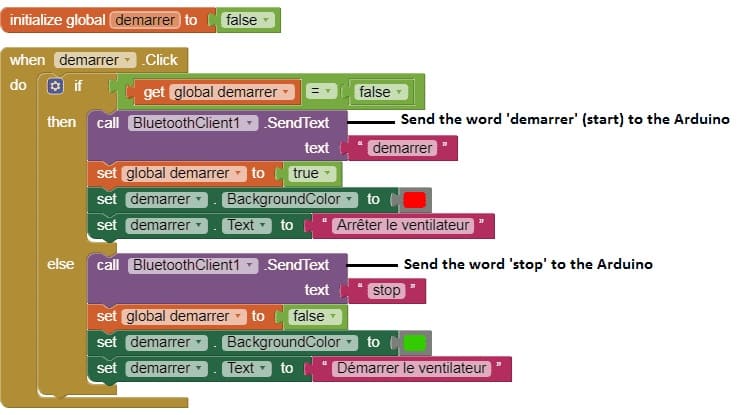
c) Program the button to send the text "demarrer" or "stop" via Bluetooth.
Download projectDownload application


