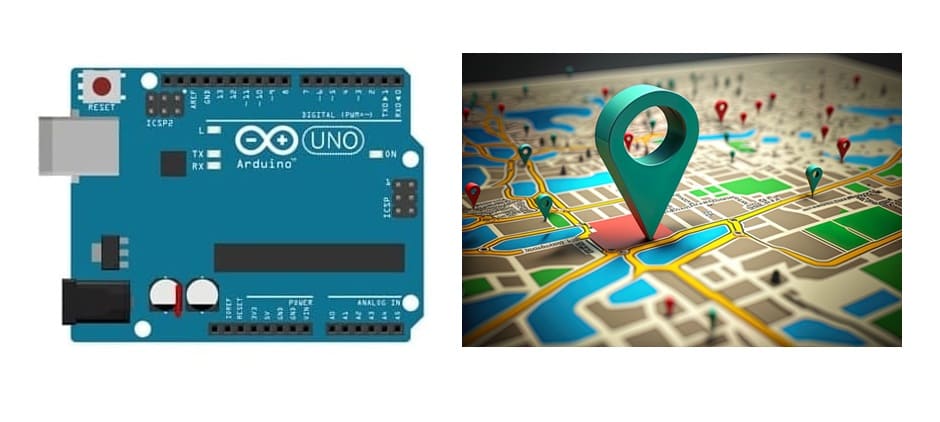
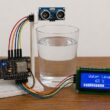
Arduino UNO and NEO-M6 GPS module
Tutorial plan
1- Presentation of GPS Trackers
2- How a GPS Tracker works using an Arduino UNO ?
3- Components Needed
4- Circuit Setup of system
5- Arduino program
Presentation of GPS Trackers
A GPS Tracker is a device that uses the Global Positioning System (GPS) to determine and track the real-time location of an object, vehicle, or person. It’s widely used for security purposes, fleet management, asset tracking, and even DIY projects with microcontrollers like the ESP32.
1. How Does a GPS Tracker Work?
Satellite Signal Reception:
The GPS module receives signals from multiple satellites to triangulate its position.
The more satellites it connects to, the more accurate the location data.
Data Processing:
The module calculates key information such as latitude, longitude, altitude, speed, and direction.
Data Transmission:
The location data can be sent to a server or device via:
GSM/GPRS (using a SIM card for SMS or internet communication)
Bluetooth or Wi-Fi (for short-range connections)
LoRa (for long-range, low-power communication)
How a GPS Tracker works using an Arduino UNO ?
Step 1: Receiving GPS Signals (NEO-6M GPS Module)
The NEO-6M connects to multiple GPS satellites orbiting the Earth.
It calculates the device’s position based on the time delay of signals from at least 4 satellites.
The module outputs data in NMEA sentences (standard GPS data format), which include:
Latitude & Longitude (position coordinates)
Altitude
Speed
UTC Time
Step 2: Data Processing (Arduino UNO)
The Arduino UNO receives raw NMEA data from the GPS module via serial communication (TX/RX pins).
Using libraries like TinyGPS++, the Arduino extracts meaningful information (e.g., GPS coordinates, speed).
The Arduino formats the data to make it readable for display.
Step 3: Displaying Data (I2C LCD Display)
The I2C LCD connects to the Arduino using only 2 pins (SDA & SCL), simplifying wiring.
The Arduino sends the processed GPS data to the LCD in real-time.
Components Needed to realize GPS Trackers with Arduino UNO
Arduino UNO (Microcontroller Unit)

Role: The brain of the GPS tracker, responsible for reading GPS data, processing it, and sending output to the LCD display.
NEO-6M GPS Module (GPS Receiver)
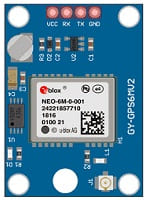
Role: Receives signals from GPS satellites to determine the current geographical position.
I2C LCD Display (16x2 or 20x4)

Role: Displays real-time GPS data like coordinates, speed, and time.
Jumper Wires (Male-to-Male / Male-to-Female)

Role: Establish electrical connections between the Arduino, GPS module, and LCD display.
Circuit Setup of system
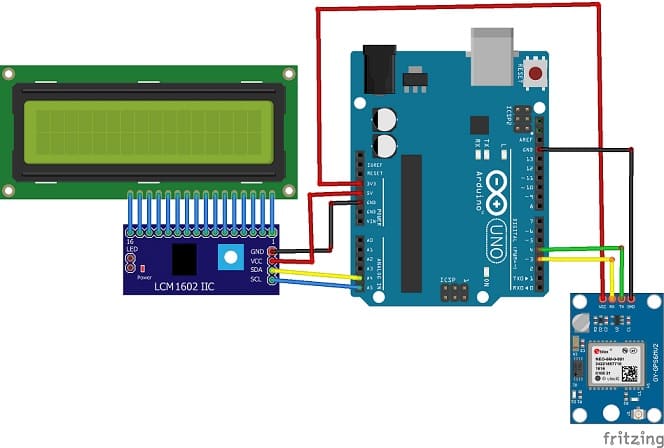
🛰️ NEO-6M GPS → Arduino UNO:
VCC → 3.3V or 5V (check your module’s specs)
GND → GND
TX → Pin 4 (RX for Arduino software serial)
RX → Pin 3 (TX for Arduino software serial)
🖥️ I2C LCD → Arduino UNO:
VCC → 5V
GND → GND
SDA → A4
SCL → A5
Arduino program
1- Open the Arduino IDE and create a new sketch
2- Install the LiquidCrystal_I2C and TinyGPS++ library in the Arduino IDE
3- Add the following code to the sketch to initialize the GPS module, LCD display, and read the location data:
|
1 2 3 4 5 6 7 8 9 10 11 12 13 14 15 16 17 18 19 20 21 22 23 24 25 26 27 28 29 30 31 32 33 34 35 36 37 38 39 40 41 42 43 44 |
#include <TinyGPS++.h> #include <SoftwareSerial.h> #include <LiquidCrystal_I2C.h> // En cas de non fonctionnement, mettez la ligne 8 en // commentaire et retirez le commentaire à la ligne 9. LiquidCrystal_I2C lcd(0x27, 20, 4); // ligne 8 //LiquidCrystal_I2C lcd(0x3F,20,4); // ligne 9 static const int RXPin = 4, TXPin = 3; static const uint32_t GPSBaud = 9600; // The TinyGPS++ object TinyGPSPlus gps; // The serial connection to the GPS device SoftwareSerial ss(RXPin, TXPin); void setup(){ lcd.init(); Serial.begin(9600); ss.begin(GPSBaud); } void loop(){ lcd.backlight(); //lcd.clear(); // This sketch displays information every time a new sentence is correctly encoded. while (ss.available() > 0){ gps.encode(ss.read()); if (gps.location.isUpdated()){ Serial.print("Latitude= "); Serial.print(gps.location.lat(), 6); Serial.print(" Longitude= "); Serial.println(gps.location.lng(), 6); lcd.setCursor(0, 0); lcd.print("Latitude="); lcd.print(gps.location.lat()); lcd.setCursor(0, 1); lcd.print("Longitude="); lcd.print(gps.location.lng()); } } } |
0 comment
Leave a comment
Passion for robotics

Recent tutorials

Robotics workshop

Polpular tutorials


Making robots

Most commented tutorials


Robotic arm

Categories
Smart Home