Système d’alarme incendie connecté à l’Internet des objets contrôlé par Arduino
Plan de tutoriel
1- Présentation du système d'alarme incendie connecté à l'Internet des objets
2- Comment la carte Arduino commande le système ?
3- Composants nécessaires
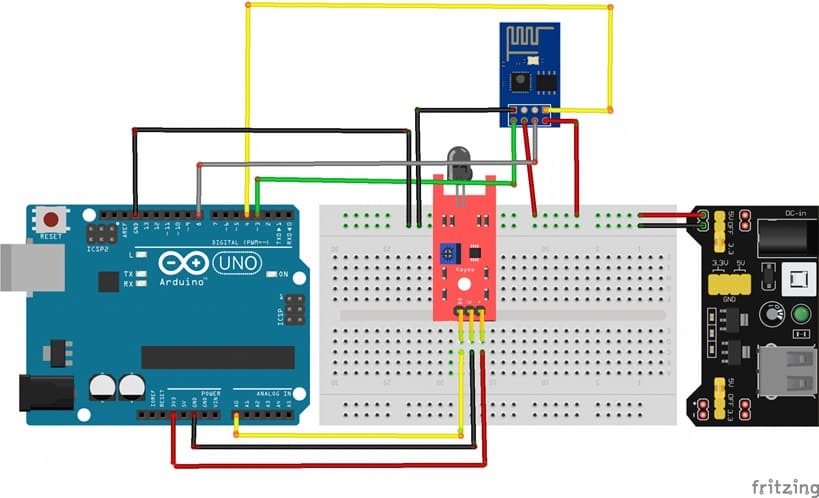
4- Schéma de câblage du système
5- Programmation de la carte Arduino en Micropython
Présentation du système d'alarme incendie connecté à l'Internet des objets
Un système d’alarme incendie IoT est une infrastructure composée de capteurs et dispositifs intelligents qui surveillent en temps réel les conditions environnementales (fumée, chaleur, gaz, etc.) et transmettent des alertes via Internet à des utilisateurs ou des centres de contrôle. Il combine la détection traditionnelle d’incendie avec des technologies avancées telles que les réseaux sans fil, le cloud et les applications mobiles.
Composants principaux
Capteurs intelligents :
Détecteurs de fumée : Identifient la présence de particules de fumée.
Détecteurs de chaleur : Mesurent les variations de température.
Détecteurs de gaz : Détectent les émissions de gaz inflammables (ex. monoxyde de carbone, propane).
Ces capteurs sont souvent équipés de modules de communication sans fil (Wi-Fi, Zigbee, LoRa, etc.).
Passerelle IoT :
Relie les capteurs au réseau Internet ou à un serveur cloud.
Peut inclure un microcontrôleur (Arduino, Raspberry Pi, etc.) pour centraliser et traiter les données.
Plateforme cloud :
Héberge et analyse les données des capteurs.
Permet de configurer des alertes, visualiser des rapports en temps réel et conserver des historiques d’événements.
Interface utilisateur :
Application mobile/web : Notifications en temps réel, contrôle à distance et accès aux journaux.
Alertes vocales et visuelles : Diffusées localement via des alarmes ou des panneaux connectés.
Système de notification :
Envoie des alertes via des notifications push, SMS, e-mails ou appels téléphoniques en cas de détection d’un danger.
Comment la carte Arduino commande le système ?
Ce projet consiste à créer un système d'alarme incendie qui utilise un Arduino UNO, un module WiFi ESP8266, un capteur de flamme KY-026 et un service email. Le système permet de détecter la présence de flammes, d'activer une alarme sonore et visuelle (buzzer et LED), puis d'envoyer une notification par email via Internet lorsque la présence de flammes est détectée.
Le système d'alarme incendie offre plusieurs fonctionnalités :
1- Détection de flammes : le capteur KY-026 détecte les flammes et les niveaux de chaleur dans l'environnement.
2- Notification par email : le module WiFi ESP8266 se connecte à Internet pour envoyer une alerte par email à l'utilisateur.
3- Reprise normale : lorsque la flamme n'est plus détectée, le système se remet dans son état de veille.
Composants nécessaires
Arduino UNO:

Cette carte commande le système
Module WiFi ESP8266:

Il permet à l'Arduino de se connecter à Internet via le Wi-Fi.
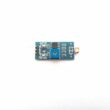
Capteur de flamme KY-026 :
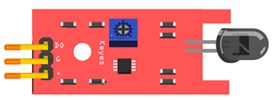
Il détecte les flammes ou des niveaux de chaleur élevés dans l'environnement.
Câbles de connexion :

Ils servent à relier tous les composants entre eux.
Breadboard (plaque de prototypage) :

Il faciliter les connexions sans soudure.
Module d'alimentation 3V/5V
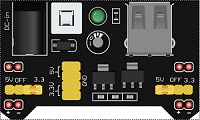
Le module Wi-Fi ESP8266 est alimenté par le module d'alimentation 3V/5V qui est un module de conversion de tension qui permet de fournir une tension de 3,3V ou de 5V à un circuit électronique.
Schéma de câblage du système
1- Capteur KY-026 ↔ Arduino :
VCC : Connecté à 3.3V ou 5V de l’Arduino.
GND : Connecté au GND de l’Arduino.
DO : Connecté à un pin analogique (ex. A0).
2- ESP8266 ↔ Arduino :
RX : Arduino UNO (pin 3)
TX : Arduino UNO (pin 4)
RST : Arduino UNO (pin 8)
VCC : Module d’alimentation 5V
GND : Module d’alimentation GND
Programmation de la carte Arduino
Voici le code Arduino complet pour ce projet. Ce code utilise l’ESP8266 pour envoyer une alerte par email lorsque des flammes sont détectées.
|
1 2 3 4 5 6 7 8 9 10 11 12 13 14 15 16 17 18 19 20 21 22 23 24 25 26 27 28 29 30 31 32 33 34 35 36 37 38 39 40 41 42 43 44 45 46 47 48 49 50 51 52 53 54 55 56 57 58 59 60 61 62 63 64 65 66 67 68 69 70 71 72 73 74 75 76 77 78 79 80 81 82 83 84 85 86 87 88 89 90 91 92 93 94 95 96 97 98 99 100 101 102 103 104 105 106 107 108 109 110 111 112 113 114 115 116 117 118 119 120 121 122 123 124 125 126 127 128 129 130 131 132 133 134 135 136 137 138 139 140 141 142 143 144 145 146 147 148 149 150 151 152 153 154 155 156 157 158 159 160 161 162 163 164 165 166 167 168 169 170 171 172 173 174 175 176 177 178 179 180 181 182 183 184 185 186 187 188 189 190 191 192 193 194 195 196 197 198 199 200 201 202 203 204 205 206 207 208 209 210 211 212 213 214 215 216 217 218 219 220 221 222 223 224 225 226 227 228 |
#include <Adafruit_ESP8266.h> #include <SoftwareSerial.h> #define ESP_RX 3 #define ESP_TX 4 #define ESP_RST 8 SoftwareSerial softser(ESP_RX, ESP_TX); // Must declare output stream before Adafruit_ESP8266 constructor; can be // a SoftwareSerial stream, or Serial/Serial1/etc. for UART. Adafruit_ESP8266 wifi(&softser, &Serial, ESP_RST); // Must call begin() on the stream(s) before using Adafruit_ESP8266 object. #define ESP_SSID "*************" // Your network name here #define ESP_PASS "*************" // Your network password here char EMAIL_FROM[] = "adresse email de l'émetteur"; char EMAIL_PASSWORD[] = "************"; char EMAIL_TO[] = "adresse email du récepteur"; char SUBJECT[] = "My ESP8266"; char EMAIL_CONTENT[] = "Attention!!! ,\r\n il y a un feu ."; // We'll need your EMAIL_FROM and its EMAIL_PASSWORD base64 encoded, you can use https://www.base64encode.org/ #define EMAIL_FROM_BASE64 "bm9yZXBseUBtZXNhcnRpc2Fucy5mcg==" #define EMAIL_PASSWORD_BASE64 "WVlMdVhKelphVg==" #define HOST "Nom du serveur SMTP" // Find/Google your email provider's SMTP outgoing server name for unencrypted email #define PORT 587 // Find/Google your email provider's SMTP outgoing port for unencrypted email int count = 0; // we'll use this int to keep track of which command we need to send next bool send_flag = false; // we'll use this flag to know when to send the email commands const int btnPin = A0; // le bouton est connecté à la broche A0 de la carte Adruino int btnVal = 0; int analogPin = A0; // KY-026 analog interface int analogVal; //analog readings void setup() { pinMode(btnPin,INPUT_PULLUP); char buffer[50]; // This might work with other firmware versions (no guarantees) // by providing a string to ID the tail end of the boot message: // comment/replace this if you are using something other than v 0.9.2.4! wifi.setBootMarker(F("Version:0.9.2.4]\r\n\r\nready")); softser.begin(9600); // Soft serial connection to ESP8266 Serial.begin(57600); while(!Serial); // UART serial debug Serial.println(F("Adafruit ESP8266 Email")); // Test if module is ready Serial.print(F("Hard reset...")); if(!wifi.hardReset()) { Serial.println(F("no response from module.")); for(;;); } Serial.println(F("OK.")); Serial.print(F("Soft reset...")); if(!wifi.softReset()) { Serial.println(F("no response from module.")); for(;;); } Serial.println(F("OK.")); Serial.print(F("Checking firmware version...")); wifi.println(F("AT+GMR")); if(wifi.readLine(buffer, sizeof(buffer))) { Serial.println(buffer); wifi.find(); // Discard the 'OK' that follows } else { Serial.println(F("error")); } Serial.print(F("Connecting to WiFi...")); if(wifi.connectToAP(F(ESP_SSID), F(ESP_PASS))) { // IP addr check isn't part of library yet, but // we can manually request and place in a string. Serial.print(F("OK\nChecking IP addr...")); wifi.println(F("AT+CIFSR")); if(wifi.readLine(buffer, sizeof(buffer))) { Serial.println(buffer); wifi.find(); // Discard the 'OK' that follows Serial.print(F("Connecting to host...")); Serial.print("Connected.."); wifi.println("AT+CIPMUX=0"); // configure for single connection, //we should only be connected to one SMTP server wifi.find(); wifi.closeTCP(); // close any open TCP connections wifi.find(); Serial.println("Type \"send it\" to send an email"); } else { // IP addr check failed Serial.println(F("error")); } } else { // WiFi connection failed Serial.println(F("FAIL")); } } void loop() { if(!send_flag){ // check if we expect to send an email // Read the analog interface analogVal = analogRead(analogPin); if (analogVal<=11) // si le capteur détecte un feu { send_flag = true; // envoi d'un email d'alerte //Serial.println(btnVal); delay(1000); } } if(send_flag){ // the send_flat is set, this means we are or need to start sending SMTP commands if(do_next()){ // execute the next command count++; // increment the count so that the next command will be executed next time. } } } // do_next executes the SMTP command in the order required. boolean do_next() { switch(count){ case 0: Serial.println("Connecting..."); return wifi.connectTCP(F(HOST), PORT); break; case 1: // send "HELO ip_address" command. Server will reply with "250" and welcome message return wifi.cipSend("HELO computer.com",F("250")); // ideally an ipaddress should go in place // of "computer.com" but I think the email providers // check the IP anyways so I just put anything. break; case 2: // send "AUTH LOGIN" command to the server will reply with "334 username" base 64 encoded return wifi.cipSend("AUTH LOGIN",F("334 VXNlcm5hbWU6")); break; case 3: // send username/email base 64 encoded, the server will reply with "334 password" base 64 encoded return wifi.cipSend(EMAIL_FROM_BASE64,F("334 UGFzc3dvcmQ6")); break; case 4: // send password base 64 encoded, upon successful login the server will reply with 235. return wifi.cipSend(EMAIL_PASSWORD_BASE64,F("235")); break; case 5:{ // send "MAIL FROM:<emali_from@domain.com>" command char mailFrom[50] = "MAIL FROM:<"; // If 50 is not long enough change it, do the same for the array in the other cases strcat(mailFrom,EMAIL_FROM); strcat(mailFrom,">"); return wifi.cipSend(mailFrom,F("250")); break; } case 6:{ // send "RCPT TO:<email_to@domain.com>" command char rcptTo[50] = "RCPT TO:<"; strcat(rcptTo,EMAIL_TO); strcat(rcptTo,">"); return wifi.cipSend(rcptTo,F("250")); break; } case 7: // Send "DATA" command, the server will reply with something like "334 end message with \r\n.\r\n." return wifi.cipSend("DATA",F("354")); break; case 8:{ // apply "FROM: from_name <from_email@domain.com>" header char from[100] = "FROM: "; strcat(from,EMAIL_FROM); strcat(from," "); strcat(from,"<"); strcat(from,EMAIL_FROM); strcat(from,">"); return wifi.cipSend(from); break; } case 9:{ // apply TO header char to[100] = "TO: "; strcat(to,EMAIL_TO); strcat(to,"<"); strcat(to,EMAIL_TO); strcat(to,">"); return wifi.cipSend(to); break; } case 10:{ // apply SUBJECT header char subject[50] = "SUBJECT: "; strcat(subject,SUBJECT); return wifi.cipSend(subject); break; } case 11: return wifi.cipSend("\r\n"); // marks end of header (SUBJECT, FROM, TO, etc); break; case 12: return wifi.cipSend(EMAIL_CONTENT); break; case 13: return wifi.cipSend("\r\n."); // marks end of data command break; case 14: return wifi.cipSend("QUIT"); break; case 15: wifi.closeTCP(); return true; break; case 16: Serial.println("Done"); send_flag = false; count = 0; return false; // we don't want to increment the count break; default: break; } } |
0 commentaire
laisser un commentaire
Tutoriels récents
Tutoriels populaires
Tutoriels plus commentés

